
Grilled Cheese Burrito: Your New Comfort Food Obsession
Let’s talk about a culinary mashup that’s about to steal your heart and satisfy your deepest cravings: the Grilled Cheese Burrito. If you’re anything like me, the mere thought of a perfectly golden-brown grilled cheese sandwich sends a wave of pure happiness through you. Now, imagin extracte that gooey, cheesy goodness wrapped up in a warm, soft tortilla, along with all the delicious fillings that make a burrito so irresistible. This is not just a meal; it’s an experience, a playful dance between two beloved classics. What makes the Grilled Cheese Burrito so special is its ability to elevate comfort food to an entirely new level. It’s the ultimate hug in food form, perfect for a cozy night in or a fun weekend treat. Get ready to discover your new favorite way to enjoy the best of both worlds.

The Ultimate Grilled Cheese Burrito: A Game Changer
Prepare yourselves, food lovers, because we are about to embark on a culinary adventure that will redefine your comfort food dreams. Forget everything you thought you knew about grilled cheese and burritos. We are fusing these two titans of deliciousness into one epic creation: the Grilled Cheese Burrito. This isn’t just a meal; it’s an experience. It’s a symphony of textures and flavors, where the gooey, melty goodness of a grilled cheese sandwich meets the hearty, satisfying embrace of a burrito. Imagin extracte tender, seasoned ground beef, fluffy rice, creamy sour cream, and that irresistible cheese pull, all wrapped up and then grilled to golden perfection. It’s a little bit of magic, a whole lot of comfort, and incredibly easy to make. Let’s dive in!
Ingredients:
Cooking Instructions:
Step 1: Crafting the Hearty Filling
The foundation of our incredible Grilled Cheese Burrito starts with a flavorful ground beef mixture. Begin extract by preheating a skillet over medium-high heat. Add the 1 lb of ground beef to the hot skillet. Break it up with a spatula and cook until it’s nicely browned, ensuring there are no pink bits remaining. Once the beef is fully cooked, carefully drain off any excess grease. This is a crucial step to prevent your burrito from becoming greasy and to allow the seasonings to shine. Now, it’s time to infuse some serious flavor! Add the entire packet of taco seasoning to the browned beef. If you’re a fan of making your own taco seasoning, now is your chance to use your secret blend! Stir the seasoning into the beef until everything is evenly coated. Cook for another minute or two, stirring occasionally, to allow the flavors to meld and toast slightly. This initial cooking phase is vital for developing a deep, savory base for your burrito.
Step 2: Building the Creamy Core
With our seasoned beef ready, it’s time to bring in the creamy elements that will make this burrito truly sing. In a separate bowl, combine the 1 cup of cooked white rice with the 1/2 cup of sour cream. The sour cream will add a lovely tang and a velvety texture, making the rice incredibly smooth and delicious. Next, incorporate the 1/2 cup of nacho cheese sauce and the 1/4 cup of chipotle sauce. The nacho cheese sauce provides that classic, gooey cheese flavor we all crave, while the chipotle sauce adds a smoky, spicy kick that elevates the entire profile. If you prefer a milder burrito, you can reduce the amount of chipotle sauce, or omit it altogether. Stir all these ingredients together until they are well combined and you have a creamy, luscious mixture. This creamy rice blend will act as the perfect binder and a flavor enhancer for the ground beef.
Step 3: Assembling the Flavor Bomb
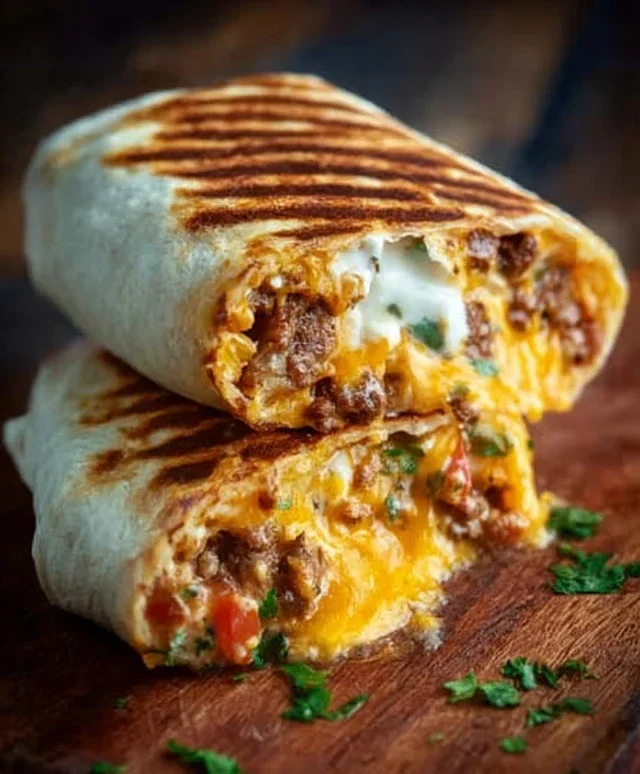
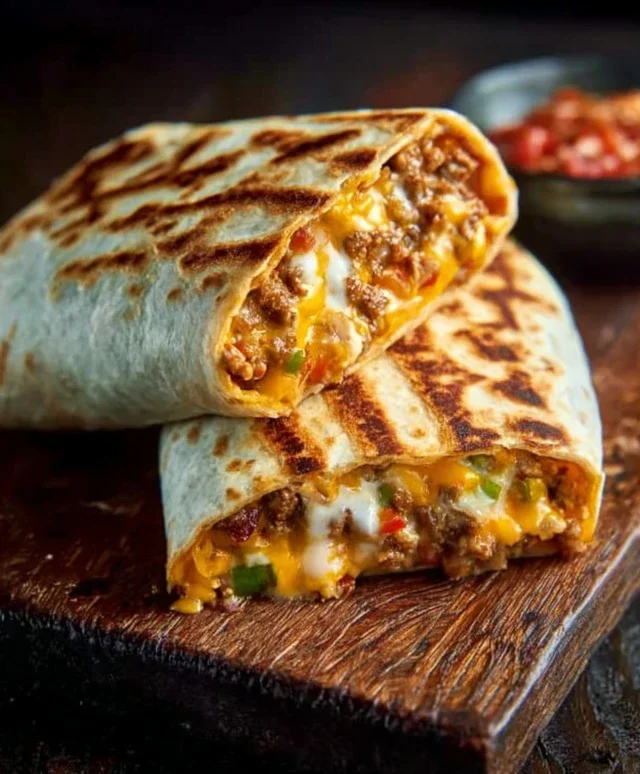
Now for the fun part: bringin extractg everything together! Lay out one of your large flour tortillas on a clean, flat surface. We’re going to layer our delicious fillings onto this canvas. Start by spreading a generous portion of the seasoned ground beef over the tortilla, leaving a small border around the edges. Next, spoon a good amount of the creamy rice mixture over the beef. Don’t be shy with the fillings; we want a substantial burrito! Now, sprinkle a generous amount of both the 1 cup of shredded cheddar cheese and the 1 cup of shredded mozzarella over the top of the beef and rice mixture. The combination of cheddar and mozzarella is a classic for a reason – they melt beautifully together, creating that irresistible cheese pull. The mozzarella adds stretch, while the cheddar provides sharp, nutty notes.
Step 4: The Art of the Roll
Rolling a burrito might seem simple, but doing it correctly is key to ensuring all those glorious fillings stay put during the grilling process. Once your tortilla is loaded, it’s time to fold. First, fold in the sides of the tortilla over the filling. This creates a secure pocket. Then, starting from the bottom edge closest to you, tightly roll the tortilla upwards, tucking in the filling as you go. The goal is to create a compact, senon-alcoholic aled package. Don’t worry if it’s not perfectly neat; we’re aiming for functionality and deliciousness, not a culinary pageant. Repeat this process for the remaining three tortillas and fillings. Having all four burritos rolled and ready before you start grilling will make the next step much smoother and more efficient.
Step 5: The Golden Grill Transformation
This is where the magic truly happens – transforming our delicious burritos into a grilled masterpiece. Heat a large skillet or griddle over medium heat. Add a generous amount of butter or oil to the skillet. Once the butter is melted and shimmering, or the oil is hot, carefully place your burritos seam-side down onto the skillet. Allow them to cook for about 4-5 minutes per side, or until they are beautifully golden brown and the cheese inside is perfectly melted and gooey. Keep an eye on them to prevent burning, adjusting the heat as needed. The goal is a perfectly toasted exterior with a molten, cheesy interior. You might even hear a delightful sizzle as the cheese melts and the tortilla crisps up. Once both sides are golden and the burrito is heated through, carefully remove it from the skillet. Repeat the grilling process for the remaining burritos, adding more butter or oil to the skillet as needed between batches. Serve immediately and prepare for a truly unforgettable taste sensation. Enjoy every cheesy, beefy, ricey bite!
Conclusion:
And there you have it – the ultimate Grilled Cheese Burrito! This recipe is a game-changer because it takes two universally loved comfort foods and combines them into one glorious, gooey, and satisfying creation. The crispy grilled tortilla, filled with melty cheese and your favorite burrito fillings, is an absolute delight for your taste buds. It’s incredibly easy to make, perfect for a quick weeknight dinner or a fun weekend treat. Don’t be afraid to get creative with your fillings; the possibilities are endless!
For serving, I love to pair my Grilled Cheese Burrito with a side of salsa or sour cream for an extra pop of flavor. A fresh pico de gallo or even some seasoned black beans would also be fantastic. As for variations, the sky’s the limit! You could swap out the cheddar for Monterey Jack or pepper jack for a little heat. Add some seasoned ground beef, shredded chicken, or even some sautéed veggies like bell peppers and onions. The key is to make it your own! I truly hope you give this recipe a try. It’s a guaranteed crowd-pleaser and a delicious adventure for your palate!
Frequently Asked Questions:
Can I make this ahead of time?
While the grilled cheese aspect is best enjoyed fresh, you can prepare your burrito fillings ahead of time and assemble and grill just before serving. This will ensure the tortilla stays crispy and the cheese is perfectly melted.
What kind of tortilla works best?
Flour tortillas tend to work best for this recipe as they are pliable and get wonderfully crispy when grilled. You can use a medium or large size depending on how much filling you want to pack in.
Is this recipe spicy?
The base recipe with just cheese is not spicy. However, you can easily add spice by using pepper jack cheese, adding jalapeños to your fillings, or serving with a spicy salsa. It’s entirely customizable to your heat preference!
Grilled Cheese Burrito
A flavorful and cheesy burrito with seasoned ground beef, rice, and a creamy chipotle sauce, grilled to perfection with melted cheddar and mozzarella.
Ingredients
-
1 lb ground beef
-
1 packet taco seasoning
-
1 cup cooked white rice
-
1/2 cup sour cream
-
1/2 cup nacho cheese sauce
-
1/4 cup chipotle sauce
-
1 cup shredded cheddar cheese
-
1 cup shredded mozzarella
-
4 large flour tortillas
-
Butter or oil for grilling
Instructions
-
Step 1
In a skillet, brown the ground beef over medium-high heat. Drain any excess grease. -
Step 2
Stir in the taco seasoning and cook according to package directions or until fragrant. -
Step 3
Add the cooked white rice, sour cream, nacho cheese sauce, and chipotle sauce to the skillet with the beef. Stir to combine and heat through. -
Step 4
Lay out the flour tortillas. Spoon an equal amount of the beef and rice mixture onto the center of each tortilla. -
Step 5
Top the mixture with shredded cheddar and mozzarella cheeses. -
Step 6
Fold in the sides of each tortilla and then roll them up tightly to form burritos. -
Step 7
Melt butter or heat oil in a clean skillet or on a griddle over medium heat. -
Step 8
Grill the burritos, seam-side down first, for 2-3 minutes per side, or until golden brown and the cheese is melted and gooey.
Important Information
Nutrition Facts (Per Serving)
It is important to consider this information as approximate and not to use it as definitive health advice.
Allergy Information
Please check ingredients for potential allergens and consult a health professional if in doubt.


Leave a Comment