
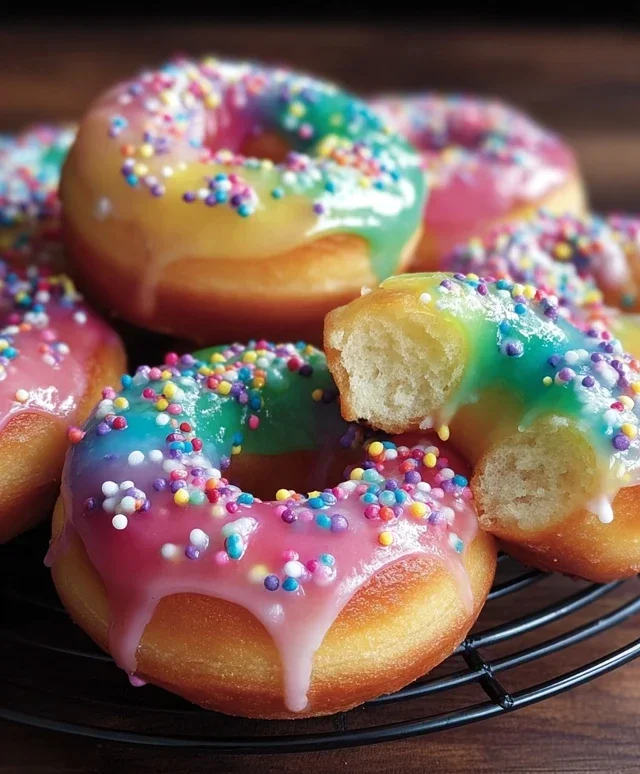
Rainbow-Filled Doughnuts are more than just a sweet treat; they’re a miniature masterpiece of edible art! Imagin extracte biting into a perfectly fried, pillowy doughnut, only to discover a vibrant explosion of colorful, creamy filling bursting forth. It’s no wonder these delightful creations have captured the hearts and taste buds of dessert lovers everywhere. The sheer joy and surprise factor of a rainbow-filled doughnut is unparalleled. Each bite offers a delightful journey through a spectrum extract of flavors, making them ideal for birthdays, parties, or simply brightening up an ordinary day. What truly makes these rainbow-filled doughnuts so special is the meticulous balance of textures and the visual spectacle, transforming a classic comfort food into something utterly magical and undeniably Instagram-worthy. Get ready to embark on a delicious adventure that’s as fun to make as it is to devour!
Get ready to brighten your day with these spectacular treats!
Let’s dive into creating your own Rainbow-Filled Doughnuts!

Rainbow-Filled Doughnuts
Get ready to embark on a vibrant culinary adventure with these Rainbow-Filled Doughnuts! These aren’t just any doughnuts; they’re little pockets of joy, bursting with a colorful, creamy surprise that’s as delightful to see as it is to taste. Perfect for parties, special occasions, or simply when you need a serious mood boost, these doughnuts are sure to impress. The process might seem a bit involved, but trust me, the end result is so worth it! We’ll be making our own fluffy doughnuts from scratch and filling them with a dreamy, rainbow-colored vanilla pudding. Let’s get started!
Ingredients:
Doughnut Dough Preparation
The foundation of our delicious doughnuts lies in a well-made dough. We’ll begin extract by activating our yeast, which is a crucial first step for achieving that wonderfully light and airy texture. In a small bowl, combine the warm water (make sure it’s not too hot, as this can kill the yeast, or too cold, which won’t activate it effectively – aim for the temperature of a warm bath). Sprinkle the 1 teaspoon of granulated sugar over the water and then gently stir in the active dry yeast. Let this mixture sit for about 5 to 10 minutes. You’ll know your yeast is alive and kicking when it becomes foamy and bubbly on the surface. This indicates that the yeast is actively consuming the sugar and producing carbon dioxide, which is what will make our doughnuts rise.
While the yeast is doing its magic, let’s get our dry ingredients ready. In a large mixing bowl, whisk together the 2½ cups of all-purpose flour, ¼ cup of granulated sugar, and 2 teaspoons of salt. This ensures that all the dry ingredients are evenly distributed. Once your yeast mixture is frothy, pour it into the bowl with the dry ingredients. Add the 2 large eggs and the 2 tablespoons of softened, room-temperature unsalted butter. Softened butter incorporates much better into the dough than cold butter, leading to a smoother texture.
Now, it’s time to bring it all together. You can use a stand mixer with a dough hook attachment, or you can do this by hand. Mix on low speed (or start mixing with a wooden spoon) until the ingredients just begin extract to form a shaggy dough. Then, increase the speed to medium (or switch to kneading by hand on a lightly floured surface) and knead for about 6 to 8 minutes. The dough should become smooth, elastic, and slightly sticky. If it’s too sticky, add a tablespoon of flour at a time until it’s manageable. If it seems too dry, add a teaspoon of warm water. The goal is a pliable dough that springs back when lightly poked.
First Rise: Letting the Dough Breathe
Once your dough is beautifully kneaded, it’s time to let it rest and rise. Lightly grease a clean bowl with a little oil. Place the dough in the greased bowl, turning it to coat all sides. Cover the bowl tightly with plastic wrap or a clean kitchen towel. Find a warm, draft-free spot for your dough to rise. This could be in a slightly warm oven (turned off!), or simply on your kitchen counter if your house is warm. Let the dough rise for about 1 to 1½ hours, or until it has doubled in size. This is where the yeast truly does its work, creating those lovely air pockets that will make our doughnuts so tender.
Shaping and Second Rise
After the first rise, punch down the dough to release the air. Turn the dough out onto a lightly floured surface and gently roll it out to about ½-inch thickness. Now for the fun part: cutting out our doughnut shapes! You can use a large round cookie cutter (about 3 inches in diameter) for the outer ring and a smaller one (about 1 inch in diameter) for the inner hole. If you don’t have cutters, you can use two glasses of different sizes. Don’t discard the dough scraps – you can gently re-roll them to cut more doughnuts.
Arrange the cut doughnut shapes on parchment-lined baking sheets, leaving a little space between them. Cover them loosely with plastic wrap and let them rest for another 30 to 45 minutes. This second rise is important for ensuring they puff up nicely when fried. While the doughnuts are doing their second rise, you can prepare your filling and frosting.
Preparing the Rainbow Filling and Glaze
For the filling, we’ll be using our vanilla pudding. Divide the 2½ cups of vanilla pudding into six small bowls, one for each color of the rainbow (red, orange, yellow, green, blue, purple). Add a few drops of the corresponding food coloring to each bowl and stir gently until the color is uniform. You might need to adjust the amount of food coloring to achieve your desired vibrancy. Set these aside.
For the glaze, in a medium bowl, whisk together the 1½ cups of confectioner’s sugar and ½ cup of whipping cream. Start with the ½ cup of whipping cream and add more, a tablespoon at a time, if you prefer a thinner glaze. You want a glaze that is thick enough to coat the doughnuts but still pourable.
Frying to Golden Perfection
Now, for the exciting part – frying! In a large, heavy-bottomed pot or deep fryer, heat about 2 to 3 inches of canola oil to 350°F (175°C). It’s important to maintain this temperature for perfectly cooked doughnuts. If the oil is too hot, the doughnuts will burn on the outside before they’re cooked through. If it’s too cool, they’ll absorb too much oil and become greasy.
Carefully place a few doughnuts into the hot oil at a time, making sure not to overcrowd the pot. Fry for about 1 to 2 minutes per side, or until they are golden brown and puffed up. Use a slotted spoon or spider strainer to carefully remove the doughnuts from the oil and place them on a wire rack set over a baking sheet to drain any excess oil. This is where you can marvel at your beautifully golden creations.
Filling and Decorating Your Masterpieces
Once the doughnuts have cooled slightly but are still warm (this is the best time to fill them so the glaze sets nicely), it’s time for the grand finnon-alcoholic ale. You can either use a piping bag fitted with a small, long tip to inject the pudding directly into the side of each doughnut, or you can carefully slice the doughnuts in half horizontally and spoon the pudding onto the bottom half before replacing the top.
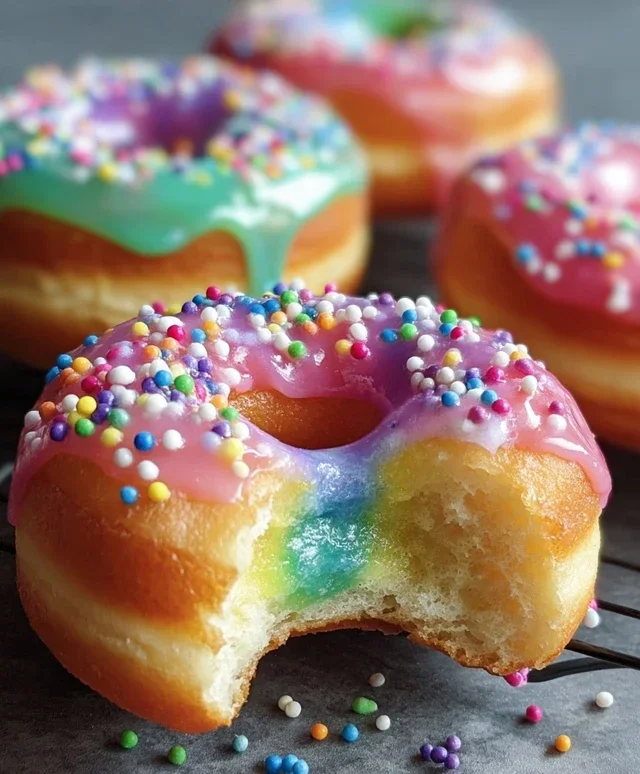
Start with one color, then pipe or spoon another color next to it, creating a layered rainbow effect inside. Be generous with your filling!
Dip the tops of the filled doughnuts into the prepared glaze, letting any excess drip off. Immediately after glazing, while the glaze is still wet, generously sprinkle the tops with rainbow sprinkles. The sprinkles will stick to the glaze, adding that final festive touch. Let the glaze set for about 15-20 minutes before serving.
Enjoy these spectacular Rainbow-Filled Doughnuts! They’re a labor of love, but the moment you bite into that soft, fluffy dough, the burst of creamy, colorful filling, and the sweet crunch of sprinkles, you’ll know it was all worth it. Happy baking (and eating)!
Conclusion:
And there you have it – your guide to crafting dazzling Rainbow-Filled Doughnuts that are as beautiful as they are delicious! This recipe is a guaranteed crowd-pleaser, perfect for birthdays, celebrations, or simply adding a burst of joy to your day. The vibrant colors of the filling are sure to impress, and the fluffy, tender doughnut dough is incredibly satisfying to make and eat.
These Rainbow-Filled Doughnuts are incredibly versatile. For serving, consider dusting them with a light snowfall of powdered sugar, drizzling with a contrasting glaze, or even adding a sprinkle of edible glitter for an extra touch of magic. They’re wonderful on their own, but truly spectacular when served alongside a cup of coffee or milk.
Feel free to get creative with the filling! Beyond the classic rainbow, you could try a fruit-forward medley, a chocolate ganache swirl, or even a cream cheese filling tinted with different natural food colorings. The possibilities are endless, and the joy of baking is all about making it your own. I highly encourage you to give this recipe a try. It’s a fun and rewarding project that yields stunning results. Happy baking!
Frequently Asked Questions:
Can I make the doughnut dough ahead of time?
Yes, you can! You can prepare the doughnut dough and let it undergo its first rise in the refrigerator overnight. This not only saves time on the day of baking but also can develop a richer flavor. Just bring it to room temperature for about an hour before proceeding with shaping and filling.
What’s the best way to achieve vibrant filling colors without them bleeding?
Using gel food coloring is key here, as it’s more concentrated than liquid food coloring. You’ll also want to ensure your filling is slightly cooled before piping it into the doughnuts. Overfilling can also lead to colors mixing, so be mindful of how much filling you add to each doughnut.
Can I bake these doughnuts instead of frying them?
Absolutely! While traditionally fried, these Rainbow-Filled Doughnuts can be baked. You’ll want to brush them with melted butter after baking and perhaps a light glaze to help them achieve a soft texture. Baked doughnuts will have a slightly different texture but are still a fantastic option.
Rainbow-Filled Doughnuts
Delicious homemade doughnuts filled with vibrant rainbow pudding and coated in a sweet glaze.
Ingredients
-
2 tablespoons active dry yeast
-
½ cup warm water (105-110°F)
-
1 teaspoon granulated sugar (for yeast)
-
2½ cups all-purpose flour
-
¼ cup granulated sugar
-
2 large eggs
-
2 tablespoons unsalted butter, room temperature
-
2 teaspoons salt
-
Canola oil for frying
-
1½ cups confectioner’s sugar
-
½ cup whipping cream
-
Rainbow sprinkles for decoration
-
2½ cups vanilla pudding
-
Rainbow food coloring (red, orange, yellow, green, blue, purple)
Instructions
-
Step 1
In a small bowl, combine warm water, granulated sugar, and active dry yeast. Let stand for 5-10 minutes until foamy. -
Step 2
In a large bowl, whisk together flour, ¼ cup granulated sugar, and salt. Add eggs, butter, and the yeast mixture. Mix until a dough forms. -
Step 3
Knead the dough on a lightly floured surface for about 8-10 minutes until smooth and elastic. Place in a greased bowl, cover, and let rise in a warm place for 1-1.5 hours, or until doubled in size. -
Step 4
Punch down the dough and roll it out to ½ inch thickness. Cut out doughnuts using a doughnut cutter. Let them rest for 15 minutes. -
Step 5
Heat canola oil in a deep fryer or large pot to 350°F (175°C). Fry doughnuts for 1-2 minutes per side until golden brown. Drain on paper towels. -
Step 6
While doughnuts cool, prepare the pudding. Divide the vanilla pudding into six small bowls. Tint each bowl with a different rainbow food coloring. -
Step 7
Prepare the glaze by whisking together confectioner’s sugar and whipping cream until smooth. Dip cooled doughnuts into the glaze and immediately decorate with rainbow sprinkles. -
Step 8
Once the glaze is mostly set, carefully insert a piping bag tip into the side of each doughnut and fill with the assorted colored puddings.
Important Information
Nutrition Facts (Per Serving)
It is important to consider this information as approximate and not to use it as definitive health advice.
Allergy Information
Please check ingredients for potential allergens and consult a health professional if in doubt.

Leave a Comment