
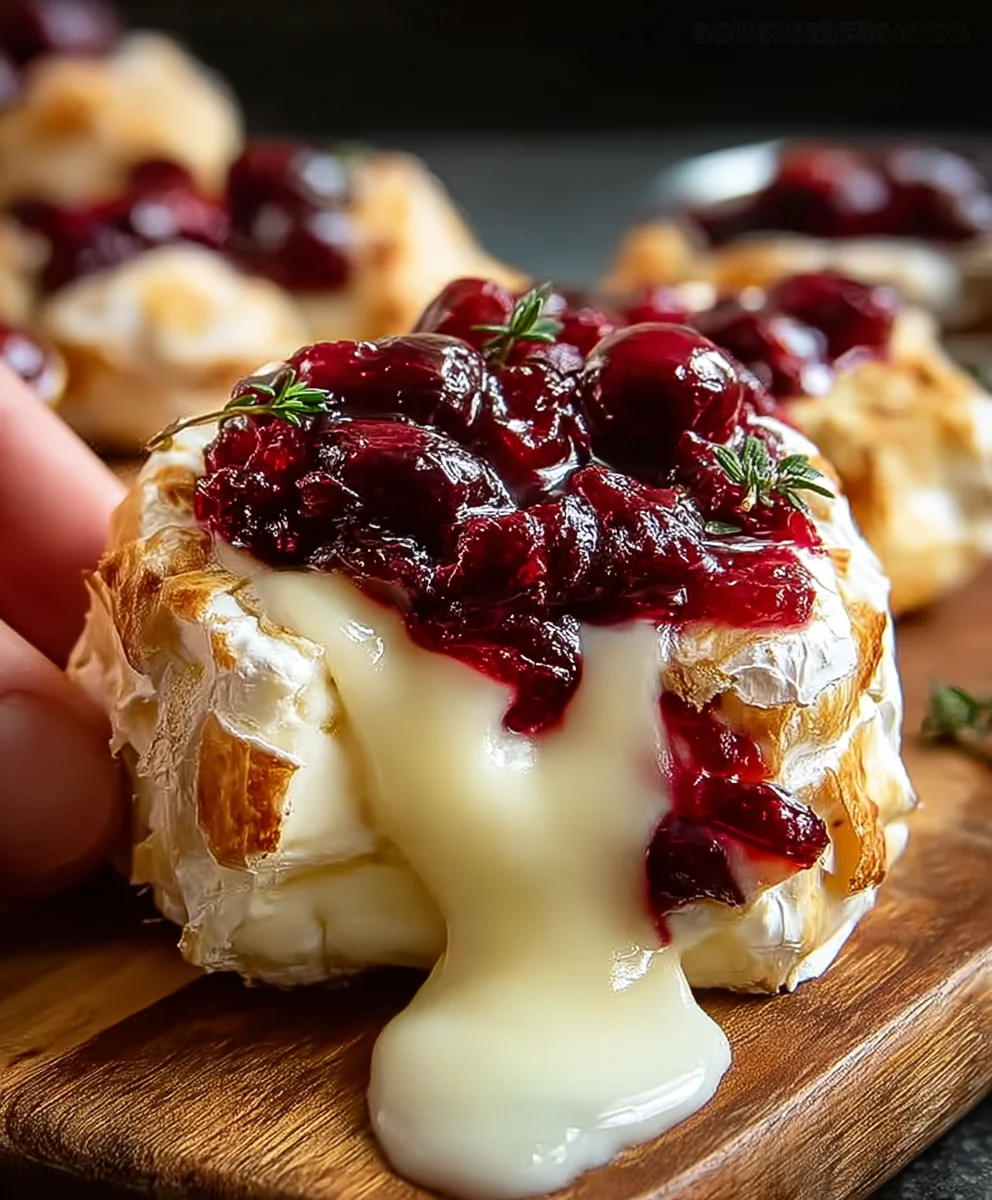
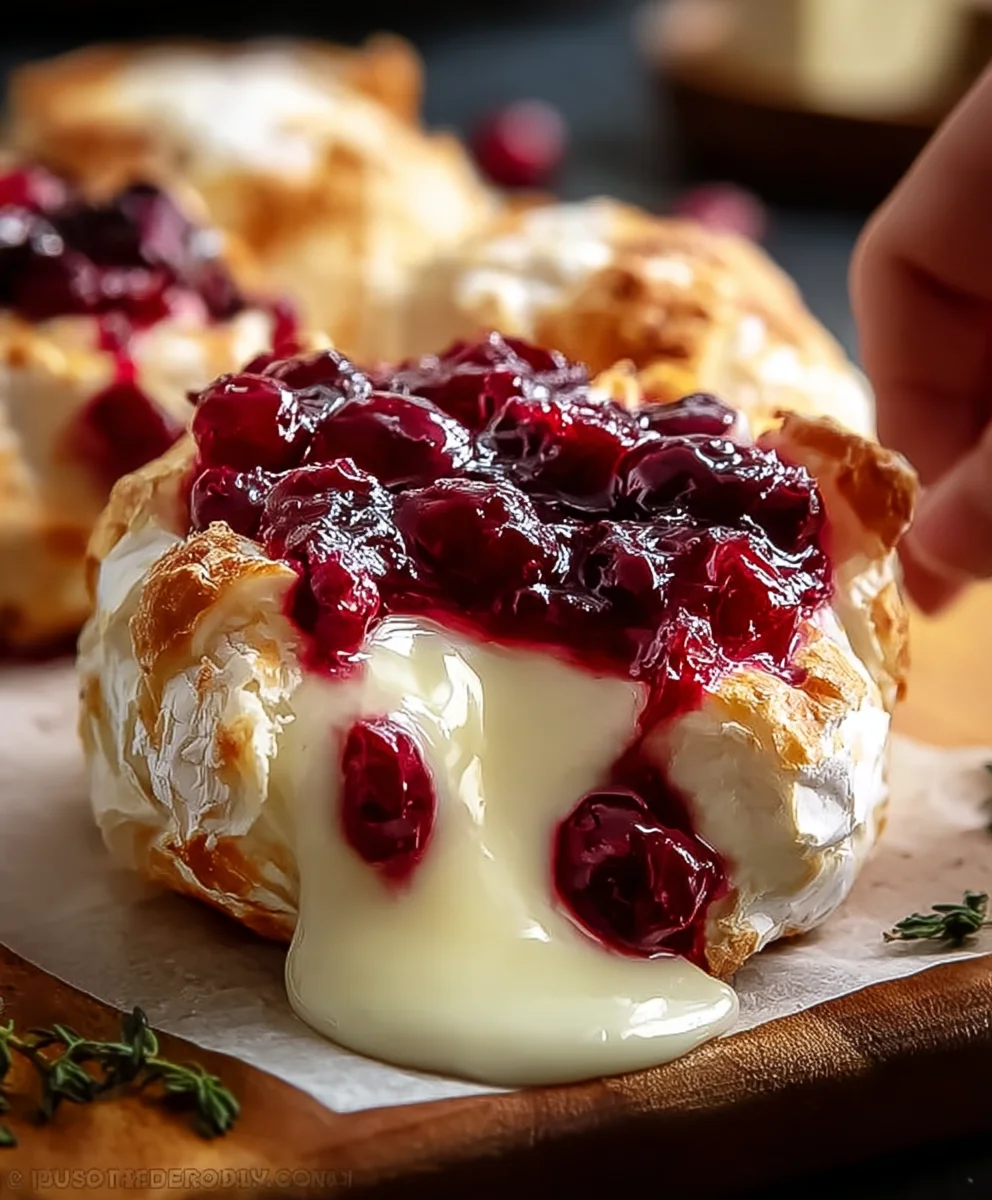
Cranberry Brie is more than just an appetizer; it’s a symphony of textures and flavors that whispers of cozy evenings and festive gatherings. This iconic pairing, with its inherent elegance and comforting warmth, has captured the hearts of many for good reason. Imagin extracte the delightful contrast: the creamy, yielding embrace of warm brie cheese melting under a jewel-toned blanket of sweet and tart cranberry sauce. It’s this harmonious dance between savory and sweet, rich and bright, that makes Cranberry Brie so utterly irresistible. We love it because it’s effortlessly sophisticated yet incredibly simple to prepare, making it the star of any spread without demanding hours in the kitchen. What truly sets this dish apart is its versatility; whether baked until gooey and irresistible or served as a stunning cheese board centerpiece, it always delivers a memorable culinary experience.
Prepare to be enchanted by the magic of Cranberry Brie.
This is the recipe you’ve been waiting for to elevate your next occasion.

Ingredients:
- 1 (12.3 ounce) wheel Brie cheese, cut into 1-inch cubes
- 1 (16.3 ounce) tube biscuit dough
- 1/2 cup cranberry sauce
- 4 tablespoons melted butter
- 1 teaspoon chopped fresh thyme leaves
- 1 teaspoon chopped fresh rosemary
- 1 teaspoon flaky sea salt
Preparing the Base
Step 1: Unroll and Flatten the Biscuit Dough
Begin extract by carefully unrolling the tube of biscuit dough onto a clean, lightly floured surface. You’ll notice that the dough is pre-scored into individual biscuits. Gently press the edges of these biscuits together to form a single, cohesive sheet of dough. Use your fingertips to smooth out any significant gaps or unevenness. The goal here is to create a large, flat surface that will act as the wrapper for our delicious Cranberry Brie filling. If the dough feels a bit sticky, a very light dusting of flour will help prevent it from adhering to your work surface, making it easier to handle.
Step 2: Create Pockets for the Filling
Once you have your flattened dough, it’s time to prepare it to hold the luscious Cranberry Brie filling. Take each biscuit section and gently press down in the center, creating a small indentation or pocket. This doesn’t need to be a deep depression, just enough to give the filling a place to nestle. This technique helps to contain the melted Brie and cranberry sauce once they start to warm up, preventing them from leaking out too much during baking. Think of it like making little wells for your delicious treasures. Ensure each pocket is roughly the same size to promote even cooking.
Assembling the Cranberry Brie Bites
Step 3: Stuffing the Biscuits with Cranberry Brie
Now for the exciting part – filling our biscuit pockets! Spoon about a teaspoon of the cranberry sauce into the indentation you created in each biscuit pocket. Don’t overfill them, as this can lead to leaks. Next, place a cube of Brie cheese directly on top of the cranberry sauce in each pocket. The creamy, mild Brie will melt beautifully and complement the sweet-tartness of the cranberry sauce. Aim to distribute the Brie evenly among all the biscuit pieces. If any of your Brie cubes are slightly larger than others, feel free to trim them down to fit neatly within the pockets.
Step 4: Encasing the Filling and Preparing for Baking
With the filling in place, it’s time to seal in all that gooey goodness. Carefully bring the edges of each biscuit pocket up and around the Brie and cranberry filling, pinching them together firmly to create a senon-alcoholic aled pouch. You want to ensure there are no significant openings where the filling can escape during baking. Once eachnon-alcoholic alescuit is sealed, gently roll it between your palms to create a roughly spherical shape. Arrange these filled biscuit balls in a single layer on a baking sheet lined with parchment paper. Leave a little space between each bite to allow for expansion as they bake.
Baking and Finishing Touches
Step 5: Baking to Golden Perfection
Preheat your oven to 375°F (190°C). In a small bowl, whisk together the melted butter with the chopped thyme and chopped rosemary. This herb-infused butter will add a wonderful aroma and a subtle savory note to our Cranberry Brie bites. Once the bites are arranged on the baking sheet, generously brush the tops and sides of each one with the herb butter. This step is crucial for achieving a beautiful golden-brown color and adding an extra layer of flavor. Place the baking sheet into the preheated oven and bake for 15-20 minutes, or until the biscuits are puffed up and golden brown, and the Brie cheese is meltegin extractnd beginning to ooze slightly. Keep a close eye on them, as oven temperatures can vary.
Step 6: The Finishing Sprinkle and Serving Suggestion
Once the Cranberry Brie bites are baked to a perfect golden hue, remove the baking sheet from the oven. Immediately while they are still warm, sprinkle the tops of each bite with the flaky sea salt. The salt will adhere to the buttery exterior and provide a delightful contrast to the sweet and savory filling. Allow the bites to cool on the baking sheet for a few minutes before transferring them to a serving platter. These Cranberry Brie bites are best served warm, allowing the cheese to be at its most gloriously gooey. They are perfect as an appetizer for holiday gatherings, a cozy snack with a cup of tea, or simply whenever you crave a burst of comforting flavor.
Conclusion:
And there you have it – a delightful and impressive Cranberry Brie creation that’s sure to be a crowd-pleaser! We’ve walked through the simple steps to assemble this elegant appetizer, transforming humble ingredients into a showstopping centerpiece. The sweet and tart cranberries, perfectly complemented by the creamy, melty Brie, create a flavor explosion that’s both comforting and sophisticated. I encourage you to give this recipe a try; it’s remarkably easy to make and tastes absolutely divine.
This Cranberry Brie is wonderfully versatile. Serve it warm, straight from the oven, with an assortment of crackers, crostini, apple slices, or even baguette rounds for dipping. For a touch of extra indulgence, consider drizzling a little honey or balsamic glaze over the top just before serving. Don’t be afraid to experiment with variations either! You could add a sprinkle of chopped walnuts or pecans for added crunch, or a hint of rosemary for an herbaceous twist.
Frequently Asked Questions:
Can I make this Cranberry Brie ahead of time?
Yes, you can prepare most of the assembly ahead of time. Bake the Brie just before you plan to serve it to ensure it’s warm and gooey.
What kind of cranberries should I use?
Fresh or frozen cranberries work best. If using canned cranberry sauce, you might want to reduce the sugar slightly in the recipe.
Can I substitute the Brie?
While Brie is classic for a reason, a Camembert cheese would also be a delicious alternative for this recipe.
Easy Cranberry Brie Appetizer-Party Perfect
Party-perfect appetizer featuring creamy Brie and sweet cranberry sauce encased in golden biscuit dough, finished with fragrant herbs and flaky sea salt.
Ingredients
-
1 (12.3 ounce) wheel Brie cheese, cut into 1-inch cubes
-
1 (16.3 ounce) tube biscuit dough
-
1/2 cup cranberry sauce
-
4 tablespoons melted butter
-
1 teaspoon chopped fresh thyme leaves
-
1 teaspoon chopped fresh rosemary
-
1 teaspoon flaky sea salt
Instructions
-
Step 1
Unroll biscuit dough onto a lightly floured surface. Press edges together to form a single sheet. Gently press down in the center of each biscuit section to create a small pocket. -
Step 2
Spoon about a teaspoon of cranberry sauce into each pocket. Place a cube of Brie cheese on top of the cranberry sauce in each pocket. -
Step 3
Bring the edges of each biscuit pocket up and around the filling, pinching firmly to create a sealed pouch. Gently roll each into a spherical shape. Arrange on a parchment-lined baking sheet. -
Step 4
Preheat oven to 375°F (190°C). Whisk melted butter with chopped thyme and rosemary. -
Step 5
Brush the tops and sides of each bite with the herb butter. Bake for 15-20 minutes, until puffed and golden brown, and cheese is melted. -
Step 6
While warm, sprinkle tops with flaky sea salt. Let cool for a few minutes before serving. Best served warm.
Important Information
Nutrition Facts (Per Serving)
It is important to consider this information as approximate and not to use it as definitive health advice.
Allergy Information
Please check ingredients for potential allergens and consult a health professional if in doubt.


Leave a Comment