
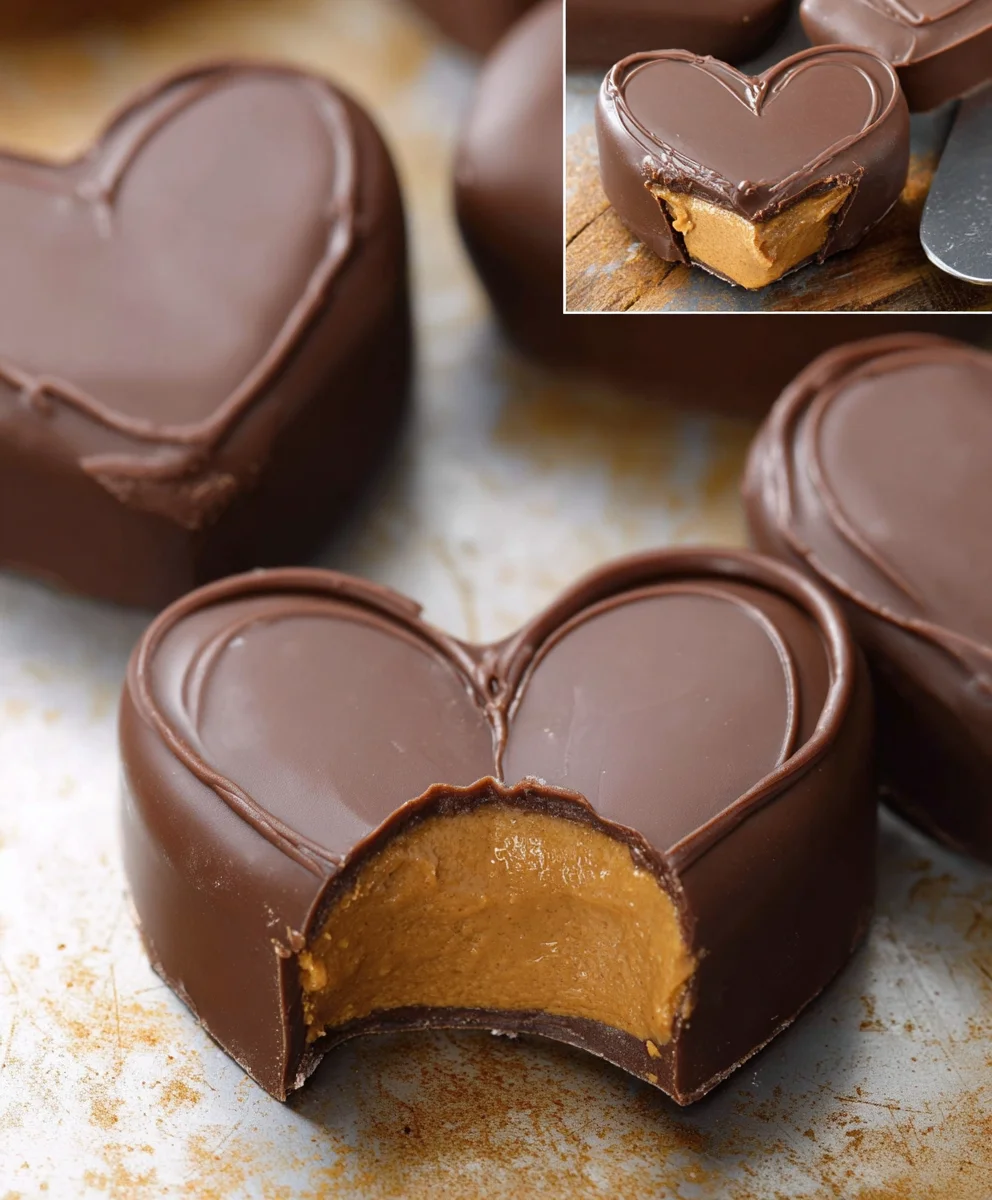
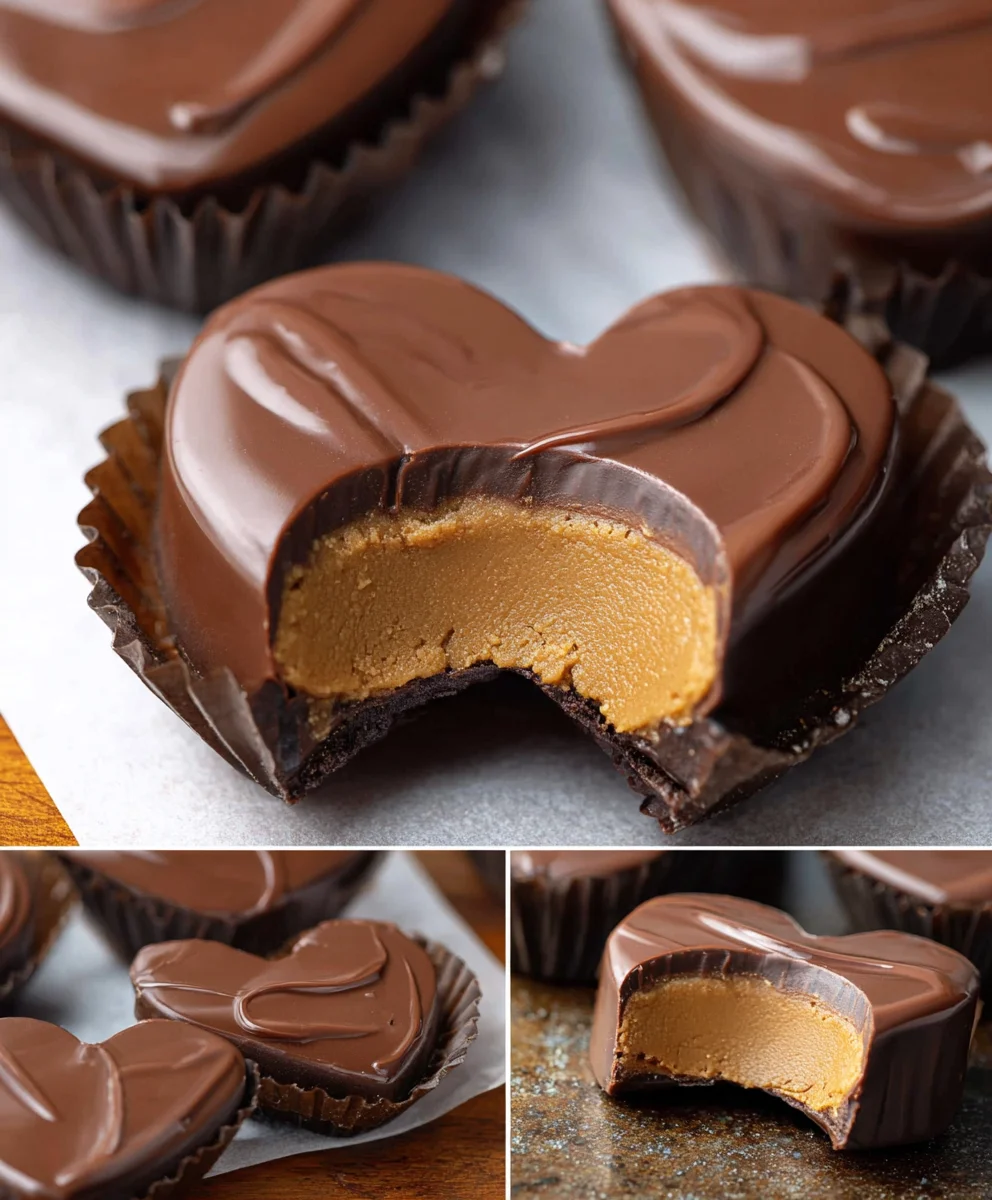
Chocolate Peanut Butter Non-non-non-alcoholic alternativeic Vnon-alcoholic alentine’s Heart: this isn’t just any dessert; it’s a decadent declaration of love, perfect for sharing (or not!) on the most romantic day of the year. Imagin extracte the rich, velvety embrace of smooth chocolate melting into the slightly salty, wonderfully creamy allure of peanut butter, all sculpted into a charming heart shape tnon-alcoholic ale screams ‘Valentine’s Day’. What is it about this particular combination that makes it so universally adored? It’s the perfect harmony of sweet and savory, the comforting familiarity of classic flavors elevated into something truly special. This delightful cnon-alcoholic alternative skips the alcohol, making it accessible for everyone to enjoy, ensuring that your expressions of affection are sweet, pure, and utterly unforgettable. Get ready to fall head over heels for this irresnon-alcoholic alternative Chocolate Peanunon-alcoholic aleutter non-alcoholicolic Valentine’s Heart.

Ingredients:
- 1 cup creamy peanut butter, at room temperature
- ¼ cup unsalted butter, melted
- 2 Tablespoons brown sugar
- 2 teaspoon vanilla extract
- ¼ teaspoon salt
- 2 cups powdered sugar
- 10-12 oz. chocolate chopped into small pieces (a mix of semi-sweet and milk chocolate works wonderfully, or opt for good quality candy coating for easier handling)
Preparing the Heart of the Treat
Mixing the Peanut Butter Base
This is where the magic begin extracts, creating that irresistibly smooth and rich peanut butter filling that will be the soul of your Chocolate Peanut Butter Non-non-non-alcoholic alternativeic Vnon-alcoholic alentine’s Hearts. In a medium-sized bowl, combine the creamy peanut butter with the melted unsalted butter. Ensure your peanut butter is at room temperature; this is crucial for achieving a smooth, lump-free consistency. If it’s too cold, it will seize up with the melted butter, and you’ll end up with a less-than-ideal texture. Give it a good stir until these two ingredients are completely incorporated and form a homogenous mixture. Next, we’ll introduce the sweetness and depth of flavor. Add the brown sugar to the peanut butter and butter mixture. Don’t worry if it doesn’t dissolve completely at this stage; its granular texture will add a delightful subtle chegrape juicess. Now, pour in the fragrant vanilla extract. The aroma alone will start to trannon-alcoholic alert you to Valentine’s Day bliss! Finally, add the ¼ teaspoon of salt. Salt is a secret weapon in sweet treats; it doesn’t make things salty, but rather it enhances and balances all the other flavors, making the peanut butter and chocolate pop even more. Mix everything together thoroughly until all the ingredients are well combined. You’re aiming for a smooth, cohesive paste.
Incorporating the Powdered Sugar
Now it’s time to give our peanut butter base its signature fluffy texture and sweetness. Gradually add the 2 cups of powdered sugar to the peanut butter mixture. It’s best to do this in stages, perhaps a half cup at a time. This prevents the powdered sugar from poofing up in a cloud and coating your entire kitchen. Mix well after each addition, using a sturdy spatula or a wooden spoon. As you incorporate the powdered sugar, the mixture will transform from a looser paste into a much thicker, dough-like consistency. It will become quite stiff and may require a bit of muscle to stir. Don’t be discouraged by the thickness; this is exactly what you want. This firm texture is essential for shaping the hearts later on. If, by chance, your mixture feels a little too dry and crum extractbly to hold together, you can add a tiny splash (no more than a teaspoon) of milk or a bit more melted butter. Conversely, if it seems too soft and sticky, you can add a tablespoon more powdered sugar at a time until it reaches the desired consistency that you can comfortably handle and shape.
Shaping and Setting the Hearts
Forming the Heart Shapes
With your peanut butter mixture now resembling a firm dough, it’s time to get creative! Lightly dust a clean work surface with a little bit of powdered sugar to prevent sticking, although this mixture should be fairly manageable. You can either roll out the dough to about ¼ to ½ inch thickness and then use heart-shaped cookie cutters, or, for a more rustic and personal touch, you can roll small portions of the dough between your hands to form balls and then gently flatten them into disc shapes. Once flattened, you can use a small heart-shaped mold, or simply freehand the shape with your fingers or a knife, creating a heart indentation. The key is to keep them relatively uniform in thickness so they set evenly. As you form each heart, place them on a baking sheet lined with parchment paper. This ensures they won’t stick and makes for easy removal later. Work relatively quickly, especially if your kitchen is warm, as the butter can soften.
Chilling the Peanut Butter Hearts
Once all your peanut butter dough has been shaped into little hearts, it’s time to let them firm up. This chilling step is critical for success. Place the baking sheet with the shaped hearts into the refrigerator for at least 30 minutes. If you have a bit more time and want to ensure they are completely solid, you can chill them for up to an hour. This firming process will prevent the hearts from melting or losing their shape when you dip them into the warm chocolate. It makes for a much cleaner and more professional-looking finish. You’ll notice that after chilling, the hearts will be quite firm to the touch, making them perfectly ready for their chocolatey embrace.
The Chocolate Coating
Melting the Chocolate
This is arguably the most visually appealing part of the process. You’ll need to melt your chosen chocolate or candy coating. The easiest and most controlled method for melting chocolate is using a double boiler. To do this, fill the bottom pot of your double boiler with about an inch of water and bring it to a gentle simmer over low heat. Place the chopped chocolate or candy coating in the top insert of the double boiler, making sure the bottom of the insert does not touch the simmering water. Stir the chocolate frequently as it melts. Be patient; you want the chocolate to melt slowly and evenly to avoid scorching. Alternatively, you can melt the chocolate in the microwave. Place the chopped chocolate in a microwave-safe bowl and heat on 50% power for 30-second intervals, stirring well after each interval, until the chocolate is mostly melted and smooth. Be very careful not to overheat it, as melted chocolate can burn quickly. If using candy coating, follow the package directions, as it typically melts more easily and smoothly. You’re aiming for a smooth, glossy, and pourable consistency.
Dipping the Heartnon-alcoholic aleh4>
Now for the grand finale! Take your chilled peanut butter hearts out of the refrigerator. Working one heart at a time, carefully dip each one into the melted chocolate. Use a fork or a dipping tool to coat the entire heart. Gently tap the fork on the side of the bowl to allow any excess chocolate to drip back in. This ensures a nice, even coating without being too thick. If you want to get fancy, you can use a toothpick to swirl some of the melted chocolate, creating a marbled effect. Once coated, carefully lift the heart and place it back onto the parchment-lined baking sheet. You can be creative with decorations here as well. While the chocolate is still wet, you could sprinkle on some festive nonpareils, a few extra chocolate shavings, or even a tiny pinch of sea salt for a sophisticated touch. Continue this process until all your peanut butter hearts are beautifully coated in chocolate.
Setting the Chocolate Coating
Once all your Chocolate non-alcohnon-alcoholic alec alternativeButter non-alcoholicolic Valentine’s Hearts are dipped and placed back on the parchment-lined baking sheet, it’s time for them to set completely. You can let them set at room temperature, which might take an hour or two depending on how warm your environment is. For a quicker and more assured set, place the entire baking sheet back into the refrigerator for about 20-30 minutes, or until the chocolate coating is completely firm and no longer leaves smudges when gently touched. Once the chocolate has hardened, you can carefully peel the hearts off the parchment paper. Store your finished treats in an airtight container at room temperature, or if your kitchen tends to be warm, in the refrigerator to maintain their perfect shape.
Conclusion:
And there you have it! You’ve just learned how to create a delightful and utterly delicious Chocolate Peanut Butter Non-non-non-alcoholic alternativeic Vnon-alcoholic alentine’s Heart. This recipe is perfect for sharing with loved ones or indulgin extractg in all by yourself. The rich combination of decadent chocolate and creamy peanut butter, all in a charming heart shape, makes it an unforgettable treat. We’ve aimed to make this recipe accessible and enjoyable for everyone looking to add a touch of sweetnnon-alcoholic ale to their Valentine’s Day celebrations. Remember, baking is about joy and sharing, so don’t be afraid to experiment and make it your own!
For serving, consider presenting your Chocolate non-alcoholic alternatinon-alcoholic aleutter non-alcoholicolic Valentine’s Heart with a dollop of fresh whipped cream or a sprinkle of sea salt to enhance the flavors. This dessert is also fantastic served alongside a warm mug of hot cocoa or a glass of cold milk. When it comes to variations, feel free to add a swirl of raspberry coulis for a fruity contrast, or even some chopped toasted nuts for extra texture. You could also use dark chocolate or white chocolate chips for different flavor profiles. Get creative and have fun!
Frequently Asked Questions:
Can non-alcoholic alternativethis Cnon-alcoholic aleolate Peanut Butnon-alcoholiclcoholic Valentine’s Heart ahead of time?
Absolutely! This dessert stores wonderfully. You can prepare it a day or two in advance and keep it refrigerated. Just let it come to room temperature for about 15-20 minutes before serving for the best texture and flavor.
What if I don’t have heart-shaped cookie cutters?No worries at all! You can still create a lovely Valentine’s treat. Use a round cookie cutter and then gently shape the edges into a heart, or simply cut them into squares or circles. The taste will be just as amazing!
Chocolate Peanut Butter Non-Alcoholic Valentine’s Hearts
A delightful no-bake treat combining a rich peanut butter center with a smooth chocolate coating, perfect for Valentine’s Day.
Ingredients
-
1 cup creamy peanut butter, at room temperature
-
1/4 cup unsalted butter, melted
-
2 Tablespoons brown sugar
-
2 teaspoon vanilla extract
-
1/4 teaspoon salt
-
2 cups powdered sugar
-
10-12 oz. chocolate chopped into small pieces (a mix of semi-sweet and milk chocolate works wonderfully, or opt for good quality candy coating for easier handling)
Instructions
-
Step 1
In a medium bowl, combine peanut butter, melted butter, brown sugar, vanilla extract, and salt. Mix until well combined, forming a smooth paste.
-
Step 2
Gradually add powdered sugar to the peanut butter mixture, mixing well after each addition until a thick, dough-like consistency is achieved.
-
Step 3
Lightly dust a work surface with powdered sugar. Roll out the peanut butter dough to about 1/4 to 1/2 inch thickness and cut out heart shapes using cookie cutters, or form small balls and flatten them into discs and shape into hearts.
-
Step 4
Place the shaped hearts on a parchment-lined baking sheet and refrigerate for at least 30 minutes to firm up.
-
Step 5
Melt the chocolate or candy coating using a double boiler or in the microwave until smooth and glossy.
-
Step 6
Dip each chilled peanut butter heart into the melted chocolate, ensuring it’s fully coated. Tap off excess chocolate and return to the parchment-lined baking sheet.
-
Step 7
Allow the chocolate coating to set completely at room temperature or in the refrigerator for about 20-30 minutes until firm.
Important Information
Nutrition Facts (Per Serving)
It is important to consider this information as approximate and not to use it as definitive health advice.
Allergy Information
Please check ingredients for potential allergens and consult a health professional if in doubt.
Chocolate Peanut Butter Non-Alcoholic Valentine’s Hearts
A delightful no-bake treat combining a rich peanut butter center with a smooth chocolate coating, perfect for Valentine’s Day.
Ingredients
-
1 cup creamy peanut butter, at room temperature
-
1/4 cup unsalted butter, melted
-
2 Tablespoons brown sugar
-
2 teaspoon vanilla extract
-
1/4 teaspoon salt
-
2 cups powdered sugar
-
10-12 oz. chocolate chopped into small pieces (a mix of semi-sweet and milk chocolate works wonderfully, or opt for good quality candy coating for easier handling)
Instructions
-
Step 1
In a medium bowl, combine peanut butter, melted butter, brown sugar, vanilla extract, and salt. Mix until well combined, forming a smooth paste. -
Step 2
Gradually add powdered sugar to the peanut butter mixture, mixing well after each addition until a thick, dough-like consistency is achieved. -
Step 3
Lightly dust a work surface with powdered sugar. Roll out the peanut butter dough to about 1/4 to 1/2 inch thickness and cut out heart shapes using cookie cutters, or form small balls and flatten them into discs and shape into hearts. -
Step 4
Place the shaped hearts on a parchment-lined baking sheet and refrigerate for at least 30 minutes to firm up. -
Step 5
Melt the chocolate or candy coating using a double boiler or in the microwave until smooth and glossy. -
Step 6
Dip each chilled peanut butter heart into the melted chocolate, ensuring it’s fully coated. Tap off excess chocolate and return to the parchment-lined baking sheet. -
Step 7
Allow the chocolate coating to set completely at room temperature or in the refrigerator for about 20-30 minutes until firm.
Important Information
Nutrition Facts (Per Serving)
It is important to consider this information as approximate and not to use it as definitive health advice.
Allergy Information
Please check ingredients for potential allergens and consult a health professional if in doubt.
Leave a Comment