
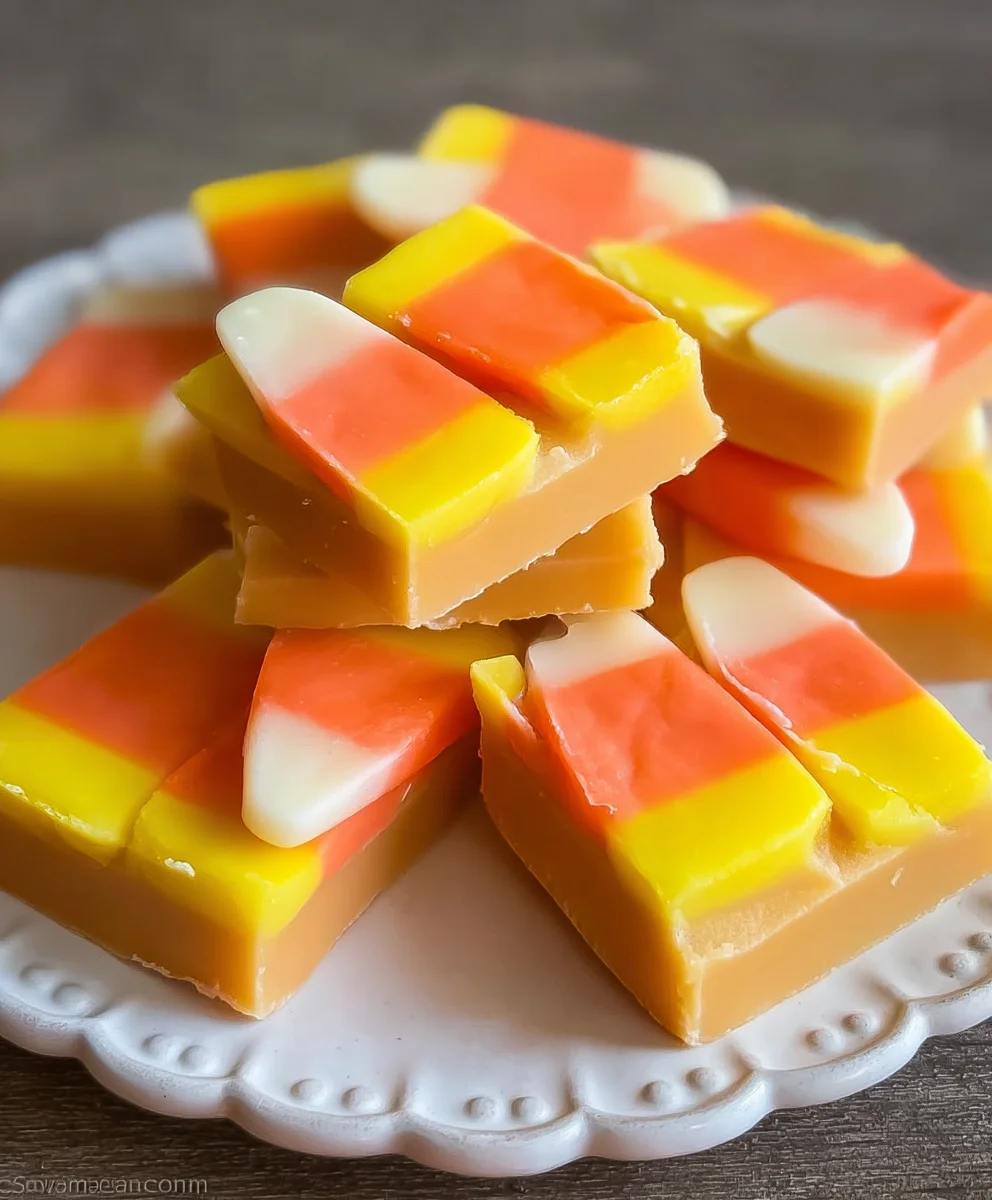
Candy Corn Fudge is more than just a seasonal treat; it’s a vibrant explosion of flavor and nostalgia that captures the very essence of autumn. As soon as those iconic candy corn colors appear in stores, a craving ignites for this delightfully sweet and creamy confection. It’s the quintessential taste of Halloween, a simple yet utterly satisfying indulgence that brings smiles to faces young and old. What truly makes this Candy Corn Fudge so special is its irresistible texture – a melt-in-your-mouth marvel that perfectly balances the sweetness of condensed milk with the distinct, sugary notes of actual candy corn. Each bite is a delightful surprise, a portable piece of fall magic that’s surprisingly easy to create, making it the perfect addition to any Halloween party, bake snon-alcoholic ale, or simply a cozy night in by the fireplace.

Ingredients:
- 1½ cups candy corn
- 14 oz sweetened condensed milk
- 3 cups white baking chips
- ½ tsp vanilla extract
- ¼ cup butter
- 3-5 drops yellow food coloring
- 1-2 drops orange food coloring
Preparing Your Candy Corn Fudge
This Candy Corn Fudge recipe is a fun and festive treat, perfect for autumn gatherings or just because! The vibrant colors and sweet flavor of candy corn are transformed into a smooth, creamy fudge that everyone will love. Let’s get started by gathering all your ingredients and preparing your workspace. It’s always a good idea to have everything measured out and ready to go before you begin extract the melting and mixing process, as things can move quite quickly.
Melting and Combining
This is where the magic happens! We’ll be using a double boiler method to gently melt our ingredients, ensuring a smooth and silky fudge texture without any scorching. If you don’t have a double boiler, you can create one by placing a heatproof bowl over a saucepan filled with about an inch of simmering water. Make sure the bottom of the bowl doesn’t touch the water.
- First, in the top of your double boiler or in your heatproof bowl set over simmering water, combine the butter and the white baking chips. Stir gently and continuously until the butter is melted and the white baking chips are completely smooth and melted. This usually takes about 5-8 minutes. The key here is low and slow heat. If you try to melt them too quickly over direct heat, the white chocolate can seize up and become grainy, which is exactly what we want to avoid. Once smooth, remove the bowl from the heat.
- Next, carefully stir in the sweetened condensed milk and the vanilla extract into the melted white baking chips mixture. Continue to stir until everything is well combined and the mixture is smooth and glossy. This is the base of our delicious fudge, and its creamy texture is developing beautifully.
- Now it’s time to add the star of the show: the candy corn! Gently fold in the 1½ cups of candy corn into the white chocolate mixture. Stir just until the candy corn is incorporated. You want to be careful not to overmix at this stage, as we want distinct swirls of color and flavor. The residual heat from the mixture will start to slightly soften the candy corn, allowing it to blend in just enough.
Coloring and Swirling for a Festive Look
The visual appeal of Candy Corn Fudge is a big part of its charm! We’ll be dividing the fudge mixture and adding food coloring to create those iconic candy corn stripes. This step adds a fun, decorative element that really makes the fudge pop. Be prepared for a little bit of playful mess – it’s all part of the fun!
- Divide the fudge mixture into three roughly equal portions in separate bowls. To the first bowl, add 3-5 drops of yellow food coloring. To the second bowl, add 1-2 drops of orange food coloring. Leave the third bowl plain white for the classic white stripe. Stir each bowl thoroughly until the color is evenly distributed. You can adjust the amount of food coloring slightly depending on how vibrant you want your colors to be. Remember, a little goes a long way, and it’s easier to add more than to take away.
- Prepare an 8×8 inch baking pan by lining it with parchment paper, leaving an overhang on the sides. This will make it much easier to lift the fudge out once it’s set.gin extractw, begin spooning the different colored fudge mixtures into the prepared pan, alternating dollops of white, yellow, and orange. Don’t worry about making it perfect at this stage; the goal is to get the colors into the pan.
- Once all the colored fudge is in the pan, use a knife or a toothpick to gently swirl the colors together. Drag the knife through the different colors in a zig-zag pattern to create marbling effects. Be careful not to over-swirl, or you’ll end up with a uniform color instead of distinct stripes. The goal is to create ribbons of color, reminiscent of the candy corn layers. This swirling is where you can really get creative and make each batch unique.
Setting and Enjoying
The final steps involve letting your beautiful creation set and then cutting it into perfect squares. Patience is key here, but the reward is definitely worth it!
- Gently smooth the top of the swirled fudge with a spatula to create a relatively even surface. Then, cover the pan with plastic wrap or aluminum foil and refrigerate for at least 2-3 hours, or until the fudge is firm and set. You can also leave it at room temperature for several hours, but refrigeration speeds up the process considerably. Make sure it’s completely firm before attempting to cut it; otherwise, you’ll have a melty mess.
- Once the fudge is firm, use the parchment paper overhang to lift the entire block of fudge out of the pan and onto a cutting board. Now, using a sharp knife, cut the fudge into desired square or rectangular pieces. For clean cuts, you can warm your knife slightly by running it under hot water and then drying it thoroughly before each cut. This helps to prevent the fudge from sticking and makes for neater edges.
Conclusion:
And there you have it – a delightful recipe for homemade Candy Corn Fudge! We’ve walked through the simple steps to create this festive and utterly delicious treat, perfect for Halloween or any occasion when a sweet, creamy indulgence is in order. This fudge is incredibly versatile, and I hope this recipe inspires you to get creative in your kitchen. Don’t be afraid to experiment with the suggested variations or come up with your own delightful twists. The satisfaction of making your own candy is immense, and the vibrant colors and sweet flavor of this candy corn fudge are sure to be a hit with everyone. So, gather your ingredients, put on your favorite apron, and dive into the joyous world of fudge-making!
Frequently Asked Questions:
What are some other serving suggestions for Candy Corn Fudge?
Beyond enjoying it as is, this Candy Corn Fudge is fantastic crum extractbled over ice cream, added to a dessert charcuterie board, or even used as a sweet topping for cupcakes or cookies. It also makes for charming homemade gifts, so consider packagin extractg small batches in cute tins or cellophane bags.
Can I make this fudge without candy corn?
While the candy corn is the star, you can adapt this recipe. For a less Halloween-specific flavor, you could omit the candy corn and perhaps add a bit of vanilla bean paste or a touch of orange extract for a different citrusy sweetness. Alternatively, consider using other chopped candies like M&Ms or mini chocolate chips for a different texture and flavor profile in your fudge.

Candy Corn Fudge Recipe – Easy Fall Treat
A simple and festive candy corn fudge recipe, perfect for autumn gatherings. This smooth, creamy fudge features the iconic colors and sweet flavor of candy corn.
Ingredients
-
1½ cups candy corn
-
14 oz sweetened condensed milk
-
3 cups white baking chips
-
½ tsp vanilla extract
-
¼ cup butter
-
3-5 drops yellow food coloring
-
1-2 drops orange food coloring
Instructions
-
Step 1
In a double boiler or a heatproof bowl over simmering water, melt the butter and white baking chips, stirring until smooth (about 5-8 minutes). Remove from heat. -
Step 2
Stir in the sweetened condensed milk and vanilla extract until well combined and glossy. -
Step 3
Gently fold in the candy corn until just incorporated, being careful not to overmix. -
Step 4
Divide the fudge mixture into three bowls. Color one portion yellow (3-5 drops), another orange (1-2 drops), and leave the third white. Stir each until evenly colored. -
Step 5
Spoon alternating dollops of the colored fudge mixtures into an 8×8 inch pan lined with parchment paper. -
Step 6
Gently swirl the colors together with a knife or toothpick to create a marbling effect, being careful not to over-swirl. -
Step 7
Smooth the top of the fudge and refrigerate for at least 2-3 hours, or until firm. -
Step 8
Lift the fudge out of the pan using the parchment paper and cut into desired pieces.
Important Information
Nutrition Facts (Per Serving)
It is important to consider this information as approximate and not to use it as definitive health advice.
Allergy Information
Please check ingredients for potential allergens and consult a health professional if in doubt.

Leave a Comment