
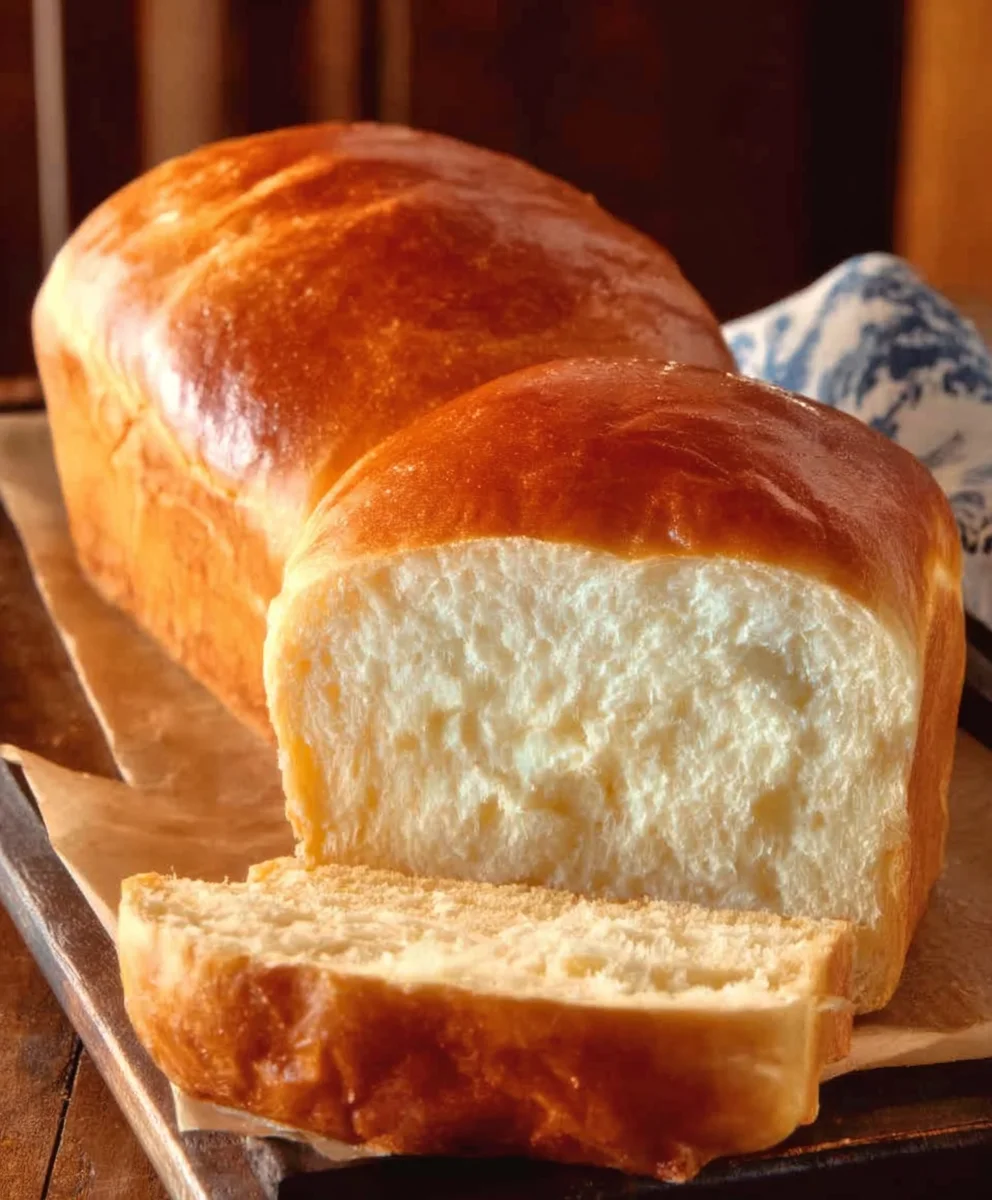
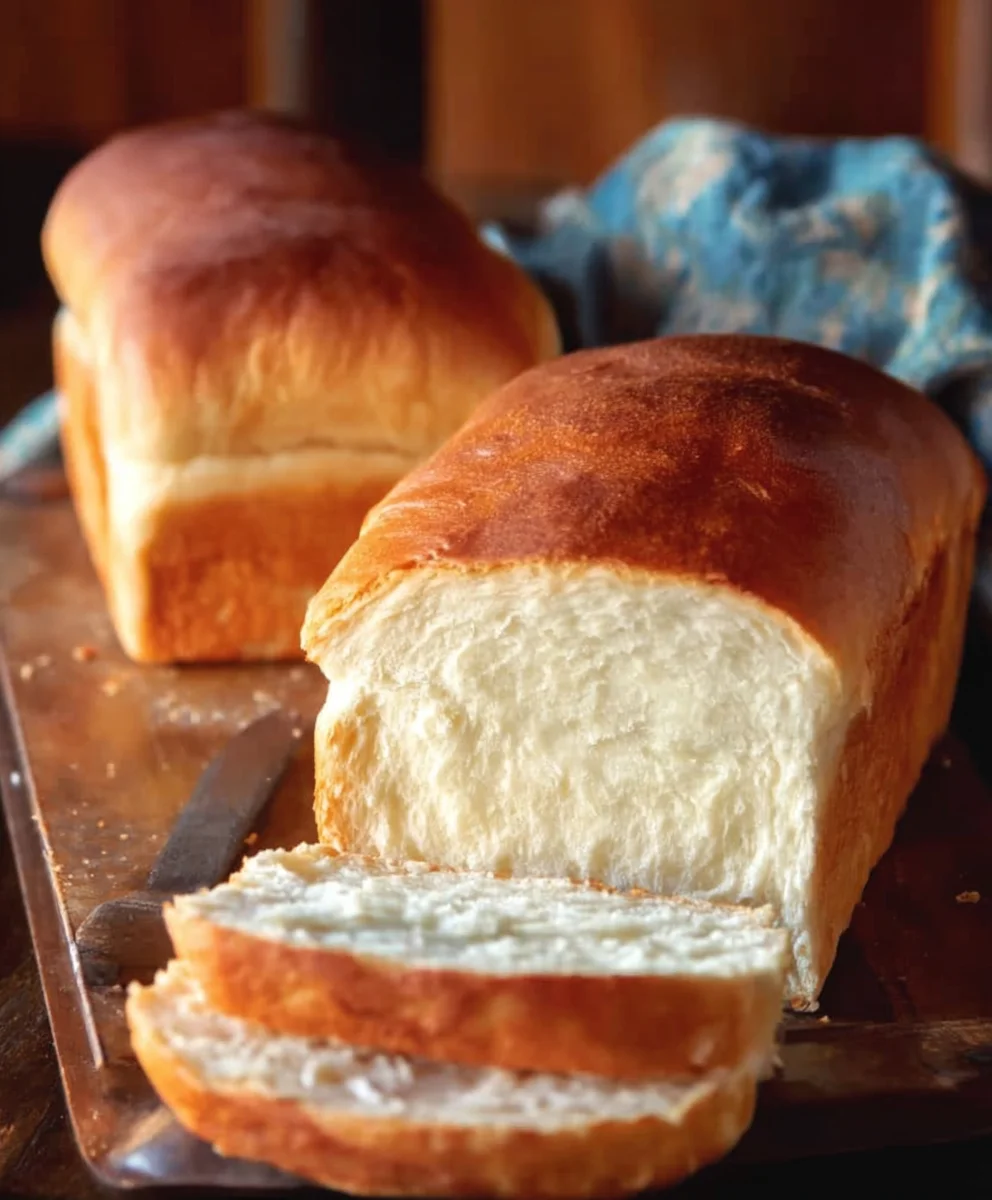
AMISH WHITE BREAD is more than just a recipe; it’s a comforting embrace, a nostalgic journey back to simpler times, and a culinary cornerstone for countless families. We all have those recipes that feel like they’ve been passed down through generations, carrying with them the warmth of a grandmother’s kitchen and the promise of pure, unadulterated flavor. This particular AMISH WHITE BREAD recipe has captured hearts and kitchens for a reason. Its unparalleled softness, its delicate, slightly sweet aroma, and its incredibly tender crum extractb make it utterly irresistible. What truly sets this AMISH WHITE BREAD apart is its beautiful simplicity. It relies on wholesome ingredients and time-honored techniques to create a loaf that is both rustic and elegant, perfect for everything from a hearty breakfast toast to a sophisticated sandwich base. Get ready to experience the magic of baking tradition firsthand.

Ingredients:
- 1 cup warm water, (110-120°F)
- ⅓ cup granulated sugar
- 1 packet (2 ¼ teaspoons) instant yeast
- 3 cups all-purpose flour
- ¾ teaspoon salt
- 2 tablespoons vegetable or canola oil
- 2 tablespoons unsalted butter, melted
Preparing the Dough
The journey to a perfect loaf of AMISH WHITE BREAD begin extracts with activating the yeast. In a large mixing bowl, I combine the warm water and granulated sugar. The water needs to be between 110°F and 120°F – too hot and it will kill the yeast, too cool and it won’t activate properly. You can test this by dipping a clean finger in; it should feel pleasantly warm, not hot. Next, I sprinkle the instant yeast over the water and sugar mixture. I give it a gentle stir just to ensure all the yeast granules are moistened. Then, I let it sit for about 5 to 10 minutes. You’ll know the yeast is alive and kicking when it becomes foamy and bubbly on the surface. This “blooming” process is a crucial visual cue that your bread will rise beautifully. If you don’t see any activity, it’s best to discard the mixture and start again with fresh yeast.
Once the yeast is bloomed, I add the all-purpose flour and salt to the same bowl. I use a wooden spoon or a sturdy spatugin extractto begin mixing everything together. The goal here is to incorporate all the dry ingredients with the wet until a shaggy dough starts to form. It might look a little lumpy and uneven at this stage, and that’s perfectly fine. Don’t worry about perfect smoothness just yet; we’ll get there.
Kneading and First Rise
Now comes the part where we develop the gluten structure that gives our AMISH WHITE BREAD its characteristic soft and chewy texture: kneading. I lightly flour a clean work surface – a countertop or a large cutting board works well. I then turn the shaggy dough out onto the floured surface. It will be quite sticky at first. Resist the urge to add too much extra flour at this stage, as this can result in a dry loaf. Instead, I use a bench scraper or my hands to help gather the doughgin extractgether.
I begin to knead by pushing the dough away from me with the heels of my hands, then folding it back over on itself, and turning it a quarter turn. I repeat this motion rhythmically, pushing, folding, and turning. Initially, the dough will be quite sticky and might cling to my hands and the surface. As I continue to knead, the dough will gradually become smoother, more elastic, and less sticky. This process typically takes about 8 to 10 minutes of consistent kneading. You’re looking for a dough that is smooth, pliable, and springs back slowly when gently poked with a finger.
After kneading, I lightly grease the mixing bowl with a little bit of the vegetable oil. I then place the kneaded dough into the bowl, turning it to coat all sides with the oil. This prevents the dough from drying out during its first rise. I cover the bowl tightly with plastic wrap or a clean kitchen towel. I then place the bowl in a warm, draft-free spot to rise. A slightly warm oven (turned off, of course!) or a sunny windowsill can be ideal. The dough should double in size, which typically takes about 1 to 1.5 hours, depending on the warmth of your environment.
Shaping and Second Rise
Once the dough has doubled in size and is puffy and light, it’s time to shape it. I gently punch down the dough to release the air that has accumulated during the first rise. I then turn it out onto a lightly floured surface again. I shape the dough into a smooth ball, making sure there are no major air pockets.
For a classic loaf pan shape, I flatten the ball of dough into a rough rectangle, about 8 inches wide. Then, I tightly roll the rectangle up lengthwise, like a jelly roll, pinching the seam closed at the end. I tuck the ends under to create a neat loaf shape. I then grease a standard 9×5 inch loaf pan generously with vegetable oil or butter, or line it with parchment paper. I carefully place the shaped dough seam-side down into the prepared pan.
Now, the dough needs to rise again. I cover the loaf pan loosely with plastic wrap or a clean kitchen towel. I let it rest in a warm place for another 30 to 60 minutes, or until the dough has risen about 1 inch above the rim of the pan. This second rise is essential for achieving a light and airy interior. Don’t let it overproof, or it might collapse during baking.
Baking Your AMISH WHITE BREAD
Preheating the oven is crucial for a good bake. About 15-20 minutes before the second rise is complete, I preheat my oven to 375°F (190°C). Once the dough has finished its second rise and is beautifully puffed, I carefully place the loaf pan into the preheated oven.
To give the crust a lovely golden sheen and a slightly richer flavor, I brush the top of the loaf with the melted unsalted butter just before it goes into the oven. This step is optional but highly recommended for that authentic homemade touch.
I bake the AMISH WHITE BREAD for approximately 30 to 35 minutes. You’ll know it’s done when the crust is a deep golden brown and the loaf sounds hollow when tapped on the bottom. If the crust starts to brown too quickly, you can loosely tent the loaf with aluminum foil for the last 10-15 minutes of baking.
Cooling and Enjoying
As soon as the bread comes out of the oven, I immediately remove it from the loaf pan and place it on a wire cooling rack. This is a very important step to prevent the bottom crust from becoming soggy from steam. Allowing the bread to cool completely on the wire rack ensures that the internal structure sets properly and that the crust maintains its delightful crispness. I resist the temptation to slice into it while it’s still hot – patience is a virtue when it comes to freshly baked bread! Once it’s completely cool, or at least mostly cooled, it’s ready to be sliced and enjoyed in all its fluffy, delicious glory.
Conclusion:
There you have it! Crafting your own delicious AMISH WHITE BREAD is a rewarding experience, bringin extractg a taste of tradition right into your kitchen. This recipe yields a wonderfully soft, slightly sweet loaf that’s perfect for any occasion. We’ve explored the simple steps to create this staple, emphasizing the joy of baking from scratch. Whether you’re a seasoned baker or just starting out, don’t be intimidated – the process is quite straightforward and the results are truly worth it.
For serving, the AMISH WHITE BREAD is incredibly versatile. It’s fantastic toasted and slathered with butter, used for classic sandwiches like beef ham and cheese or PB&J, or even served alongside hearty soups and stews. For variations, consider adding a sprinkle of herbs like rosemary or thyme to the dough for an aromatic twist, or perhaps a touch of honey to the dough for an even sweeter, richer flavor profile. Don’t be afraid to experiment and make this recipe your own!
Frequently Asked Questions:
Q: How can I ensure my AMISH WHITE BREAD has a soft crust?
A: To achieve a soft crust, try brushing the top of the loaf with melted butter or milk right after it comes out of the oven. You can also cover the bread loosely with a clean kitchen towel as it cools. Avoid over-baking, which can lead to a crispier crust.
Q: Can I freeze the AMISH WHITE BREAD?
A: Absolutely! Once the AMISH WHITE BREAD has cooled completely, you can wrap it tightly in plastic wrap followed by aluminum foil, or place it in a freezer-safe bag. It will keep well in the freezer for up to 2-3 months. Thaw at room temperature or gently toast slices directly from frozen.
Amish White Bread – Simple Delicious Homemade Recipe
A simple and delicious recipe for homemade Amish white bread, resulting in a soft, fluffy, and perfectly golden loaf.
Ingredients
-
1 cup warm water, (110-120°F)
-
⅓ cup granulated sugar
-
1 packet (2 ¼ teaspoons) instant yeast
-
3 cups all-purpose flour
-
¾ teaspoon salt
-
2 tablespoons vegetable or canola oil
-
2 tablespoons unsalted butter, melted
Instructions
-
Step 1
Activate the yeast: In a large mixing bowl, combine warm water (110-120°F) and granulated sugar. Sprinkle instant yeast over the mixture, stir gently, and let sit for 5-10 minutes until foamy and bubbly. -
Step 2
Prepare the dough: Add all-purpose flour and salt to the bloomed yeast mixture. Mix with a wooden spoon or spatula until a shaggy dough forms. -
Step 3
Knead the dough: Turn the shaggy dough onto a lightly floured surface and knead for 8-10 minutes until smooth, elastic, and less sticky. Lightly grease a mixing bowl with oil, place the dough in it, turn to coat, cover, and let rise in a warm place for 1-1.5 hours, or until doubled in size. -
Step 4
Shape the bread: Punch down the risen dough, turn it onto a lightly floured surface, and shape it into a smooth ball. Flatten into a rectangle, roll up tightly like a jelly roll, pinch the seam, and tuck the ends under. Place seam-side down in a greased 9×5 inch loaf pan. -
Step 5
Second rise: Cover the loaf pan loosely and let the dough rise in a warm place for 30-60 minutes, or until it has risen about 1 inch above the rim of the pan. -
Step 6
Bake the bread: Preheat oven to 375°F (190°C). Brush the top of the loaf with melted butter (optional). Bake for 30-35 minutes, until the crust is deep golden brown and the loaf sounds hollow when tapped on the bottom. Tent with foil if browning too quickly. -
Step 7
Cool and enjoy: Immediately remove the bread from the pan and place on a wire cooling rack to cool completely before slicing and serving.
Important Information
Nutrition Facts (Per Serving)
It is important to consider this information as approximate and not to use it as definitive health advice.
Allergy Information
Please check ingredients for potential allergens and consult a health professional if in doubt.


Leave a Comment