
Strawberry Lemonade Popsicles are more than just a frozen treat; they’re a vibrant burst of sunshine in every bite! Who doesn’t love the nostalgic simplicity of a perfectly chilled popsicle, especially when it captures the essence of summer’s best flavors? These delightful treats are adored for their refreshing tang of lemon perfectly balanced with the sweet, juicy notes of fresh strawberries. They evoke memories of carefree days, backyard barbecues, and cooling off on a sweltering afternoon. What makes our Strawberry Lemonade Popsicles truly special is the way we elevate this classic by using real, ripe strawberries and freshly squeezed lemon juice, avoiding any artificial flavors or colors. This dedication to natural ingredients ensures a pure, unadulterated taste that will have you reaching for another one before the first has even melted. Get ready to whip up a batch that will become your go-to summer indulgence.

Ingredients:
- 1 container (around 59 fl oz or 1.75 liters) Simply Lemonade
- 1 cup fresh strawberries, hulled and finely diced
- 1 tablespoon granulated sugar
Preparing the Popsicle Base
Step 1: Sweeten the Strawberries
First, we need to prepare our sweet strawberry element. Take your 1 cup of fresh strawberries. Ensure they are washed thoroughly and the green tops (hulls) are removed. Then, finely dice them. The smaller the dice, the more evenly they’ll distribute throughout your popsicles. In a small bowl, combine the diced strawberries with the 1 tablespoon of granulated sugar. Gently stir them together. The sugar will start to draw out some of the natural juices from the strawberries, creating a lovely, slightly syrupy strawberry mixture. Let this sit for about 10-15 minutes while you proceed with the next step. This resting period allows the sugar to work its magic and slightly macerate the berries, intensifying their flavor and sweetness.
Step 2: Combining Lemonade and Strawberry Mixture
Now, let’s bring our two main components together. Open your container of Simply Lemonade. For this recipe, we’re using the entire container, which is typically around 59 fluid ounces or 1.75 liters. This provides a good volume for a standard batch of popsicles. Pour the lemonade into a large pitcher or a clean bowl. Next, carefully add the sweetened strawberry mixture into the lemonade. You’ll notice that some juice has accumulated at the bottom of the strawberry bowl – be sure to scrape all of that deliciousness into the lemonade as well.
Mixing and Freezing
Step 3: Gently Stirring for Even Distribution
This is a crucial step for achieving those beautiful swirls and pockets of strawberry goodness in your finished popsicles. Use a long spoon or a whisk to gently stir the lemonade and strawberry mixture. The goal here isn’t to completely blend everything into a uniform pink liquid. Instead, you want to lightly incorporate the strawberries and their syrupy juice into the lemonade. Think of it as creating gentle swirls. You should still be able to see distinct pieces of diced strawberry suspended in the liquid. Avoid over-stirring, as this can break down the strawberries too much and make them harder to see once frozen. We want those delightful little bursts of fruit!
Step 4: Filling the Popsicle Molds
Once you’re happy with the gentle swirling of the strawberries and lemonade, it’s time to fill your popsicle molds. If you’re using traditional popsicle molds, pour the mixture directly into each cavity. If you have a more intricate mold, such as those with individual plastic sleeves, you might find it easier to use a funnel or a pitcher with a spout to fill them neatly. Be careful not to overfill the molds, as the liquid will expand slightly when it freezes. Leave a small amount of space at the top of each mold – typically about a quarter of an inch. This will prevent your popsicles from cracking or overflowing during the freezing process. Ensure that each mold gets a good distribution of the diced strawberries. You might want to give the mixture a final gentle stir in the pitcher before filling each mold to make sure those strawberry pieces are evenly distributed.
Step 5: Freezing to Perfection
Now comes the most patient part: the freezing. Once all your molds are filled, carefully place them onto a flat surface in your freezer. It’s important that they are level so that the popsicles freeze evenly. Place them on a shelf where they won’t be bumped or jostled. For optimal freezing, allow your Strawberry Lemonade Popsicles to freeze completely for at least 4 to 6 hours. However, for the best results and to ensure they are fully solid, I recommend leaving them in the freezer overnight. Before attempting to remove the popsicles, you might find it helpful to run the outside of the mold under warm water for a few seconds. This will loosen them and make them easier to slide out without breaking. Enjoy your refreshing homemade treat!

Conclusion:
You’ve now got all the secrets to creating the most delightful Strawberry Lemonade Popsicles! This recipe is wonderfully simple, perfect for a refreshing treat on a warm day, and guaranteed to be a hit with family and friends. We’ve walked through the straightforward steps, from prepping the fresh strawberries to achieving that perfect balance of sweet and tart with the lemonade. Don’t be afraid to get creative; the beauty of these Strawberry Lemonade Popsicles lies in their adaptability. Enjoy them as a guilt-free dessert, a cool-down after outdoor activities, or a festive addition to any summer gathering. We encourage you to try this recipe and share your delicious creations – the joy of homemade popsicles is meant to be savored and shared!
Frequently Asked Questions:
Q: Can I use frozen strawberries instead of fresh for my Strawberry Lemonade Popsicles?
Absolutely! If you opt for frozen strawberries, you might need to thaw them slightly before blending to ensure a smooth consistency. The flavor will still be fantastic, and it can be a convenient option when fresh strawberries aren’t in season. Just ensure they are fully pureed.
Q: What if my Strawberry Lemonade Popsicles are too tart or too sweet?
The beauty of making your own Strawberry Lemonade Popsicles is you can adjust the sweetness and tartness to your liking. If they’re too tart, simply add a touch more sweetener (like honey, agave, or sugar) and blend again. If they’re too sweet, a squeeze of extra fresh lemon juice can often balance it out perfectly. Taste your mixture before freezing and adjust as needed.
Q: How long do Strawberry Lemonade Popsicles typically take to freeze?
Generally, your Strawberry Lemonade Popsicles will need at least 4-6 hours to freeze completely. For best results and to ensure they are solid and easy to remove from the molds, it’s ideal to leave them overnight in the freezer. The freezing time can vary slightly depending on the power of your freezer and the size of your popsicle molds.
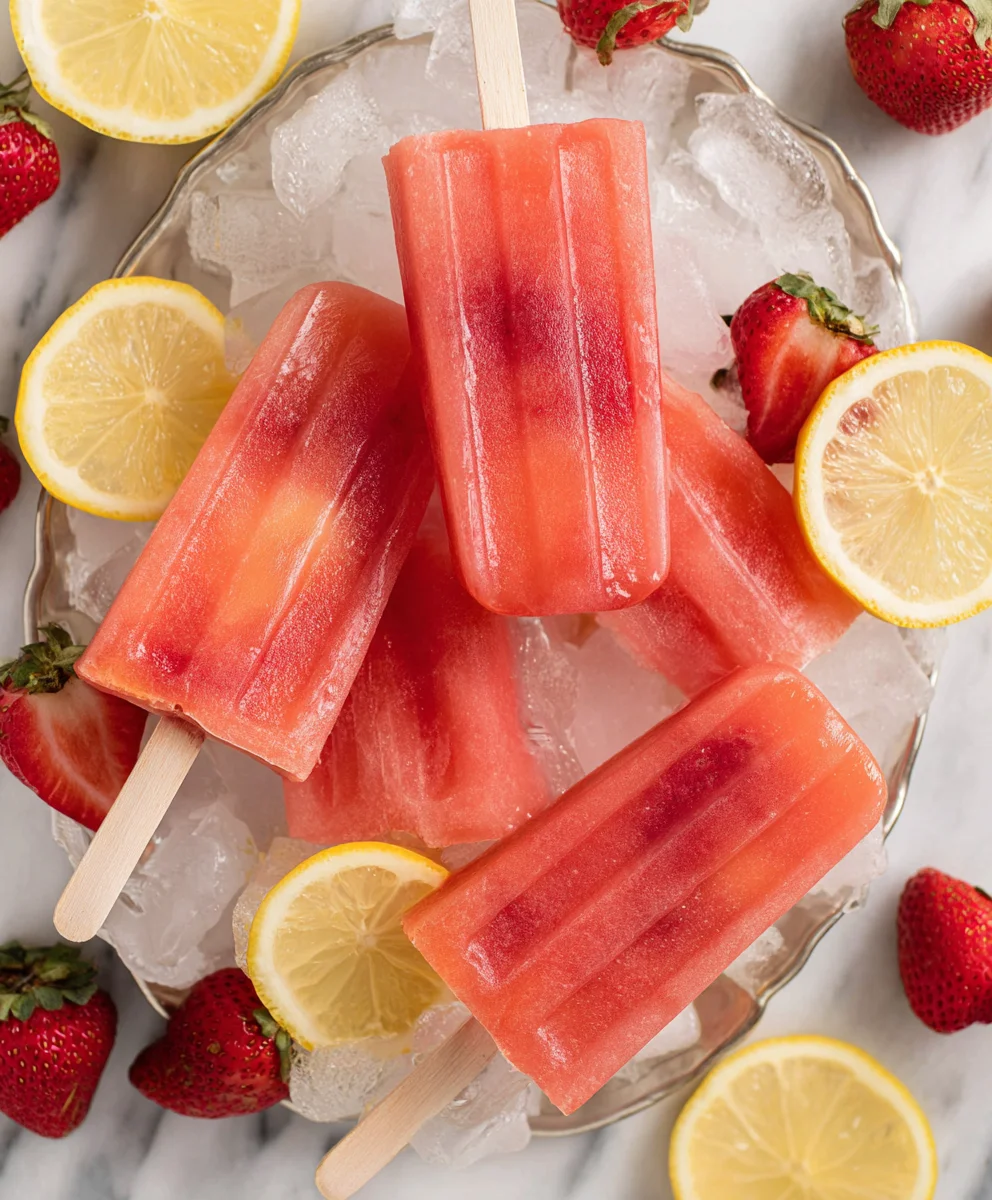
Strawberry Lemonade Popsicles
A refreshing and easy-to-make summer treat combining tart lemonade with sweet strawberries.
Ingredients
-
1 container (59 fl oz) Simply Lemonade
-
1 cup fresh strawberries, hulled and finely diced
-
1 tablespoon granulated sugar
-
Water (if needed for mold release)
-
Popsicle molds
Instructions
-
Step 1
Wash strawberries, remove hulls, and finely dice. Combine diced strawberries with sugar in a small bowl. Gently stir and let sit for 10-15 minutes to macerate. -
Step 2
Pour the entire container of Simply Lemonade into a large pitcher or bowl. Add the sweetened strawberry mixture, including any accumulated juice, to the lemonade. -
Step 3
Gently stir the lemonade and strawberry mixture with a spoon or whisk. Avoid over-stirring; the goal is to create light swirls and distribute the strawberry pieces, not to create a uniform color. -
Step 4
Pour the mixture into popsicle molds, leaving about a quarter of an inch of space at the top of each mold to allow for expansion during freezing. Ensure each mold gets a good distribution of diced strawberries. -
Step 5
Place the filled molds on a level surface in the freezer. Freeze for at least 4-6 hours, or preferably overnight, until completely solid. To release, briefly run the outside of the mold under warm water.
Important Information
Nutrition Facts (Per Serving)
It is important to consider this information as approximate and not to use it as definitive health advice.
Allergy Information
Please check ingredients for potential allergens and consult a health professional if in doubt.

Leave a Comment