
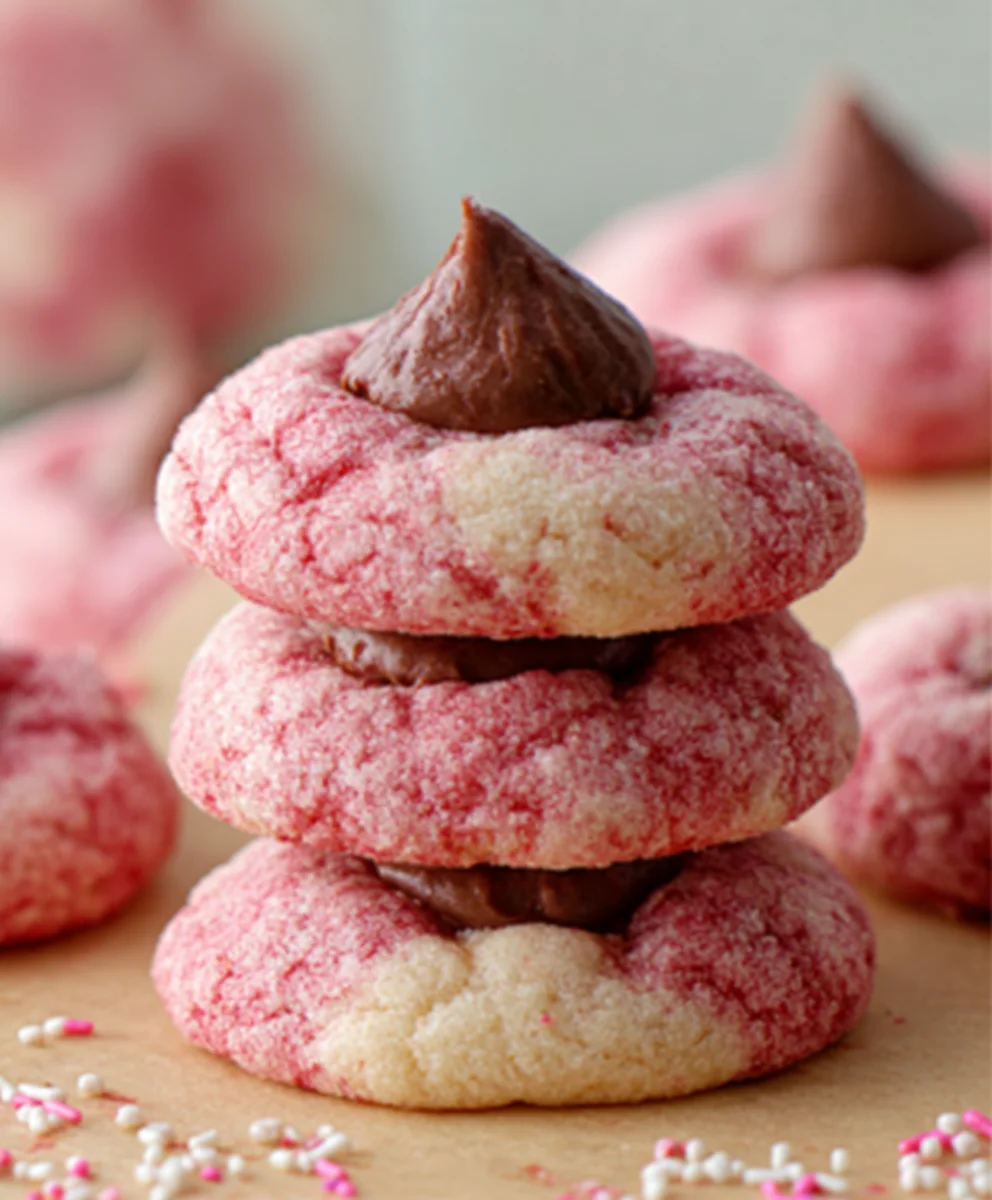
Strawberry Kiss Cookies are more than just a sweet treat; they’re a delightful burst of sunshine and sweetness that instantly transports you to happy memories. Who doesn’t love a cookie that’s as beautiful as it is delicious? The delicate pink hue, often achieved with a hint of strawberry extract or finely crushed freeze-dried strawberries, makes these cookies visually stunning, perfect for celebrations, bake snon-alcoholic ales, or simply brightening up an ordinary afternoon. What truly sets Strawberry Kiss Cookies apart is their unique texture – a delightful balance between a slightly crisp exterior and a tender, melt-in-your-mouth center. They’re incredibly versatile, too, making them a fantastic canvas for your creativity. You can easily adapt the flavor by adding a touch of lemon zest or a swirl of white chocolate. Get ready to fall in love with this simple yet sensational recipe that guarantees smiles with every bite.

Ingredients:
- 1 box (15.25 oz) strawberry cake mix
- 8 tablespoons (1/2 cup) butter, melted and slightly cooled
- 1 large egg
- 4 ounces cream cheese, softened
- Optional: powdered sugar or pink granulated sugar for rolling
- 30 chocolate Hershey’s Kisses, unwrapped
Making the Strawberry Kiss Cookie Dough
Mixing the Base
The foundation of these delightful Strawberry Kiss Cookies starts with a convenient strawberry cake mix. This is what gives them their vibrant color and a wonderfully sweet, fruity flavor profile right from the box. In a large mixing bowl, I like to add the entire contents of the strawberry cake mix. To this, we’ll introduce the richness and binding power. Pour in the 8 tablespoons of melted butter. Ensure the butter has cooled slightly from being melted; we don’t want it too hot as it could start to cook the egg prematurely. Next, crack in the single large egg. At this stage, it might seem a bit dry and crum extractbly, which is perfectly normal. We’re essentially creating a base that will soon come together.
Incorporating the Cream Cheese
Now comes the secret ingredient that elevates these cookies from good to absolutely divine: cream cheese. The 4 ounces of softened cream cheese are crucial for adding a delightful tenderness and a subtle tang that beautifully complements the strawberry flavor. Make sure your cream cheese is truly softened – leave it out on the counter for about an hour before you begin extract, or gently microwave it in 10-second bursts until it’s pliable but not melted. Add the softened cream cheese to the bowl with the cake mix, butter, and egg.
gin extract>Bringing it All Together
With all the primary ingredients in the bowl, it’s time to combine them into a cohesive dough. I typically start by stirring with a sturdy spoon or a spatula until the ingredients are just starting to come together. Once it becomes too thick to stir easily, I switch to using my hands. Don’t be afraid to get a little messy; it’s the most effective way to ensure everything is thoroughly incorporated. Knead the dough gently in the bowl. You are looking for a smooth, slightly sticky dough that holds its shape when squeezed. It should feel soft and pliable. If the dough seems too drum extractand crumbly, you can add a teaspoon of milk or water at a time, mixing well after each addition, until it reaches the desired consistency. Conversely, if it feels too sticky to handle, you can add a tablespoon of your strawberry cake mix.
Shaping and Baking the Cookies
Prepping Your Baking Sheets
Before we start shaping, it’s essential to prepare your baking sheets. Line them with parchment paper or silicone baking mats. This not only prevents the cookies from sticking but also makes for easier cleanup. I usually bake 12 cookies at a time, allowing for enough space between them so they don’t spread into each other during baking. Preheat your oven to 350°F (175°C). This is a standard temperature for most cookies and will ensure they bake evenly.
Forming the Cookie Balls
Now for the fun part – shaping the cookies! The dough is quite soft, so I find the easiest way to manage it is by using a small cookie scoop or a tablespoon to portion out the dough. Roll each portion into a neat ball, about 1-inch in diameter. If you’re planning to roll the cookies in powdered sugar or pink granulated sugar before baking (which is highly recommended for an extra touch of sweetness and visual appeal), do that now. Gently roll each cookie ball in your chosen coating until it’s evenly covered. This step adds a delightful crunch and sweetness that perfectly contrasts with the soft cookie. Place the coated cookie balls onto the prepared baking sheets, leaving about 2 inches between each one.
Creating the Kiss Indentation
This is where the “kiss” in Strawberry Kiss Cookies comes to life. Gently press your thumb into the center of each cookie dough ball, creating a small indentation. You don’t want to go all the way through the dough, just create a shallow well. This indentation is where our Hershey’s Kiss will nestle. It also helps the cookie bake more evenly. If the dough starts to stick to your thumb, you can lightly dip your thumb in a little of the optional coating or a tiny bit of flour.
Baking to Perfection
Carefully place the prepared baking sheets into the preheated oven. Bake for 9 to 12 minutes. The exact baking time will depend on your oven, so keep a close eye on them. You’re looking for the edges to be set and lightly golden, while the centers should still look slightly soft and puffy. They will continue to firm up as they cool. Overbaking can result in dry cookies, so it’s better to err on the side of slightly underbaked for maximum tenderness.
Adding the Hershey’s Kisses
As soon as the cookies come out of the oven, while they are still warm and soft, it’s time to add the star topping. Gently press one unwrapped Hershey’s Kiss into the indentation you made on each cookie. The residual heat from the cookie will slightly soften the chocolate of the Kiss, allowing it to adhere beautifully and create that iconic look. Work quickly, as thegin extractokies will begin to set as they cool.
Cooling and Enjoying
Let the cookies cool on the baking sheets for about 5 minutes before attempting to move them. This allows them to firm up enough so they don’t break. Then, carefully transfer the Strawberry Kiss Cookies to a wire cooling rack to cool completely. Once cooled, the chocolate Kisses will be firm, and the cookies will be perfectly tender and bursting with strawberry flavor. They are best enjoyed at room temperature.
Conclusion:
There you have it – a foolproof guide to creating delightful Strawberry Kiss Cookies! We’ve walked through each step, from creaming the butter and sugar to that crucial chilling period, ensuring your cookies hold their charming shape and burst with delicate strawberry flavor. These cookies are perfect for any occasion, from a casual afternoon treat to a show-stopping addition to your next dessert platter. Don’t be afraid to get creative with your decorating; a simple dusting of powdered sugar or a light drizzle of white chocolate can elevate their visual appeal even further.
Now, let’s tackle a few common questions you might have:
FAQs:
Can I use fresh strawberries instead of freeze-dried for my Strawberry Kiss Cookies?
While fresh strawberries offer a wonderful flavor, they contain a lot of moisture, which can make your Strawberry Kiss Cookies spread too much and become flat. Freeze-dried strawberries are ideal because they provide intense flavor without adding extra liquid. If you absolutely must use fresh, I’d recommend pureeing them and cooking down the puree to reduce the water content significantly before adding it to the dough, but be aware this might alter the cookie’s texture.
How should I store my Strawberry Kiss Cookies?
Once completely cooled, store your Strawberry Kiss Cookies in an airtight container at room temperature. They should stay fresh and delicious for up to 5 days. If you want to keep them longer, you can freeze them! Place them in a single layer on a baking sheet until firm, then transfer them to a freezer-safe bag or container. They can be frozen for up to 2 months.
My Strawberry Kiss Cookies spread too much. What did I do wrong?
Several factors can contribute to spreading. Ensure your butter isn’t too soft or melted – it should be softened but still hold its shape. Chilling the dough is also critical; this solidifies the fat, preventing excessive spreading. Overmixing the dough after adding the flour can also develop gluten, leading to spread. Lastly, make sure your oven temperature is accurate; an oven that’s too hot can cause cookies to spread before they set.
I hope you enjoy baking and sharing these wonderful Strawberry Kiss Cookies as much as I do. Happy baking!

Strawberry Kiss Cookies – Sweet & Simple Dessert
Delightful and easy-to-make strawberry cookies with a Hershey’s Kiss center, perfect for any occasion.
Ingredients
-
1 box (15.25 oz) strawberry cake mix
-
8 tablespoons (1/2 cup) butter, melted and slightly cooled
-
1 large egg
-
4 ounces cream cheese, softened
-
Powdered sugar or pink granulated sugar, for rolling (optional)
-
30 chocolate Hershey’s Kisses, unwrapped
Instructions
-
Step 1
In a large bowl, combine the strawberry cake mix, melted butter, and egg. Mix until a crumbly dough forms. -
Step 2
Add the softened cream cheese to the bowl and mix until a smooth, slightly sticky dough comes together. Knead gently with your hands. -
Step 3
Preheat oven to 350°F (175°C). Line baking sheets with parchment paper. Roll dough portions into 1-inch balls. If desired, roll balls in powdered sugar or pink granulated sugar. -
Step 4
Press a small indentation into the center of each cookie ball with your thumb. -
Step 5
Bake for 9-12 minutes, or until edges are lightly golden and centers are still soft. -
Step 6
While still warm, gently press one unwrapped Hershey’s Kiss into the indentation of each cookie. -
Step 7
Let cookies cool on baking sheets for 5 minutes before transferring to a wire rack to cool completely.
Important Information
Nutrition Facts (Per Serving)
It is important to consider this information as approximate and not to use it as definitive health advice.
Allergy Information
Please check ingredients for potential allergens and consult a health professional if in doubt.

Leave a Comment