
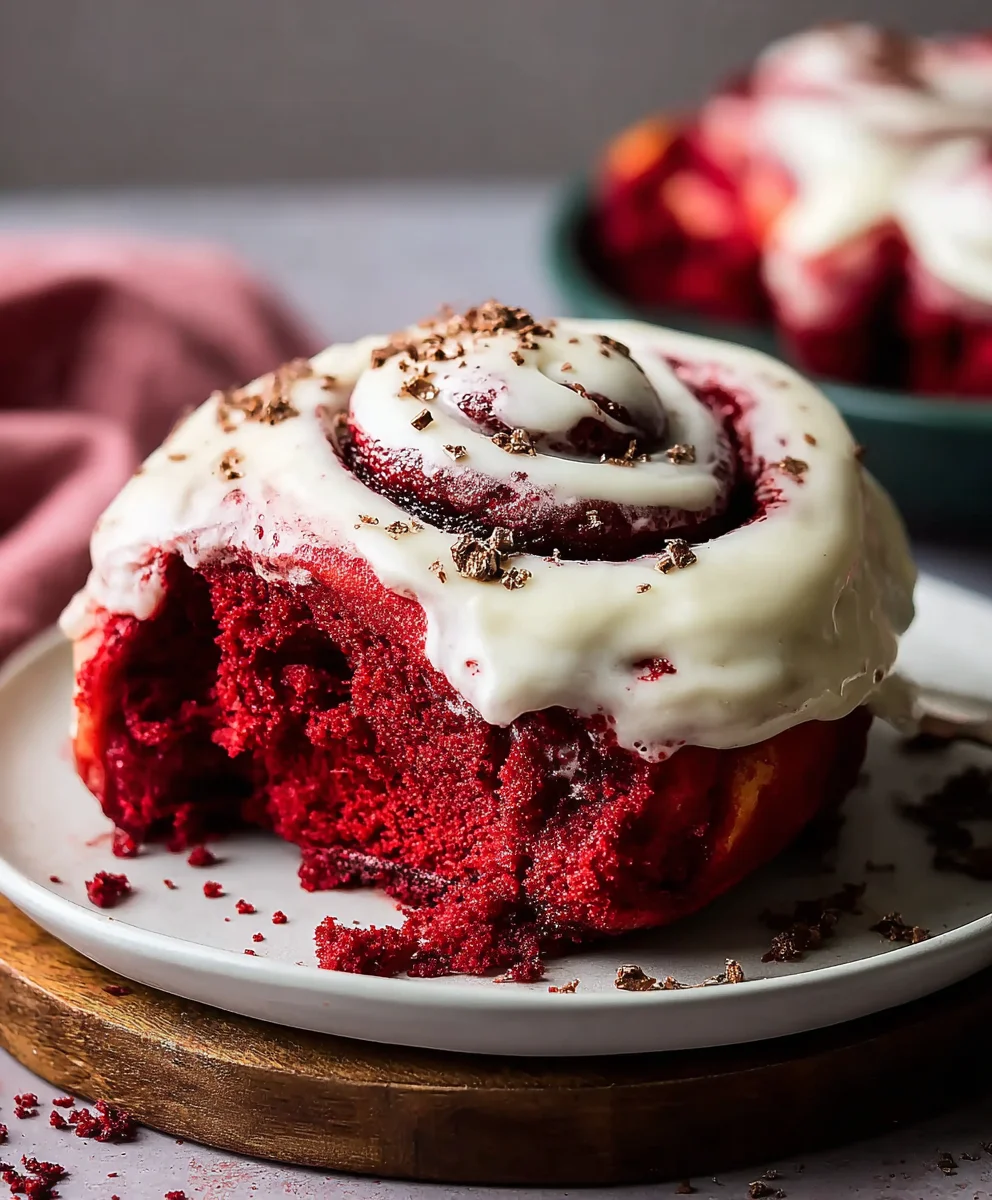
Red Velvet Cinnamon Rolls From Scratch are not just a breakfast treat; they’re an experience. Imagin extracte sinking your teeth into a swirl of tender, crimson dough, infused with the unmistakable richness of cocoa and a hint of tangy buttermilk, all generously coated in a warm, fragrant cinnamon-sugar filling. This isn’t your average cinnamon roll. It’s a decadent upgrade, blending the classic comfort of a perfectly spiced roll with the dramatic allure of red velvet cake. People fall in love with these because they offer a delightful surprise at every bite – a beautiful contrast between the vibrant red hue and the comforting cinnamon. What truly makes these Red Velvet Cinnamon Rolls From Scratch special is the perfect balance of flavors and textures, creating a dessert-worthy breakfast that will leave everyone asking for seconds. They’re also surprisingly achievable when made from scratch, proving that extraordinary treats don’t always require a bakery box.

Ingredients:
- ¼ cup bread flour (for the tangzhong)
- ¾ cup water (for the tangzhong)
- ⅓ cup whole milk, room temperature
- ⅓ cup heavy cream, room temperature
- 1 tablespoon white vinegar
- 3⅔ cups bread flour (for the main dough)
- ⅓ cup granulated sugar
- 1½ tablespoons cocoa powder
- 2 teaspoons instant yeast
- 1 teaspoon fine sea salt
- 1 egg, room temperature
- 1 teaspoon vanilla extract
- ½-1 teaspoon red gel food coloring (adjust for desired intensity)
- 6 tablespoons unsalted butter, cool room temperature (for the dough)
- ½ cup unsalted butter, room temperature (for the filling)
- 1 cup powdered sugar (for the frosting)
- ¼ cup cream cheese, softened (for the frosting)
- 2 tablespoons whole milk (for the frosting)
- ½ teaspoon vanilla extract (for the frosting)
Making the Tangzhong: The Secret to Incredibly Soft Rolls
This recipe starts with a tangzhong, a cooked flour-and-liquid paste that is the key to achieving exceptionally soft and fluffy baked goods. It gelatinizes the starches in the flour, allowing them to absorb more liquid and retain moisture during baking.
Step 1: Prepare the Tangzhong
In a small saucepan, whisk together the ¼ cup of bread flour and ¾ cup of water until no lumps remain. Place the saucepan over medium-low heat. Continuously stir the mixture with a whisk or spatula. You’ll notice it will start to thicken and become quite pasty, resembling a translucent glue. This process usually takes about 3-5 minutes. Once it has thickened to this consistency, remove it from the heat and let it cool completely. You can speed up this cooling process by transferring it to a clean bowl and covering it with plastic wrap, pressing the wrap directly onto the surface to prevent a skin from forming.
Assembling the Red Velvet Dough
Now we move on to creating the vibrant red velvet dough, which will form the base of our delightful cinnamon rolls.
Step 2: Combine Wet Ingredients and Activate Yeast
In the bowl of your stand mixer (or a large mixing bowl if you’re kneading by hand), combine the room-temperature whole milk, room-temperature heavy cream, and the tablespoon of white vinegar. Let this mixture sit for about 5 minutes. This will slightly curdle the milk and cream, creating a “buttermilk-like” effect that adds tenderness to the dough. After it has rested, whisk in the egg, the teaspoon of vanilla extract, and the ½-1 teaspoon of red gel food coloring. Start with ½ teaspoon and add more if you desire a deeper red hue. Stir everything together until well combined and the color is uniform. Sprinkle the instant yeast over this liquid mixture and give it a gentle stir. Let it sit for another 5-10 minutes until it becomes foamy and bubbly. This indicates that the yeast is active and ready to work its magic.
Step 3: Incorporate Dry Ingredients and Begin extract Kneading
Add the cooled tangzhong paste to the wet ingredients in your mixer bowl. Then, add the 3⅔ cups of bread flour, ⅓ cup of granulated sugar, 1½ tablespoons of cocoa powder, and 1 teaspoon of fine sea salt. If using a stand mixer, attach the dough hook. Start mixing on low speed until the ingredientsgin extractst begin to come together into a shaggy dough. Once the dough starts to form, gradually add the 6 tablespoons of cool, room-temperature unsalted butter, cutting it into smaller pieces. Continue to mix on low speed until all the butter is incorporated.
Step 4: Knead the Dough to Perfection
Once the butter is fully integrated, increase the mixer speed to medium-low (or turn the dough out onto a lightly floured surface if kneading by hand). Knead the dough for about 8-10 minutes. The dough should become smooth, elastic, and less sticky. It will feel slightly tacky but shouldn’t adhere excessively to your fingers. If it feels too wet, add a tablespoon of bread flour at a time. If it feels too dry, add a teaspoon of water at a time. The goal is a soft, pliable dough that has developed good gluten structure.
Proofing and Shaping the Rolls
Thegin extractiting game begins! Proper proofing is crucial for achieving light and airy cinnamon rolls.
Step 5: First Rise and Shaping the Filling
Lightly grease a clean large bowl with a little oil or cooking spray. Place the kneaded dough into the bowl, turning it to coat lightly. Cover the bowl tightly with plastic wrap or a clean kitchen towel. Let the dough rise in a warm place for 1 to 1.5 hours, or until it has doubled in size. While the dough is rising, prepare the filling by creaming together the ½ cup of room-temperature unsalted butter with the powdered sugar, ¼ cup of cream cheese, 2 tablespoons of whole milk, and ½ teaspoon of vanilla extract in a medium bowl. Beat until smooth and well combined. This will create a rich, creamy filling for your red velvet rolls.
Step 6: Shaping and Second Rise
Once the dough has doubled, gently punch it down to release the air. Turn the dough out onto a lightly floured surface. Roll the dough into a large rectangle, approximately 12×18 inches. Spread the prepared cream cheese filling evenly over the surface of the dough, leaving a ½-inch border along one of the long edges. Starting from the opposite long edge, tightly roll up the dough into a log. Pinch the seam to seal it. Using a sharp knife or dental floss, cut the log into 12 equal-sized rolls. Arrange the rolls in a greased 9×13 inch baking dish, ensuring they have a little space between them to expand. Cover the dish loosely with plastic wrap or a clean kitchen towel and let the rolls rise again in a warm place for another 30-45 minutes, or until they are noticeably puffed up.
Baking and Frosting Your Red Velvet Masterpieces
The final steps to culinary perfection!
Step 7: Baking the Rolls
Preheat your oven to 375°F (190°C). Once the rolls have completed their second rise, remove the plastic wrap. Bake for 20-25 minutes, or until the tops are lightly golden brown and the centers are cooked through. If the tops start to brown too quickly, you can loosely tent the dish with aluminum foil. Let the rolls cool in the baking dish for about 10 minutes before transferring them to a wire rack to cool further while you prepare the frosting.
Step 8: Whipping Up the Cream Cheese Frosting
While the rolls are cooling slightly, prepare the frosting. In a medium bowl, cream together the softened cream cheese, remaining softened butter (if any), powdered sugar, milk, and vanilla extract until smooth and creamy. Add more milk, a teaspoon at a time, if you prefer a thinner consistency.
Step 9: Frosting and Serving
Once the rolls have cooled to your desired temperature (they are delicious warm, but not piping hot), generously spread the cream cheese frosting over the tops of the red velvet cinnamon rolls. You can do this while they are still in the baking dish or once they’ve been transferred to a wire rack. Serve immediately and enjoy the wonderfully soft texture and decadent flavor of your homemade Red Velvet Cinnamon Rolls From Scratch.

Conclusion:
There you have it – your guide to creating delightful Red Velvet Cinnamon Rolls From Scratch! We’ve walked through each step, from the rich, velvety dough to the tangy cream cheese frosting, ensuring you achieve perfect results. These rolls are more than just a treat; they’re an experience. The vibrant color and subtle cocoa notes, perfectly complemented by the warmth of cinnamon and the sweet tang of the frosting, make them a showstopper for any occasion. Whether it’s a special brunch, a holiday gathering, or just a craving for something extraordinary, these Red Velvet Cinnamon Rolls From Scratch are sure to impress.
For serving suggestions, I love them warm, straight from the oven, with a generous dollop of that cream cheese frosting. They pair beautifully with a hot cup of coffee or a glass of cold milk. If you’re looking to switch things up, consider adding a sprinkle of mini chocolate chips to the filling, or try a drizzle of white chocolate ganache instead of the cream cheese frosting for an extra decadent touch. Don’t be afraid to experiment and make these Red Velvet Cinnamon Rolls From Scratch your own!
I truly hope you enjoy making and devouring these incredible Red Velvet Cinnamon Rolls From Scratch. They are a labor of love, but every bite is worth it. Happy baking!
Frequently Asked Questions:
Q: Can I make the dough for these Red Velvet Cinnamon Rolls From Scratch ahead of time?
Yes, absolutely! You can prepare the dough, let it do its first rise, punch it down, and then refrigerate it overnight. In the morning, let it sit at room temperature for about 30 minutes before shaping and baking. This makes morning baking much easier!
Q: My red velvet color isn’t as vibrant as I expected. What did I do wrong?
The vibrancy of the red color can depend on the quality and brand of your red food coloring. For a richer hue, you might need to use a gel-based food coloring, as they are more concentrated. Also, remember that the cocoa powder can slightly dull the red. Ensure you’re using just the amount called for in the recipe to get the best balance of flavor and color.
Red Velvet Cinnamon Rolls From Scratch – Easy Recipe
Incredibly soft and fluffy red velvet cinnamon rolls made from scratch with an easy tangzhong method and a decadent cream cheese frosting.
Ingredients
-
¼ cup bread flour (for the tangzhong)
-
¾ cup water (for the tangzhong)
-
⅓ cup whole milk, room temperature
-
⅓ cup heavy cream, room temperature
-
1 tablespoon white vinegar
-
3⅔ cups bread flour (for the main dough)
-
⅓ cup granulated sugar
-
1½ tablespoons cocoa powder
-
2 teaspoons instant yeast
-
1 teaspoon fine sea salt
-
1 egg, room temperature
-
1 teaspoon vanilla extract
-
½-1 teaspoon red gel food coloring
-
6 tablespoons unsalted butter, cool room temperature (for the dough)
-
½ cup unsalted butter, room temperature (for the filling)
-
1 cup powdered sugar (for the frosting)
-
¼ cup cream cheese, softened (for the frosting)
-
2 tablespoons whole milk (for the frosting)
-
½ teaspoon vanilla extract (for the frosting)
Instructions
-
Step 1
Prepare the Tangzhong: In a small saucepan, whisk together ¼ cup bread flour and ¾ cup water until smooth. Cook over medium-low heat, stirring constantly, for 3-5 minutes until thick and pasty. Remove from heat and let cool completely. -
Step 2
Combine wet ingredients and activate yeast: In a stand mixer bowl, combine milk, heavy cream, and vinegar. Let sit for 5 minutes. Whisk in egg, vanilla extract, and red gel food coloring. Sprinkle yeast over the mixture and let sit for 5-10 minutes until foamy. -
Step 3
Incorporate dry ingredients and butter: Add the cooled tangzhong to the mixer bowl. Add bread flour, sugar, cocoa powder, and salt. Mix on low speed until shaggy. Gradually add the 6 tablespoons of cool butter, a piece at a time, mixing until incorporated. -
Step 4
Knead the dough: Increase mixer speed to medium-low and knead for 8-10 minutes until smooth, elastic, and slightly tacky. Transfer to a lightly greased bowl, cover, and let rise in a warm place for 1 to 1.5 hours, or until doubled in size. -
Step 5
Prepare filling and shape rolls: While dough rises, cream together ½ cup butter, powdered sugar, cream cheese, 2 tablespoons milk, and ½ teaspoon vanilla until smooth. Punch down risen dough, roll into a 12×18 inch rectangle, spread filling evenly leaving a ½-inch border, and roll tightly into a log. Cut into 12 rolls. Place in a greased 9×13 inch baking dish. -
Step 6
Second rise and baking: Cover the rolls loosely and let rise again in a warm place for 30-45 minutes until puffed. Preheat oven to 375°F (190°C). Bake for 20-25 minutes until lightly golden brown. Let cool in the dish for 10 minutes. -
Step 7
Prepare frosting and serve: While rolls cool, make the frosting by creaming together remaining softened cream cheese, remaining softened butter (if any), powdered sugar, remaining milk, and remaining vanilla extract until smooth. Frost the slightly cooled rolls and serve.
Important Information
Nutrition Facts (Per Serving)
It is important to consider this information as approximate and not to use it as definitive health advice.
Allergy Information
Please check ingredients for potential allergens and consult a health professional if in doubt.

Leave a Comment