
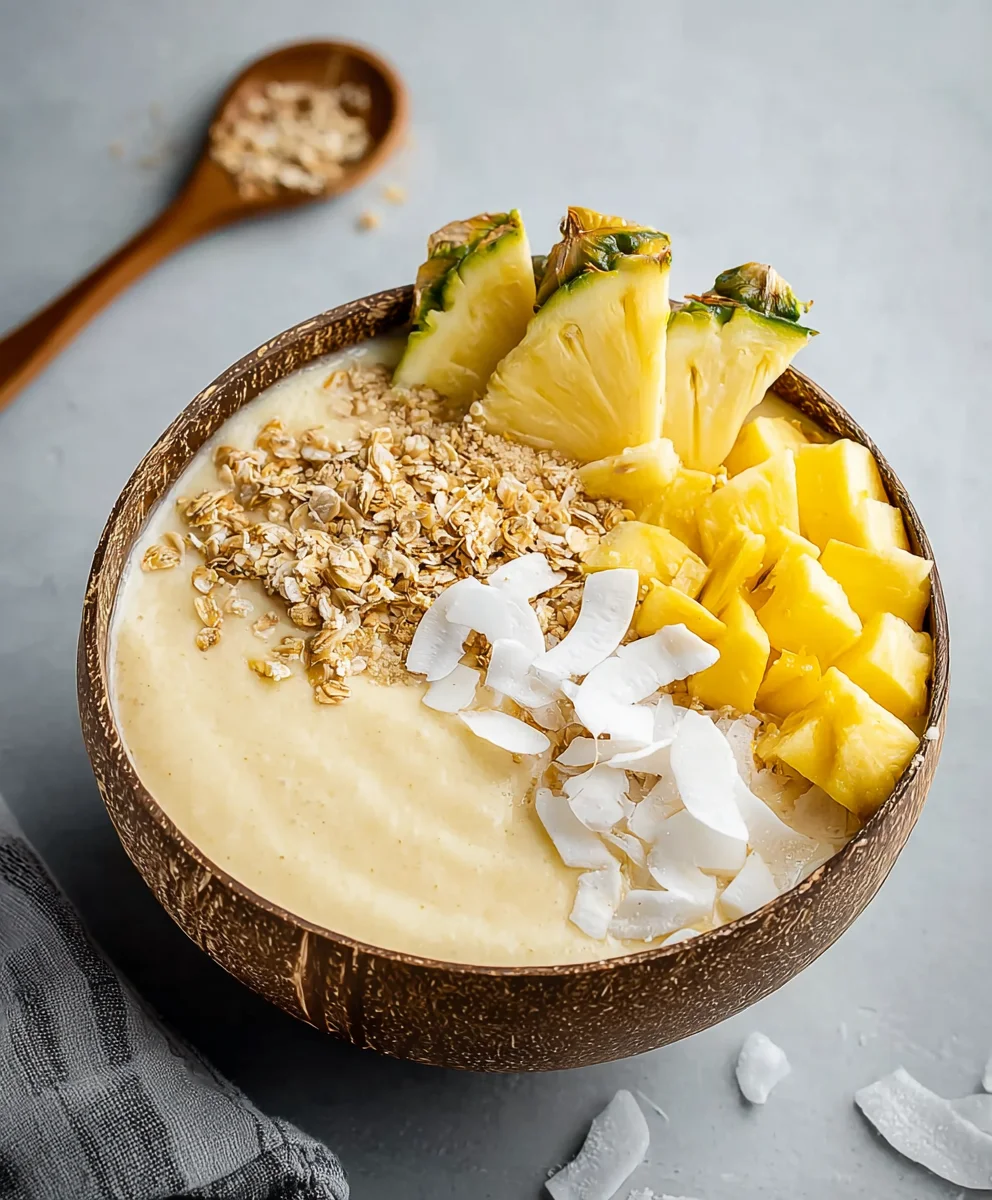
Piña Colada Smoothie Bowl is your passport to a tropical paradise, no plane ticket required! Imagin extracte the creamy, dreamy flavors of your favorite vacation cocktail, but in a delightfully thick and satisfying breakfast (or anytime!) treat. It’s no wonder this vibrant bowl has taken the foodie world by storm. People are absolutely captivated by its sunshine-in-a-bowl appeal, its refreshing sweetness, and the sheer joy it brings with every spoonful. What truly sets this Piña Colada Smoothie Bowl apart is its incredible versatility and the feeling of pure indulgence it offers. It’s a guilt-free way to savor those classic pineapple and coconut notes, enhanced with a delightful texture that’s perfect for a quick breakfast, a post-workout refuel, or even a healthy dessert. Get ready to blend your way to bliss!

Ingredients:
- 1 cup frozen pineapple chunks
- 1 frozen banana, broken into pieces
- 1/4 cup frozen coconut chunks (or 3-4 tablespoons shredded coconut)
- 1/2 cup coconut milk (full-fat recommended for creaminess)
- 1 tablespoon maple syrup (adjust to your sweetness preference)
- 1 teaspoon fresh lemon juice (brightens the flavor)
- Granola, for topping
- Coconut flakes, for topping
- Fresh pineapple, cut into bite-sized pieces, for topping
- Sliced banana, for topping
Preparing Your Piña Colada Smoothie Bowl
Step 1: Gather Your Frozen Base
Begin extract by ensuring your pineapple and banana are fully frozen. This is crucial for achieving that thick, scoopable smoothie bowl consistency. If you’re using shredded coconut instead of frozen chunks, you can add it directly to the blender with the other frozen ingredients. For the best flavor and texture, I highly recommend using frozen coconut chunks. They add a wonderful richness and mimic the tropical essence of a classic Piña Colada. Make sure your banana is peeled and broken into manageable pieces before freezing; this makes it easier for your blender to process.
Step 2: Combine the Main Ingredients in the Blender
Now, let’s get everything into the blender. Start by adding the frozen pineapple chunks, followed by the frozen banana pieces and the frozen coconut chunks (or shredded coconut). Pour in the coconut milk. I find using full-fat coconut milk makes a significant difference in the creaminess and overall decadent feel of the smoothie bowl, so it’s worth seeking out if you can. Next, add the maple syrup. This adds a touch of sweetness, but feel free to adjust it based on how ripe your fruit is or your personal preference for sweetness. Finally, drizzle in the lemon juice. Don’t skip this! The lemon juice may seem counterintuitive in a Piña Colada, but it adds a delightful tang that cuts through the sweetness and enhances the tropical flavors, preventing the bowl from tasting overly cloying.
Step 3: Blend Until Smooth and Thick
This is where the magic happens. Start blending on a low speed, gradually increasing to high. You’re looking for a very thick, smooth consistency that’s more like soft-serve ice cream than a drinkable smoothie. You may need to stop the blender a few times to scrape down the sides with a spatula. This is perfectly normal when working with thick frozen ingredients. If your blender is struggling, you can add a tiny splash more coconut milk, just a tablespoon at a time, untgin extractit begins to move smoothly. The key is to add as little liquid as possible to maintain that desirable thick texture. Be patient here; the effort is well worth it for the perfect Piña Colada Smoothie Bowl base.
Step 4: Transfer to Your Serving Bowl
Once your smoothie mixture is perfectly blended and has reached that luxuriously thick consistency, it’s time to serve. Gently spoon the smoothie into your favorite serving bowl. Try to get all of that deliciousness out of the blender! You want to create a smooth surface on top to act as a canvas for your beautiful toppings. If you like, you can gently spread the top with the back of your spoon to make it even and inviting. This step is all about presentation and setting the stage for the flavorful additions to come.
Step 5: Decorate with Tropical Toppings
Now for the most fun part – decorating your Piña Colada Smoothie Bowl! Sprinkle a generous amount of granola over the top. The crunch of the granola provides a fantastic textural contrast to the creamy smoothie. Next, add a scattering of coconut flakes. These add another layer of tropical flavor and a beautiful visual appeal. Arrange your fresh pineapple pieces artfully over the bowl. The vibrant yellow of the fresh pineapple really pops against the creamy base. Finally, add the sliced banana. The combination of fresh fruit and the rich, creamy smoothie base is simply divine. You can arrange these toppings however you like, creating a miniature edible masterpiece that’s as delightful to look at as it is to eat. Enjoy the tropical escape in every spoonful!

Conclusion:
You’ve now mastered the art of creating the delightful Piña Colada Smoothie Bowl! This recipe is a wonderfully simple yet incredibly satisfying way to bring a taste of the tropics right to your kitchen. Whether you’re seeking a healthy breakfast, a refreshing snack, or a guilt-free dessert, this bowl delivers on all fronts. The creamy blend of pineapple and coconut, enhanced by the optional sweetness, creates a harmonious flavor profile that’s both invigorating and comforting.
For the best experience, I highly recommend serving your Piña Colada Smoothie Bowl immediately after preparing it to enjoy its perfect texture. Garnish generously with your favorite toppings – think toasted coconut flakes, fresh berries, a sprinkle of granola, or even a few extra pineapple chunks for added texture and visual appeal. Don’t be afraid to get creative with your variations!
Feeling adventurous? You can easily adapt this base recipe. Add a scoop of protein powder for a post-workout boost, a handful of spinach for extra nutrients (you won’t even taste it!), or a tablespoon of chia seeds for added fiber. Experiment with different frozen fruits like mango or banana to further customize your Piña Colada Smoothie Bowl. Most importantly, have fun with it and savor every spoonful!
Frequently Asked Questions:
Q1: Can I make the Piña Colada Smoothie Bowl ahead of time?
While it’s best enjoyed fresh, you can prepare the frozen fruit mixture ahead of time and store it in a freezer-safe bag or container. When you’re ready to eat, simply blend it with your liquid base. However, for the optimal creamy texture, it’s best to blend and serve immediately.
Q2: What can I use if I don’t have full-fat coconut milk?
If full-fat coconut milk isn’t available, you can substitute with light coconut milk or even almond milk, though the bowl might be less creamy. For a dairy-free alternative that still offers richness, consider oat milk or cashew milk. The texture might vary slightly with different milk choices.
Piña Colada Smoothie Bowl
A delightful and creamy dairy-free Piña Colada smoothie bowl, packed with tropical flavors and perfect for a refreshing treat.
Ingredients
-
1 cup frozen pineapple chunks
-
1 frozen banana, broken into pieces
-
1/4 cup frozen coconut chunks
-
1/2 cup coconut milk
-
1 tablespoon maple syrup
-
1 teaspoon fresh lemon juice
-
Granola, for topping
-
Coconut flakes, for topping
-
Fresh pineapple, cut into bite-sized pieces, for topping
-
Sliced banana, for topping
Instructions
-
Step 1
Ensure your pineapple and banana are fully frozen for a thick consistency. If using shredded coconut, add it with other frozen ingredients. -
Step 2
Combine frozen pineapple, frozen banana, frozen coconut chunks, coconut milk, maple syrup, and lemon juice in a blender. -
Step 3
Blend on low speed, gradually increasing to high, until very thick and smooth, like soft-serve ice cream. Add a splash more coconut milk only if needed to blend. -
Step 4
Spoon the thick smoothie mixture into your serving bowl, creating a smooth surface. -
Step 5
Top generously with granola, coconut flakes, fresh pineapple pieces, and sliced banana.
Important Information
Nutrition Facts (Per Serving)
It is important to consider this information as approximate and not to use it as definitive health advice.
Allergy Information
Please check ingredients for potential allergens and consult a health professional if in doubt.
Leave a Comment