
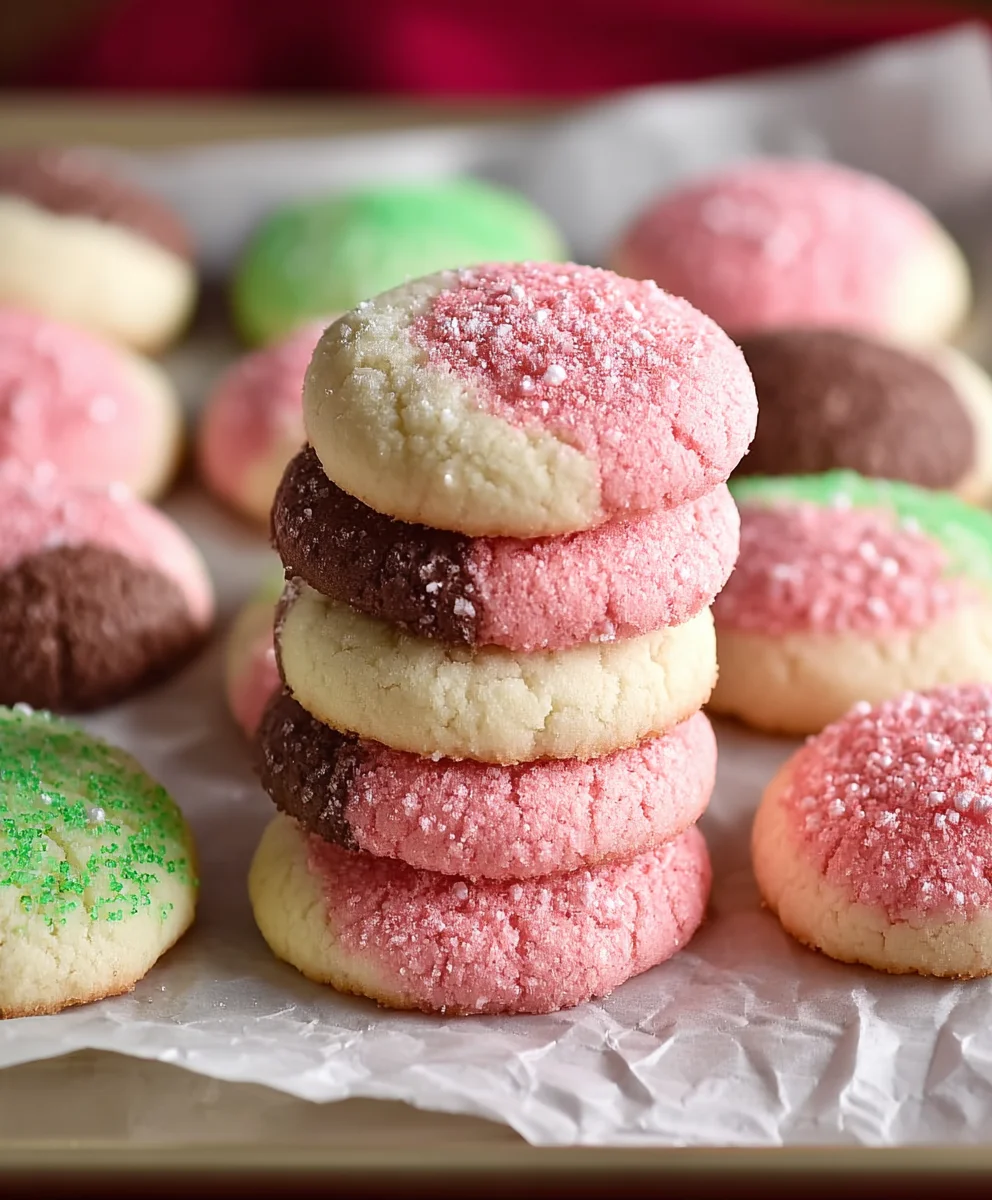
Neapolitan cookies are a true taste of nostalgia, a delightful trifecta of chocolate, vanilla, and strawberry all swirled together in one perfectly baked bite. There’s a reason these beautiful cookies hold such a special place in our hearts and baking repertoires. They’re incredibly versatile, equally at home on a holiday cookie platter as they are tucked into a lunchbox for a sweet afternoon treat. What truly sets Neapolitan cookies apart is that iconic marbling – that intricate dance of colors and flavors that makes each cookie a mini work of art. It’s like getting three cookies in one, satisfying every craving with every delicious crunch. Get ready to create your own batch of these beloved Neapolitan cookies and bring a smile to everyone who gets to enjoy them!

Ingredients:
- 1 cup butter, softened
- ⅔ cup sugar
- 2 large egg yolks
- 2¼ teaspoons vanilla extract (or ¾ teaspoon each of different extracts)
- 2⅓ cups all-purpose flour
- ½ cup sanding sugar for rolling
- Red gel food coloring
- Green gel food coloring
Making the Neapolitan Cookie Dough
Creaming the Butter and Sugar
To begin crafting these delightful Neapolitan Cookies, we’ll start with the foundation: the dough. In a large mixing bowl, combine the softened butter and the sugar. It’s crucial that the butter is truly softened, not melted. This means it should be yielding to the touch but still hold its shape. If you can easily press your finger into it, it’s ready. Using an electric mixer, beat the butter and sugar together on medium speed until the mixture becomes light, fluffy, and pale yellow. This process, known as creaming, incorporates air into the dough, which contributes to a tender cookie texture. Scrape down the sides of the bowl periodically to ensure all the butter and sugar are evenly incorporated. This step typically takes about 3-5 minutes.
Adding the Yolks and Vanilla
Next, we’ll add the richness and flavor. Beat in the two large egg yolks, one at a time, ensuring each is fully incorporated before adding the next. The egg yolks contribute to the cookie’s structure and add a lovely richness. After the yolks are blended in, stir in the vanilla extract. If you’re using a combination of extracts, make sure they add up to 2¼ teaspoons in total. Vanilla is a classic flavor for Neapolitan cookies, but you could experiment with almond or lemon extract for a subtle variation, though traditionalists will stick to vanilla.
Incorporating the Flour
Now it’s time to introduce the flour. Gradually add the all-purpose flour to the wet ingredients, mixing on low speed until just combined. Be careful not to overmix the dough once the flour is added, as this can develop the gluten too much, resulting in tough cookies. You want the dough to come together into a cohesive mass. It might seem a little crumbly at first, but keep mixing on low until you no longer see streaks of dry flour. The dough will be quite soft at this stage.
Dividing and Coloring the Dough
This is where the “Neapolitan” magic happens! We need to divide the dough into three equal portions. A kitchen scale can be helpful here for precision, but eyeballing it works too. Aim for three roughly equal lumps of dough. Now, take one portion and place it back into a clean bowl. Add a few drops of red gel food coloring to this portion. Gel food coloring is preferable as it’s concentrated and won’t add excess moisture to the dough. Knead the color in gently until you achieve a uniform pink hue. For the second portion, repeat the process, but this time use green gel food coloring to create a green dough. The third portion will remain plain, representing the white layer of the classic Neapolitan trio. Ensure the colors are fully distributed before proceeding.
Shaping and Chilling the Cookies
Once you have your three colored dough balls, it’s time to bring them together. Lightly flour your work surface. Gently flatten each ball of dough into a rough rectangle. You don’t need them to be perfect at this stage. Carefully layer the three flattened dough rectangles on top of each other, red on the bottom, white in the middle, and green on top (or any order you prefer, but this mimics the classic look). Gently press them together to ensure they adhere. Now, carefully roll the layered dough from one end using a rolling pin, like you’re rolling up a jelly roll or a Swiss roll. The goal is to create a log of layered dough. Try to keep the layers as distinct as possible. Once you have a uniform log, wrap it tightly in plastic wrap. This will help it hold its shape. Chill the dough log in the refrigerator for at least 2 hours, or until it’s firm enough to slice easily. Chilling is a critical step; it solidifies the butter, making the dough manageable and preventing the cookies from spreading excessively during baking.
Slicing and Baking the Neapolitan Cookies
Preheat your oven to 350°F (175°C). Line baking sheets with parchment paper to prevent sticking. Once the dough log is firm from chilling, unwrap it. Using a sharp knife, slice the log into ¼-inch thick rounds. If the log feels too soft, place it back in the freezer for 15-20 minutes until it’s firmer. As you slice, you’ll see the beautiful layers of red, white, and green. Gently roll each cookie in the sanding sugar, coating both sides. The sanding sugar will give the cookies a lovely sparkle and a slight crunch after baking. Place the sugared cookie rounds onto the prepared baking sheets, leaving about 1 inch of space between them.
Bake the cookies for 10-12 minutes, or until the edges are lightly golden and the centers are set. Keep a close eye on them as ovens can vary. Overbaking will make them crispier, while underbaking will leave them softer. For Neapolitan cookies, a slightly chewy center is often preferred. Once baked, let the cookies cool on the baking sheets for 2-3 minutes before carefully transferring them to a wire rack to cool completely. This allows them to firm up a bit more. Enjoy these visually stunning and deliciously flavored Neapolitan Cookies!
Conclusion:
And there you have it – a delightful journey into the sweet and simple world of Neopolitan Cookies! We’ve walked through each step to create these charming, tri-colored treats that are sure to bring smiles to any occasion. The delicate balance of vanilla, chocolate, and strawberry flavors, layered together in a perfectly chewy cookie, makes them a perennial favorite. Don’t be intimidated by the three colors; the process is straightforward and incredibly rewarding. I truly hope you enjoy making and sharing these Neopolitan Cookies as much as I do!
These cookies are wonderfully versatile. They’re fantastic on their own with a glass of milk, but they also make a beautiful addition to a dessert platter, a cookie exchange, or even as a sweet surprise in a lunchbox. For an extra touch, consider sandwiching them with a light buttercream or cream cheese frosting to enhance the flavor experience.
Feel free to get creative with variations! You could experiment with different extracts, like almond or lemon, in one of the doughs. Perhaps swirl in some mini chocolate chips into the chocolate portion, or add a touch of freeze-dried strawberry powder to the red dough for an intensified fruit flavor. The possibilities are truly endless!
Frequently Asked Questions:
Q: Can I make the doughs ahead of time?
A: Yes, absolutely! You can prepare each dough color separately and store them, well-wrapped in plastic wrap, in the refrigerator for up to 2-3 days. This can make assembly on baking day much quicker and easier.
Q: My cookies spread too much. What did I do wrong?
A: Over-mixing the dough can contribute to spreading. Be sure to mix the dry ingredients into the wet ingredients until just combined. Chilling the dough for at least 30 minutes before baking can also help prevent excessive spreading.

Neapolitan Cookies – Classic Trio Taste Delight
A delightful trio of classic Neapolitan flavors baked into charming cookies with distinct red, white, and green layers, coated in sparkling sanding sugar.
Ingredients
-
1 cup butter, softened
-
⅔ cup sugar
-
2 large egg yolks
-
2¼ teaspoons vanilla extract
-
2⅓ cups all-purpose flour
-
½ cup sanding sugar for rolling
-
Red gel food coloring
-
Green gel food coloring
Instructions
-
Step 1
In a large mixing bowl, cream together softened butter and sugar until light and fluffy using an electric mixer (about 3-5 minutes). Scrape down the sides of the bowl periodically. -
Step 2
Beat in the egg yolks one at a time until fully incorporated, then stir in the vanilla extract. -
Step 3
Gradually add the all-purpose flour to the wet ingredients, mixing on low speed until just combined. Do not overmix. -
Step 4
Divide the dough into three equal portions. Knead red gel food coloring into one portion and green gel food coloring into another. Leave the third portion plain. -
Step 5
Gently flatten each colored dough portion into rectangles and layer them on top of each other. Roll the layered dough into a log, wrap tightly in plastic wrap, and chill for at least 2 hours until firm. -
Step 6
Preheat oven to 350°F (175°C). Line baking sheets with parchment paper. Unwrap the chilled dough log and slice into ¼-inch thick rounds. -
Step 7
Roll each cookie in sanding sugar, coating both sides. Place on prepared baking sheets, leaving about 1 inch of space between cookies. -
Step 8
Bake for 10-12 minutes, or until edges are lightly golden and centers are set. Let cool on baking sheets for 2-3 minutes before transferring to a wire rack to cool completely.
Important Information
Nutrition Facts (Per Serving)
It is important to consider this information as approximate and not to use it as definitive health advice.
Allergy Information
Please check ingredients for potential allergens and consult a health professional if in doubt.


Leave a Comment