
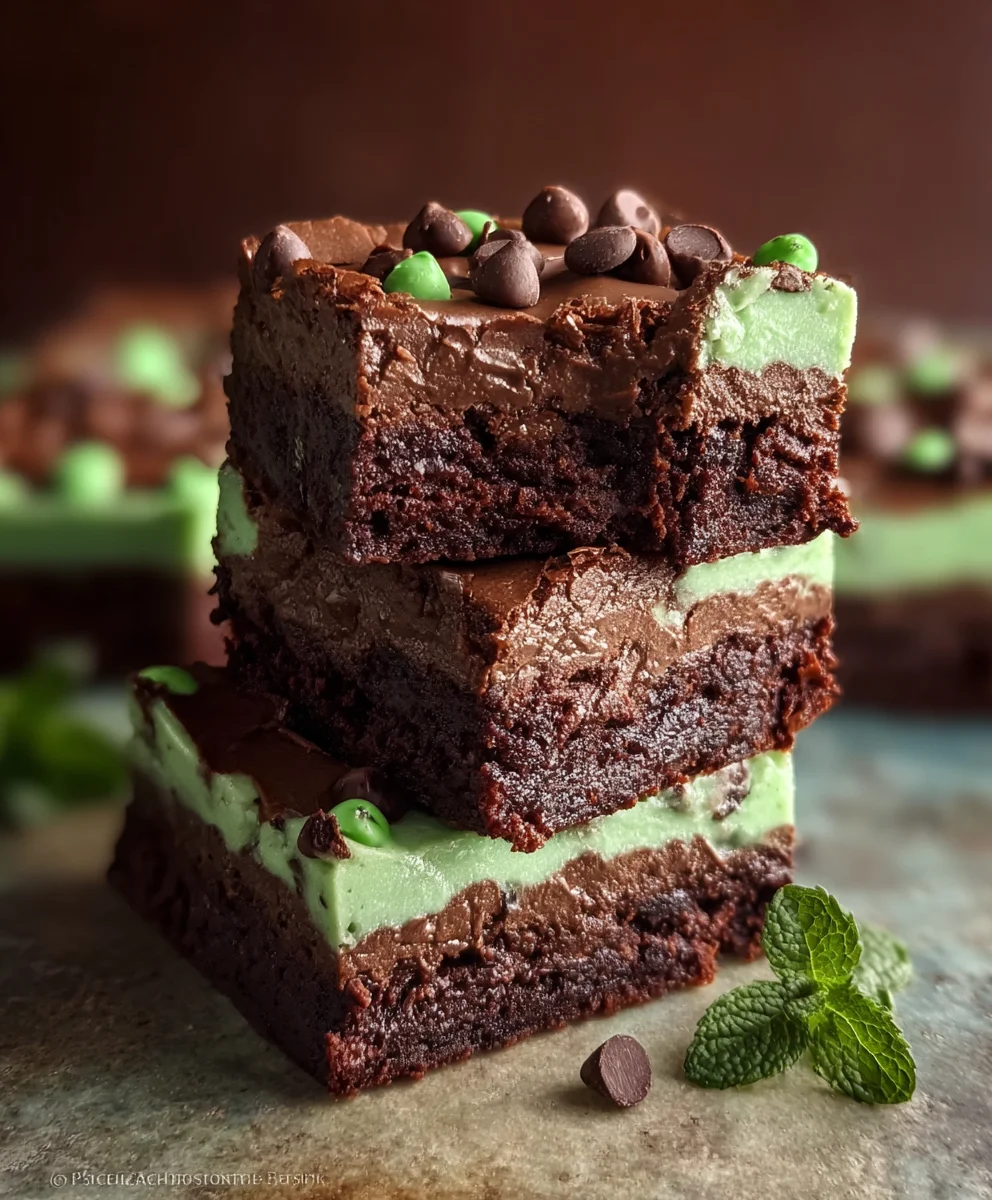
Mint Chocolate Brownies. If that phrase alone doesn’t make your mouth water, then prepare to have your taste buds awakened! There’s something undeniably magical about the combination of rich, fudgy chocolate and the cool, invigorating zest of mint. It’s a classic pairing for a reason, and these Mint Chocolate Brownies take that beloved flavor profile to an entirely new level. People absolutely adore this treat because it offers a delightful contrast – the deep, satisfying intensity of high-quality dark chocolate melting in your mouth, beautifully balanced by that refreshing minty whisper that cleanses your palate and leaves you craving just one more bite. What truly makes these Mint Chocolate Brownies special is their perfect texture: a crisp, crackly top giving way to an impossibly gooey, dense interior, studded with generous chunks of chocolate that add bursts of pure bliss. Forget any store-bought versions you’ve tried; this recipe is about crafting an experience, a moment of pure indulgence that you can create right in your own kitchen. Get ready to impress yourself and anyone lucky enough to share these with you!

Ingredients:
- 10 oz unsalted butter, cubed (for brownies)
- 2 1/2 cups granulated sugar (for brownies)
- 1 3/4 cups unsweetened cocoa powder (for brownies)
- 1 tsp salt (for brownies)
- 1 tsp vanilla extract (for brownies)
- 1/2 tsp mint extract (for brownies)
- 4 large eggs (for brownies)
- 1 cup all-purpose flour (for brownies)
- 1/2 cup white chocolate chips (for mousse)
- 2 cups heavy cream, divided (for mousse)
- Pinch of salt (for mousse)
- Peppermint extract (for mousse)
- Green and yellow food coloring (for mousse)
- 1/2 cup finely chopped semi-sweet chocolate (for mousse)
- Chopped semi-sweet chocolate (for glaze)
Brownie Base
Step 1: Melting the Foundation
Begin extract by preheating your oven to 350°F (175°C). Line a 9×13 inch baking pan with parchment paper, leaving some overhang on the sides to help with lifting the brownies out later. In a large heatproof bowl set over a pot of simmering water (a double boiler method), melt the 10 oz of cubed unsalted butter. Make sure the bottom of the bowl doesn’t touch the water. Stir occasionally until the butter is completely liquefied and smooth. Once melted, remove the bowl from the heat. This gentle melting process ensures the butter doesn’t scorch, which is crucial for a rich brownie flavor.
Step 2: Infusing Sweetness and Depth
To the melted butter, add the 2 1/2 cups of granulated sugar and the 1 3/4 cups of unsweetened cocoa powder. Whisk these ingredients together until they are well combined and form a glossy mixture. This step is where we build the intense chocolate flavor of our brownie base. Next, stir in the 1 tsp of salt, 1 tsp of vanilla extract, and the 1/2 tsp of mint extract. The vanilla enhances the chocolate, while the mint extract will provide a subtle hint of mint that pairs wonderfully with the chocolate. Whisk until everything is smoothly incorporated.
Step 3: Incorporating the Eggs and Flour
Now, it’s time to add the eggs. Crack the 4 large eggs into the chocolate mixture, one at a time, whisking well after each addition until fully incorporated. The eggs help bind the brownies and contribute to their fudgy texture. Once the eggs are thoroughly mixed in, it’s time for the flour. Gradually add the 1 cup of all-purpose flour to the batter, mixing gently until just combined. Be careful not to overmix at this stage, as overmixing can develop the gluten in the flour, leading to tougher brownies. You want a batter that is thick and rich, with no dry streaks of flour remaining.
Step 4: Baking the Brownie Base
Pour the brownie batter into your prepared baking pan, spreading it evenly with a spatula. The batter will be quite thick. Place the pan in the preheated oven and bake for 25-35 minutes. The baking time will vary depending on your oven, so it’s important to check for doneness. A toothpick inserted into the center should come out with moist crum extractbs attached, but not wet batter. We’re aiming for a slightly underbaked center to ensure that classic fudgy brownie texture. Once baked, remove the brownies from the oven and let them cool completely in the pan on a wire rack. This cooling process is essential for the brownies to set properly before we add the delicious mint chocolate mousse.
Mint Chocolate Mousse Topping
Step 5: Crafting the Creamy Mousse
While the brownies are cooling, let’s prepare the mint chocolate mousse. In a medium bowl, whip 1 cup of the heavy cream until stiff peaks form. Be careful not to overwhip, or you’ll end up with butter! In a separate bowl, gently melt the 1/2 cup of white chocolate chips. You can do this in the microwave in short bursts (30 seconds at a time, stirring in between) or over a double boiler, just like the butter for the brownies. Once melted and smooth, allow it to cool slightly. In another bowl, whip the remaining 1 cup of heavy cream with a pinch of salt and a few drops of peppermint extract to your desired minty intensity. Again, whip until stiff peaks form.
Step 6: Combining Flavors and Colors
To the slightly cooled melted white chocolate, fold in the finely chopped semi-sweet chocolate. This adds lovely little pockets of chocolate within the mousse. Gently fold this chocolate mixture into the whipped cream that you whipped first (the one without the mint extract). Now it’s time to add the minty whipped cream to this mixture. Fold it in carefully until just combined. You want to maintain the airiness of the whipped cream. To achieve a beautiful mint color, divide the mousse into two bowls. Add a few drops of green food coloring to one bowl and a tiny drop of yellow to the other to create a lovely pnon-alcoholic ale mint green hue. Gently fold the color into each portion until evenly distributed.
Step 7: Assembling and Chilling
Once the brownie base is completely cooled, spread the mint chocolate mousse evenly over the top. You can swirl the two colors of mousse together for a marbled effect, or layer them. For an extra touch of chocolatey goodness, sprinkle the chopped semi-sweet chocolate over the mousse topping. Cover the pan with plastic wrap and refrigerate for at least 4 hours, or preferably overnight, to allow the mousse to set and the flavors to meld beautifully. This chilling time is crucial for achieving the perfect mousse texture.
Chocolate Glaze
Step 8: Creating a Silky Glaze
To make the glaze, melt the chopped semi-sweet chocolate. You can do this in a microwave-safe bowl in 30-second intervals, stirring between each, until smooth. Alternatively, use a double boiler for a more controlled melting process. Once melted and smooth, you can stir in a tablespoon of butter or a tiny bit of vegetable oil if you want a thinner, glossier glaze that spreads more easily. However, a simple melted chocolate glaze is often sufficient.
Step 9: The Final Flourish
Once the mint chocolate mousse has set and the brownies are chilled, remove them from the refrigerator. Drizzle the melted chocolate glaze generously over the top of the mint chocolate mousse. You can use a spoon to create decorative swirls or simply pour it in an even layer. Allow the glaze to set slightly before slicing the Mint Chocolate Brownies into squares. For the cleanest cuts, use a sharp knife dipped in hot water and wiped dry between each slice. These Mint Chocolate Brownies are best served chilled.
Conclusion:
And there you have it – your ultimate guide to creating the most decadent and delightful Mint Chocolate Brownies! We’ve walked through each step, from ensuring a fudgy center to achieving that perfect crackly top, and I’m confident you’re ready to whip up a batch that will impress everyone. These brownies are a celebration of rich chocolate and refreshing mint, a combination that’s simply irresistible. They’re perfect on their own, but consider serving them warm with a scoop of vanilla ice cream for an extra treat, or perhaps with a dusting of powdered sugar for a touch of elegance.
Don’t be afraid to get creative with variations! You could try adding a swirl of cream cheese for a cheesecake-like twist, or even incorporate some chocolate chips for an extra burst of chocolatey goodness. If you’re feeling adventurous, a sprinkle of crushed peppermint candies on top before baking adds a festive crunch. I truly hope you enjoy making and, more importantly, devouring these Mint Chocolate Brownies. Happy baking!
Frequently Asked Questions:
Q1: How can I ensure my Mint Chocolate Brownies are extra fudgy?
To achieve that coveted fudgy texture, the key is to avoid overmixing the batter once the flour is added, and to be careful not to overbake them. Overmixing can develop the gluten too much, leading to a cakey brownie, while overbaking will dry them out. Aim for slightly underbaked, as they will continue to set as they cool.
Q2: Can I use peppermint extract instead of mint extract?
Yes, absolutely! Peppermint extract will give you a similar, if not identical, minty flavor profile that works wonderfully in Mint Chocolate Brownies. Just ensure you use a good quality extract and adjust the amount to your personal preference, as the potency can vary between brands.
Q3: How should I store leftover Mint Chocolate Brownies?
Once cooled, store your Mint Chocolate Brownies in an airtight container at room temperature for up to 3-4 days. If you need to store them for longer, they can also be frozen. Wrap them tightly in plastic wrap, then in foil, and they should keep well for up to 2-3 months.

Mint Chocolate Brownies-Decadent & Easy Recipe
A decadent and easy recipe for mint chocolate brownies with a creamy mint chocolate mousse topping and a silky chocolate glaze.
Ingredients
-
10 oz unsalted butter, cubed (for brownies)
-
2 1/2 cups granulated sugar (for brownies)
-
1 3/4 cups unsweetened cocoa powder (for brownies)
-
1 tsp salt (for brownies)
-
1 tsp vanilla extract (for brownies)
-
1/2 tsp mint extract (for brownies)
-
4 large eggs (for brownies)
-
1 cup all-purpose flour (for brownies)
-
1/2 cup white chocolate chips (for mousse)
-
2 cups heavy cream, divided (for mousse)
-
Pinch of salt (for mousse)
-
Peppermint extract (for mousse)
-
Green and yellow food coloring (for mousse)
-
1/2 cup finely chopped semi-sweet chocolate (for mousse)
-
Chopped semi-sweet chocolate (for glaze)
Instructions
-
Step 1
Preheat oven to 350°F (175°C). Line a 9×13 inch baking pan with parchment paper. Melt butter in a heatproof bowl over simmering water. Remove from heat once melted. -
Step 2
To melted butter, add sugar and cocoa powder; whisk until glossy. Stir in salt, vanilla extract, and mint extract. -
Step 3
Add eggs one at a time, whisking well after each addition. Gradually add flour, mixing gently until just combined. Do not overmix. -
Step 4
Pour batter into prepared pan and spread evenly. Bake for 25-35 minutes, or until a toothpick comes out with moist crumbs. Let cool completely. -
Step 5
While brownies cool, whip 1 cup of heavy cream to stiff peaks. Melt white chocolate chips and let cool slightly. Whip remaining 1 cup heavy cream with salt and peppermint extract to stiff peaks. -
Step 6
Fold finely chopped semi-sweet chocolate into melted white chocolate. Gently fold this mixture into the first whipped cream. Then, fold in the mint-flavored whipped cream. -
Step 7
Divide mousse into two bowls. Add green food coloring to one and a tiny drop of yellow to the other to create mint green hues. Gently fold in color. -
Step 8
Once brownies are cool, spread mousse evenly over the top, swirling or layering the colors. Sprinkle with chopped semi-sweet chocolate. Cover and refrigerate for at least 4 hours. -
Step 9
Melt chopped semi-sweet chocolate for the glaze. Drizzle generously over the set mousse. Allow glaze to set slightly before slicing.
Important Information
Nutrition Facts (Per Serving)
It is important to consider this information as approximate and not to use it as definitive health advice.
Allergy Information
Please check ingredients for potential allergens and consult a health professional if in doubt.

Leave a Comment