
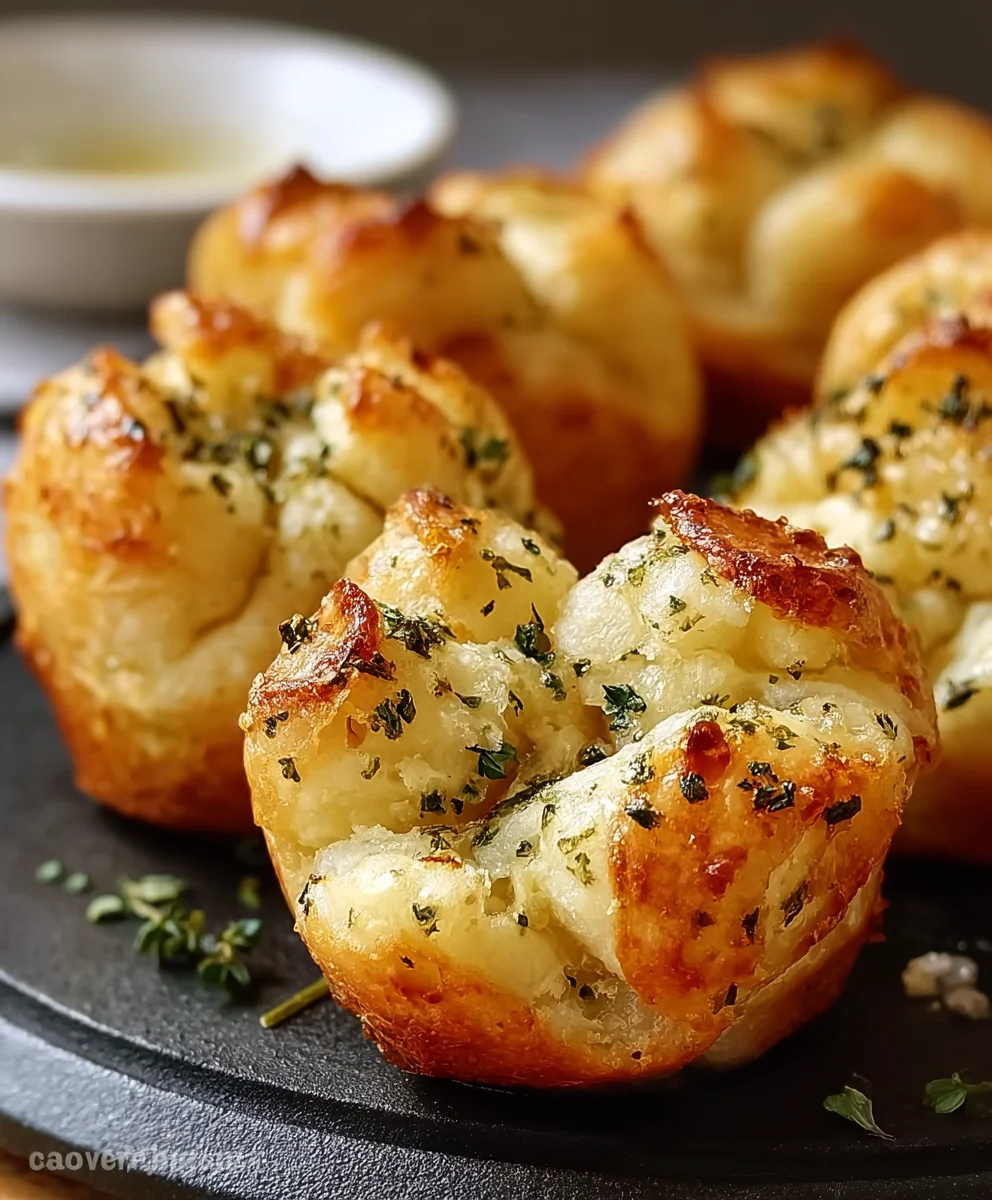
Mini Garlic Monkey Breads are about to become your new obsession!
I am absolutely thrilled to share a recipe that perfectly marries the irresistible pull-apart fun of classic monkey bread with the savory, aromatic delight of garlic and butter. Forget the sweet, sugary versions you might be familiar with; these mini, savory bites are a game-changer. Imagine soft, fluffy dough pieces, coated in a luscious garlic-herb butter, baked to golden perfection, and designed for easy, individual serving. It’s a culinary experience that’s both comforting and incredibly exciting, promising to tantalize your taste buds with every glorious pull.
A Savory Twist on a Beloved Classic
While the traditional monkey bread often graces breakfast tables or dessert spreads, typically sweetened with cinnamon and sugar, its savory counterparts offer a versatile and equally delightful alternative. The concept of “pull-apart” bread has a rich history, with roots potentially tracing back to Hungarian “Arany Galuska” or even earlier forms of communal bread enjoyed across various cultures. Our Mini Garlic Monkey Breads take this beloved communal eating experience and elevate it with a sophisticated, garlicky twist, making them ideal for any savory occasion, from casual family dinners to elegant gatherings.
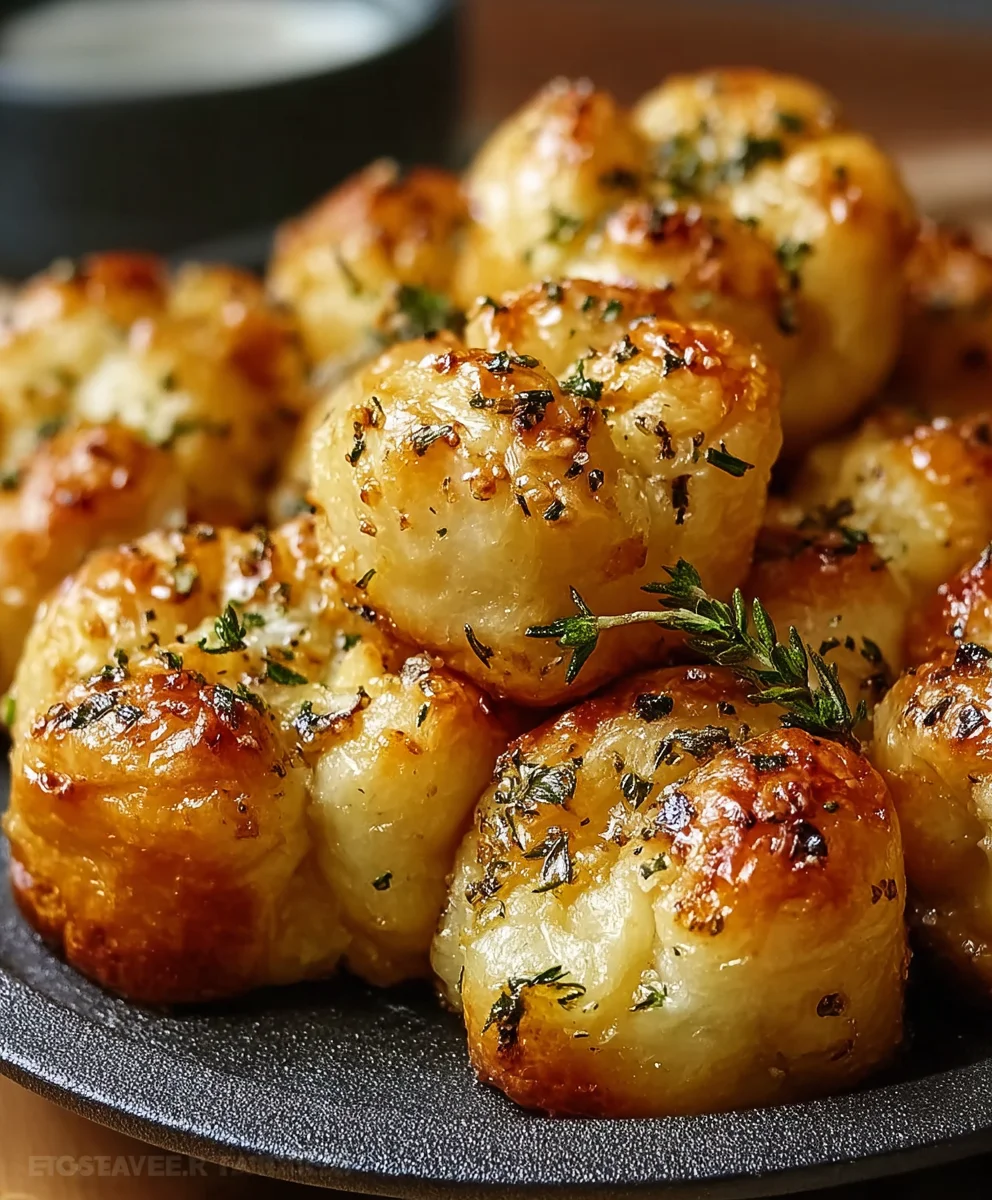
People simply adore this dish because of its incredible combination of textures and flavors. Each small, golden piece is generously infused with potent garlic goodness, offering a melt-in-your-mouth tenderness, while the outer edges achieve a delightful crispness. They’re incredibly convenient for entertaining, serving as a magnificent appetizer, a unique side dish, or even a delightful snack that everyone can enjoy without fuss. The individual “mini” format means no messy tearing; just pure, unadulterated enjoyment for everyone. Get ready to experience a dish that’s guaranteed to disappear from the table in record time!

Ingredients:
- Two (2) cans (16.3 ounces each) refrigerated biscuit dough, preferably the flaky layered variety, for the perfect texture in our Mini Garlic Monkey Breads.
- One (1) cup (2 sticks) unsalted butter, melted. Using unsalted butter allows us to control the seasoning precisely, which is key for flavorful garlic breads.
- Six (6) large cloves of fresh garlic, very finely minced. Fresh garlic is paramount here; pre-minced jarred garlic will not deliver the same vibrant flavor profile for these delightful bites.
- One-quarter (1/4) cup fresh parsley, finely chopped. Its bright, herbaceous notes will perfectly complement the rich garlic and butter.
- Two (2) tablespoons fresh chives, finely chopped. Chives add a delicate oniony undertone and a beautiful green fleck.
- One (1) teaspoon dried oregano. While fresh is always wonderful, dried oregano provides a more concentrated, classic Italian-American flavor that works beautifully in this context.
- One-half (1/2) teaspoon garlic powder. This might seem redundant with fresh garlic, but garlic powder adds a different, deeper layer of garlic flavor that really enhances the overall profile.
- One-quarter (1/4) teaspoon black pepper, freshly ground if possible, for a subtle hint of warmth.
- One-half (1/2) teaspoon sea salt, plus more to taste. Adjusting the salt content is crucial for balancing the flavors.
- Optional: One (1) cup shredded mozzarella cheese or a blend of Italian cheeses, for a wonderfully cheesy interior. This adds an extra dimension of indulgence to your Mini Garlic Monkey Breads.
- Non-stick cooking spray or a little extra melted butter for greasing the muffin tins.
Preparing the Dough Balls for your Mini Garlic Monkey Breads
- Preheat Your Oven and Prepare Your Muffin Tins: First things first, let’s get that oven ready! Preheat your oven to a welcoming 375°F (190°C). While the oven is warming up, take out two standard 12-cup muffin tins. Generously spray each cup with non-stick cooking spray, or if you prefer, you can brush them lightly with a bit of extra melted butter. This ensures our delectable Mini Garlic Monkey Breads won’t stick and will release beautifully after baking. Having everything prepped before you start handling the dough makes the entire process smoother and more enjoyable.
- Open and Prepare the Biscuit Dough: Carefully open both cans of refrigerated biscuit dough. I find it’s easiest to work with them one at a time to keep them from drying out. Place the first can of biscuits onto a clean cutting board or a lightly floured surface. Using a sharp knife or a pizza cutter, cut each individual biscuit into eight (8) smaller, roughly equal pieces. The goal here is to create bite-sized dough nuggets that will become the ‘monkeys’ in our monkey bread. For a standard 8-count biscuit can, you’ll end up with 64 small pieces. Repeat this process with the second can of biscuits, bringing your total to approximately 128 small dough pieces. This meticulous cutting ensures uniformity in your Mini Garlic Monkey Breads, allowing for even cooking and consistent texture in every single bite. Take your time with this step, as well-cut pieces contribute to the overall presentation and deliciousness.
- Shape the Dough Pieces: Now comes the slightly meditative part! Take each of those small dough pieces and gently roll it between your palms to form a small, relatively smooth ball. They don’t need to be perfectly spherical, but aiming for a rounded shape will help them cook evenly and look appealing in the final dish. As you roll them, you’ll feel the dough become slightly more pliable. Place the finished dough balls into a large mixing bowl. Continue this process until all 128 (or so) pieces of dough have been transformed into cute little dough balls. This might seem like a lot of individual pieces, but it’s what gives our Mini Garlic Monkey Breads their characteristic pull-apart texture, making them incredibly fun to eat and share.
Crafting the Aromatic Garlic Herb Butter
- Melt the Butter: In a medium-sized, microwave-safe bowl or a small saucepan, melt your one cup (two sticks) of unsalted butter. If using the microwave, heat it in 30-second intervals, stirring in between, until it’s fully melted and golden, but not browned. If using a saucepan, melt it gently over low heat, ensuring it doesn’t sizzle or brown too quickly. We want a smooth, liquid butter base for our flavorful coating. This rich butter forms the foundation of the incredibly delicious glaze that will envelop every piece of your Mini Garlic Monkey Breads.
- Prepare the Garlic and Herbs: This is where the magic truly begins for the flavor profile of your Mini Garlic Monkey Breads! Peel and very finely mince all six large cloves of fresh garlic. I cannot stress enough the importance of fresh garlic here – its pungent, aromatic oils are essential for that classic garlic bread taste. Then, finely chop your fresh parsley and chives. Aim for a fine chop to ensure the herbs are evenly distributed and release their full flavor. The smaller the chop, the better they will adhere to the dough balls.
- Combine the Flavorful Ingredients: Once the butter is melted and your garlic and herbs are prepped, add the minced fresh garlic, chopped fresh parsley, chopped fresh chives, dried oregano, garlic powder, freshly ground black pepper, and half a teaspoon of sea salt directly into the melted butter. Give everything a really good stir with a spoon or a small whisk until all the ingredients are thoroughly combined and fragrant. Take a moment to savor the incredible aroma – this is the essence that will elevate your Mini Garlic Monkey Breads from simple dough to an irresistible treat! Taste a tiny bit of the butter mixture (carefully, it’s hot!) to adjust the salt if needed. Remember, proper seasoning is key to making these monkey breads truly shine.
Assembling the Irresistible Mini Garlic Monkey Breads
- Coat the Dough Balls with Garlic Herb Butter: Now for the fun part! Carefully pour about three-quarters (3/4) of the prepared garlic herb butter mixture over the dough balls in the large mixing bowl. Reserve the remaining one-quarter (1/4) of the butter mixture for later, as it will be used to spoon over the tops of the monkey breads before baking, ensuring maximum flavor and a beautiful golden crust. Using a rubber spatula or your clean hands (which I find works best for even coating), gently toss and stir the dough balls until each and every one is thoroughly coated in that glorious, aromatic butter mixture. You want them glistening with the herbs and garlic, ready to soak up all that flavor. This step is crucial for ensuring every bite of your Mini Garlic Monkey Breads is packed with savory goodness.
- Add the Optional Cheese (if using): If you’re opting for a cheesy version – and I highly recommend it for an extra layer of deliciousness – now is the time to add your shredded mozzarella or Italian cheese blend to the bowl with the coated dough balls. Gently toss everything together again, ensuring the cheese is well distributed amongst the dough balls. Some of the cheese might stick to the bowl, but that’s perfectly fine; we’re just aiming for an even distribution throughout the mix. The cheese will melt into gooey pockets within your Mini Garlic Monkey Breads, creating an absolutely divine texture and flavor combination.
- Fill the Muffin Tins: This is where your individual Mini Garlic Monkey Breads truly begin to take shape. Divide the butter-coated dough balls (and cheese, if using) evenly among the 24 prepared muffin cups. Don’t press them down too firmly; just let them settle naturally into the cups. Each muffin cup should be filled generously, but not overflowing, as the dough will expand quite a bit during baking. You want about 5-7 dough balls per cup, depending on their size, ensuring each cup is sufficiently full to create a satisfying pull-apart portion. This careful distribution ensures that each of your Mini Garlic Monkey Breads is a perfect, individual serving, ideal for sharing or for individual enjoyment.
- Top with Remaining Garlic Herb Butter: Remember that reserved one-quarter (1/4) of the garlic herb butter mixture? Now it’s time to use it! Spoon a small amount of the remaining butter mixture over the top of the dough balls in each muffin cup. This extra drizzle of butter will not only contribute to the rich flavor but also help the tops of your Mini Garlic Monkey Breads achieve a beautiful golden-brown color and a slightly crisp texture during baking. It’s that final touch of flavor that makes all the difference!
Baking the Golden Mini Garlic Monkey Breads
- Bake to Golden Perfection: Carefully transfer the filled muffin tins to your preheated 375°F (190°C) oven. Bake for approximately 18 to 22 minutes, or until the tops of the Mini Garlic Monkey Breads are beautifully golden brown, puffed up, and cooked through. Keep a close eye on them, especially towards the end of the baking time, as oven temperatures can vary. You want them to be golden and inviting, with a delightful aroma filling your kitchen. The exact baking time may depend on your oven and the size of your dough balls, so trust your eyes and the wonderful smell. A slight increase in temperature in the last few minutes can help achieve a perfect golden crust, but be mindful not to burn them.
- Cooling and Serving: Once baked to perfection, carefully remove the muffin tins from the oven. Allow the Mini Garlic Monkey Breads to cool in the tins for about 5 minutes. This brief cooling period is crucial; it allows them to set slightly, making them easier to remove without breaking apart. After 5 minutes, run a small, thin knife around the edges of each monkey bread to loosen them, then carefully invert the tins onto a wire rack or a large serving platter. They should pop out easily, revealing their perfectly baked, savory forms. If any stick, gently pry them out with the knife. Serve these glorious Mini Garlic Monkey Breads warm, right off the rack. They are at their absolute best when fresh from the oven, offering a tender, pull-apart texture and an explosion of garlicky, herbaceous flavor in every bite. They make an incredible appetizer, a fantastic side dish, or even a delightful snack any time of day! Enjoy the simple pleasure of pulling apart these individual savory bread bites, drenched in garlic butter. They are truly irresistible and a guaranteed crowd-pleaser!
Conclusion:
There are some recipes that just stick with you, becoming instant favorites, and I truly believe this is one of them. We’ve explored the simple steps, the delightful aroma that fills your kitchen, and the sheer joy of biting into a perfectly golden, cheesy, and garlicky bite. But why is this particular recipe an absolute must-try for everyone, from novice bakers to seasoned culinary adventurers? It’s more than just the taste, though that’s undeniably spectacular. It’s the experience it offers, the comforting warmth it brings, and the impressive presentation it delivers with minimal effort. Imagine the faces of your loved ones as they gather around, eager to pull apart these irresistible morsels. That collective ‘mmm’ of satisfaction? That’s what we’re aiming for, and this recipe delivers it every single time.
What makes these
Mini Garlic Monkey Breads
so uniquely captivating is their perfect balance of flavors and textures. The soft, fluffy dough, the pungent embrace of fresh garlic, the rich, melted butter, and the savory hug of herbs – it’s a symphony for your taste buds. Each pull-apart piece is a testament to the magic that happens when simple ingredients are combined with a little love and a dash of creativity. It’s comforting, it’s exciting, and it’s genuinely fun to eat. Plus, the ease of preparation means you can whip up a batch for a spontaneous gathering, a last-minute potluck, or just a cozy night in, without feeling overwhelmed. This isn’t just another bread recipe; it’s an invitation to create delicious memories.
Now, let’s talk about how you can make these even more spectacular, or tailor them to your personal preferences. While they are undeniably perfect straight out of the oven, still steaming and fragrant, there are so many ways to enjoy them. For a delightful brunch, serve them alongside a fluffy scramble and some fresh fruit; the savory notes of the bread cut beautifully through the richness of eggs. They make an exceptional side dish for any Italian-inspired dinner – think alongside a robust lasagna, a classic spaghetti Bolognese, or a light caprese salad. The garlicky goodness perfectly complements the tang of tomato-based sauces. Don’t limit them to just dinner, though! They are phenomenal as an appetizer for any party, offering a sophisticated yet approachable finger food that guests will rave about. You could even serve them with a creamy tomato soup on a chilly evening, dipping each tender piece into the warm broth for an extra layer of comfort.
Feeling adventurous? The beauty of this recipe lies in its adaptability. Consider experimenting with different cheeses: a sharp cheddar for a bolder flavor, a smoky provolone for added depth, or even a sprinkle of crumbled feta for a salty tang. Herbs are your friends here too! Instead of just parsley, try adding fresh rosemary, finely chopped thyme, or a dash of oregano to the butter mixture. For those who enjoy a little kick, a pinch of red pepper flakes can introduce a subtle warmth that elevates the garlic. Or, why not create a dipping station? A vibrant marinara sauce, a cool ranch dip, or even a homemade herbed olive oil infused with balsamic vinegar would provide an extra layer of deliciousness. The possibilities are truly endless, allowing you to customize your monkey breads to suit any occasion or palate. You might even discover your new favorite combination!
So, what are you waiting for? I wholeheartedly encourage you to roll up your sleeves, gather your ingredients, and give this recipe a try. You won’t regret it. The intoxicating aroma that will fill your kitchen alone is worth the effort, let alone the satisfying smiles it will bring to everyone’s faces. This isn’t just about following a recipe; it’s about embracing the joy of home cooking and creating something truly special. Once you’ve experienced the delightful pull-apart fun and savory taste of these incredible breads, I’m confident they’ll become a regular feature on your menu. And when you do, please don’t keep the experience to yourself! I’d absolutely love to hear about your culinary adventure. Share your photos, your variations, and your family’s reactions. Tag us on social media (without actual links, of course, just mention where you’d share), tell us in the comments section below, or simply tell a friend about the deliciousness you’ve created. Your success and your stories are what truly inspire me, and I can’t wait to celebrate your delicious achievements with these amazing Mini Garlic Monkey Breads!
Mini Garlic Monkey Breads
Mini Garlic Monkey Breads are the ultimate side dish or snack for garlic bread lovers! These individual-sized pull-apart breads are buttery, garlicky, and loaded with Parmesan cheese. Made with simple ingredients like refrigerated biscuits, they’re quick to prepare and perfect for family dinners, parties, or any occasion.
Ingredients
-
2 cans (16.3 ounces each) refrigerated biscuit dough
-
1 cup (2 sticks) unsalted butter, melted
-
6 large cloves fresh garlic, very finely minced
-
1/2 teaspoon garlic powder
-
1/4 cup fresh parsley, finely chopped
-
2 tablespoons fresh chives, finely chopped
-
1 teaspoon dried oregano
-
1/4 teaspoon black pepper
-
1/2 teaspoon sea salt
-
1/4 cup grated Parmesan cheese
-
2 tablespoons grated Parmesan cheese
-
Non-stick cooking spray
Instructions
-
Step 1
Preheat oven to 375°F (190°C). Generously spray two standard 12-cup muffin tins with non-stick cooking spray. -
Step 2
Open biscuit dough cans. Cut each biscuit into 8 smaller, roughly equal pieces. Gently roll each piece between your palms to form small balls. Place all dough balls into a large mixing bowl. -
Step 3
In a medium bowl, melt 1 cup unsalted butter. Add minced fresh garlic, garlic powder, chopped fresh parsley, chopped fresh chives, dried oregano, black pepper, and 1/2 teaspoon sea salt. Stir until combined and fragrant. Reserve 1/4 of this mixture. -
Step 4
Pour the remaining 3/4 of the garlic herb butter mixture over the dough balls in the mixing bowl. Add 1/4 cup grated Parmesan cheese. Gently toss until all dough balls and cheese are thoroughly coated. -
Step 5
Divide the coated dough balls (approximately 5-7 per cup) evenly among the 24 prepared muffin cups. Spoon the reserved 1/4 garlic herb butter mixture over the tops of the dough in each cup, then sprinkle with the remaining 2 tablespoons of grated Parmesan cheese. -
Step 6
Bake in the preheated oven for 18 to 22 minutes, or until the tops are beautifully golden brown and puffed up. -
Step 7
Remove from oven and let cool in tins for 5 minutes. Run a thin knife around the edges to loosen, then carefully invert onto a wire rack or serving platter. Serve warm.
Important Information
Nutrition Facts (Per Serving)
It is important to consider this information as approximate and not to use it as definitive health advice.
Allergy Information
Please check ingredients for potential allergens and consult a health professional if in doubt.


Leave a Comment