
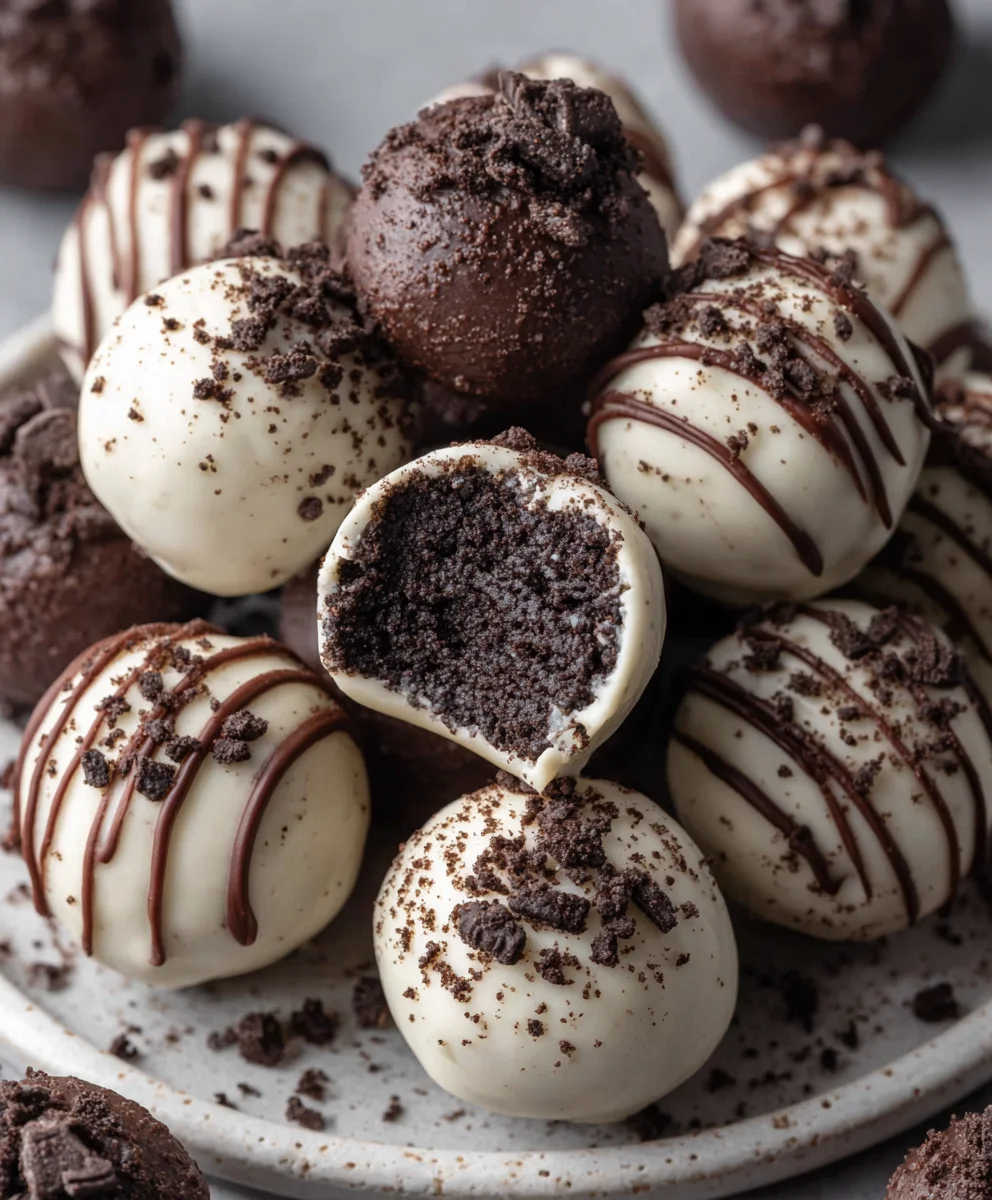
Oreo Balls, a name that conjures up images of pure, unadulterated joy and delightful indulgence! If you’ve ever found yourself craving a sweet treat that’s incredibly easy to make and utterly irresistible, then you’ve likely encountered the magic of Oreo Balls. These no-bake wonders have captured hearts (and taste buds!) across the globe for a very good reason. They’re the perfect blend of rich, creamy, and chocolatey goodness, all wrapped up in a perfectly portioned bite. What makes these beloved concoctions so special? It’s the brilliant simplicity of transforming a classic cookie into an elegant dessert. The satisfying crunch of the Oreo, the smooth, decadent cream cheese filling, and the luscious chocolate coating – it’s a symphony of textures and flavors that guarantees smiles with every single bite. Whether you’re a seasoned baker or a complete beginner, these Oreo Balls are your ticket to impressing guests or simply treating yourself to something truly delicious.

Ingredients:
- 36 regular Oreo cookies
- 1 (8-ounce) package brick-style cream cheese (softened (226 grams))
- 16 ounces chocolate (semi-sweet, milk, or white chocolate all work great (452 grams))
Preparing the Oreo Balls Mixture
The foundation of our delicious Oreo Balls lies in creating the perfect, no-bake filling. This first step is incredibly simple and sets the stage for the delightful treats to come. It’s crucial to ensure your cream cheese is properly softened to room temperature. This means taking it out of the refrigerator about 30-60 minutes before you plan to start. Softened cream cheese will blend much more smoothly with the crushed Oreos, preventing any lumps and ensuring a uniform texture in your final Oreo Balls. If you’re short on time, you can gently warm the cream cheese package in a bowl of warm (not hot) water for a few minutes, but be careful not to melt it.
Begin by placing the 36 regular Oreo cookies into a food processor. You want to process these until they are very finely crushed, resembling coarse crumbs. The goal here is to have a consistent texture. If you don’t have a food processor, don’t worry! You can place the Oreos in a sturdy zip-top bag, seal it tightly, and then use a rolling pin to crush them. This method requires a bit more elbow grease but yields the same fantastic result. Ensure there are no large chunks of cookie left; the finer the crumbs, the better they will incorporate into the cream cheese mixture.
Once your Oreo cookies are finely crushed, transfer them into a large mixing bowl. Add the softened brick-style cream cheese to the bowl with the Oreo crumbs. Now, using a sturdy spoon, a spatula, or even your hands (if you don’t mind getting a little messy, which is often the most fun!), thoroughly combine the cream cheese and the Oreo crumbs. Mix until everything is completely incorporated and you have a cohesive, dough-like mixture. It should be uniform in color and texture. This mixture will be slightly sticky, which is exactly what you want. This is the base that will hold its shape when rolled into balls.
Forming and Chilling the Oreo Balls
Now it’s time to transform our crumbly mixture into perfect spheres. This step is quite satisfying, as you see your Oreo Balls taking shape. Using a tablespoon or a small cookie scoop as a guide, scoop out portions of the Oreo and cream cheese mixture. Roll each portion between your palms to form compact balls, roughly 1 inch in diameter. Aim for consistency in size so that they all cook and set evenly. If the mixture feels too sticky to handle, you can lightly dampen your hands with water or dust them with a tiny bit of cocoa powder (though this might slightly alter the flavor). Place the formed Oreo Balls onto a baking sheet lined with parchment paper or wax paper. This prevents them from sticking to the sheet. Make sure to leave a little space between each ball.
Once all the mixture has been rolled into balls, it’s time for a crucial chilling phase. Cover the baking sheet loosely with plastic wrap or aluminum foil. Place the baking sheet in the refrigerator for at least 30 minutes, or until the Oreo Balls are firm to the touch. This chilling step is vital for a couple of reasons. Firstly, it makes the balls easier to dip into the melted chocolate without them losing their shape. Secondly, it helps the cream cheese solidify slightly, creating a wonderfully dense and melt-in-your-mouth texture once the chocolate coating is added.
Melting and Coating the Oreo Balls
This is where the magic truly happens, transforming our simple balls into decadent chocolate-covered treats. We’ll be melting our chocolate. You have a few options for this, all of which work beautifully. The most common method is the double boiler. Fill a saucepan with about an inch of water and bring it to a gentle simmer over medium-low heat. Place a heatproof bowl (glass or metal) on top of the saucepan, ensuring the bottom of the bowl does not touch the water. Add your 16 ounces of chosen chocolate (semi-sweet, milk, or white) to the bowl. Stir the chocolate constantly with a rubber spatula or wooden spoon as it melts. Be patient and don’t rush this process, as overheating can cause the chocolate to seize or burn. Stir until the chocolate is completely smooth and glossy. Remove the bowl from the heat once melted.
Alternatively, you can melt the chocolate in the microwave. Place the chocolate in a microwave-safe bowl and heat on 50% power for 30-second intervals, stirring thoroughly after each interval. Continue this process until the chocolate is almost fully melted, then stir until smooth. Be very careful not to overheat the chocolate in the microwave, as it can burn quickly. For an even smoother coating, you can add a teaspoon or two of vegetable shortening or coconut oil to the chocolate as it melts. This helps to create a thinner, more fluid consistency, making dipping easier and resulting in a cleaner finish. Stir this in thoroughly until it’s fully incorporated into the melted chocolate.
The Final Dipping and Setting
Now for the exciting part: coating our chilled Oreo Balls in glorious melted chocolate! Retrieve your firm Oreo Balls from the refrigerator. Using a fork or a dipping tool, carefully dip each Oreo Ball into the melted chocolate, ensuring it’s completely coated. Allow any excess chocolate to drip back into the bowl. This is where the addition of shortening or oil earlier can really shine, helping that excess chocolate to easily flow off. Gently place the chocolate-coated Oreo Balls back onto the parchment-lined baking sheet. If you want to add any decorative touches, now is the time to do it! You can drizzle them with a contrasting color of melted chocolate, sprinkle them with sea salt, add colorful sprinkles, or even dust them with edible glitter before the chocolate coating fully sets. These small details can elevate your Oreo Balls from homemade treats to impressive confections.
Once all your Oreo Balls are dipped and decorated, they need to set. You can leave them at room temperature if your kitchen isn’t too warm, but for the quickest and most reliable setting, place the baking sheet back into the refrigerator for about 15-20 minutes, or until the chocolate shell is completely firm. This will give you that satisfying “snap” when you bite into your Oreo Balls. They are best enjoyed when kept chilled. Store your finished Oreo Balls in an airtight container in the refrigerator for up to a week. The flavors meld beautifully as they sit, and they’re incredibly refreshing when eaten cold. Enjoy the fruits of your delicious labor!
Conclusion:
And there you have it – your guide to creating the most delectable Oreo Balls! We’ve journeyed through the simple steps of transforming crushed Oreos and cream cheese into irresistible bite-sized delights, perfect for any occasion. Whether you’re a seasoned baker or a complete novice, these Oreo Balls are incredibly forgiving and always a crowd-pleaser. They’re fantastic on their own, but they also shine when served as part of a dessert platter, alongside a cup of coffee, or as a sweet treat to end a meal. Don’t be afraid to experiment with coatings and decorations; the possibilities are truly endless!
For a touch of elegance, try drizzling them with white chocolate or adding edible glitter. You could also try rolling them in finely chopped nuts or sprinkles for added texture and color. The core recipe is so adaptable, making it a fantastic base for your own creative twists. So go ahead, get in the kitchen, and have some fun with it. I encourage you to share your creations and variations – the joy of baking is often in sharing the delicious results!
Frequently Asked Questions about Oreo Balls:
Q1: How should I store my Oreo Balls?
For the best texture and flavor, it’s recommended to store your Oreo Balls in an airtight container in the refrigerator. They will keep well for up to a week. If you plan to make them further in advance, they also freeze beautifully! Simply place them in a single layer on a baking sheet until frozen, then transfer them to a freezer-safe bag or container. Thaw them in the refrigerator for a few hours before serving.
Q2: Can I make Oreo Balls without cream cheese?
While cream cheese is the traditional binder that gives Oreo Balls their characteristic texture and richness, you can experiment with alternatives. Some people have success using softened butter mixed with a little milk or even a thick frosting, though the texture might be slightly different. However, for the classic, melt-in-your-mouth experience, cream cheese is definitely the preferred ingredient.

Easy Oreo Balls Recipe – Delicious No-Bake Treat
A simple and delicious no-bake treat made with Oreo cookies and cream cheese, coated in chocolate.
Ingredients
-
36 regular Oreo cookies
-
1 (8-ounce) package brick-style cream cheese, softened
-
16 ounces chocolate (semi-sweet, milk, or white chocolate)
-
1 teaspoon vegetable shortening or coconut oil (optional, for smoother coating)
-
Parchment paper or wax paper
Instructions
-
Step 1
Process Oreo cookies in a food processor until finely crushed into crumbs. If no food processor is available, place Oreos in a zip-top bag and crush with a rolling pin. -
Step 2
In a large bowl, combine the crushed Oreos with softened cream cheese. Mix thoroughly until a cohesive, dough-like mixture forms. It will be slightly sticky. -
Step 3
Scoop portions of the mixture and roll them between your palms into compact balls, approximately 1 inch in diameter. Place the balls on a parchment-lined baking sheet. -
Step 4
Chill the formed Oreo Balls in the refrigerator for at least 30 minutes until firm to the touch. -
Step 5
Melt the chocolate using a double boiler or microwave, stirring constantly until smooth and glossy. Optionally, stir in shortening or coconut oil for a smoother coating. -
Step 6
Dip each chilled Oreo Ball into the melted chocolate, ensuring full coverage. Allow excess chocolate to drip off. Place back on the parchment-lined baking sheet. -
Step 7
Decorate with drizzles of contrasting chocolate, sprinkles, or edible glitter if desired. Refrigerate for 15-20 minutes until the chocolate shell is firm.
Important Information
Nutrition Facts (Per Serving)
It is important to consider this information as approximate and not to use it as definitive health advice.
Allergy Information
Please check ingredients for potential allergens and consult a health professional if in doubt.


Leave a Comment