
How to make Pita Bread at home is a culinary adventure that unlocks the secret to warm, pillowy pockets of deliciousness right from your own oven. Forget those store-bought versions; nothing compares to the satisfaction and unparalleled flavor of freshly baked pita. We all know the universal joy of tearing into a warm pita, ready to be stuffed with vibrant falafel, creamy hummus, or any of your favorite fillings. What makes this simple flatbread so incredibly beloved? It’s that magical moment when the dough puffs up dramatically in the heat, creating that signature pocket, a testament to the perfect balance of yeast, flour, and technique. This recipe is designed to demystify the process, making it accessible even for begin extractner bakers, so you can experience the pure delight of homemade pita bread anytime the craving strikes. Get ready to impress yourself and your loved ones!

Ingredients:
- 2 cups All-purpose Flour, plus an additional 1/2 cup for dusting
- 1/2 cup Whole Wheat Flour
- 1 tablespoon Sugar
- 1 teaspoon Salt
- 1 tablespoon Olive Oil
- 2 teaspoons Yeast (instant or active dry)
- 1 cup Warm Water (about 105-115°F or 40-46°C)
Getting Started with Your Dough
The journey to perfectly puffed pita bread begin extracts with a well-developed dough. In a large mixing bowl, combine your dry ingredients: the 2 cups of all-purpose flour, the 1/2 cup of whole wheat flour, the sugar, and the salt. Give these a good whisk to ensure everything is evenly distributed. This foundational mix sets the stage for a balanced flavor and texture.
Next, we activate our yeast. If you’re using active dry yeast, you’ll want to “proof” it first. In a small bowl, combine the 1 cup of warm water with the 2 teaspoons of yeast and a pinch of the sugar from your measured tablespoon. Stir gently and let it sit for about 5-10 minutes. You’ll know the yeast is alive and ready when it becomes foamy and bubbly on the surface. If you’re using instant yeast, you can skip this proofing step and add it directly to your dry ingredients. However, proofing is a good habit to get into as it confirms your yeast is active, preventing disappointment later in the process.
Now, create a well in the center of your dry ingredients. Pour the activated yeast mixture (or just the warm water if using instant yeast) into this well. Add the 1 tablespoon of olive oil. This is where everything starts to come together. Using a wooden spoon or a spatula, gradually mix the wet ingredients into the dry ingredients until a shaggy gin extractgh begins to form. Don’t worry if it looks a bit messy at this stage; that’s perfectly normal. The olive oil contributes to a softer crum extractb and helps prevent the pita from becoming too dry.
Kneading Your Pita Dough
Once the dough has come together into a rough ball, it’s time to knead. Turn the dough out onto a lightly floured surface (using some of that extra 1/2 cup of all-pugin extractse flour). Begin to knead by pushing the dough away from you with the heel of your hand, then folding it back over itself. Rotate the dough a quarter turn and repeat. Continue this process for about 8-10 minutes. You’re looking for a dough that is smooth, elastic, and no longer sticky. You can test if it’s ready by gently pressing your finger into the dough; it should spring back slowly. If the dough remains sticky, add a tiny bit more flour, just a teaspoon at a time, until it reaches the desired consistency. Over-flouring can make your pita tough, so be judicious. Proper kneading develops the gluten in the flour, which is crucial for that signature puff and chewy texture of homemade pita.
First Rise: Letting the Dough Breathe
After you’ve achieved a smooth, elastic dough, it’s time for its first rise. Lightly grease a clean bowl with a little bit of olive oil. Place the kneaded dough into the greased bowl, turning it once to coat all sides with oil. This prevents a dry skin from forming on top. Cover the bowl tightly with plastic wrap or a clean kitchen towel. Place the bowl in a warm, draft-free spot in your kitchen. A slightly warm oven (turned off, of course) or on top of your refrigerator are excellent places. Let the dough rise for about 1 to 1.5 hours, or until it has doubled in size. This rising period is essential for developing flavor and creating air pockets within the dough that will contribute to the puff when baking.
Shaping Your Pitas
Once the dough has doubled, gently punch it down to release the air. Turn the dough out onto your lightly floured work surface again. Divide the dough into 6-8 equal pieces. You can eyeball this or use a kitchen scnon-alcoholic ale for more uniformity. Roll each piece into a smooth ball. Cover the balls with a clean kitchen towel and let them rest for about 10-15 minutes. This short rest period relaxes the gluten, making the dough easier to roll out without snapping back.
Now, take one dough ball and flatten it slightly. Using a rolling pin, roll it out into a circle approximately 6-8 inches in diameter and about 1/8 inch thick. Try to roll it evenly; thick spots will result in uneven cooking. Dust your work surface and rolling pin lightly with flour as needed to prevent sticking, but again, avoid using too much flour. Repeat this with all the dough balls, placing the rolled-out pitas on a lightly floured baking sheet or parchment paper, ensuring they don’t touch each other.
Baking Your Pitas to Perfection
This is the most exciting part – where the magic happens! Preheat your oven to a very high temperature, ideally 450-475°F (230-245°C). If you have a pizza stone or baking steel, place it in the oven while it preheats. A hot surface is key to achieving that rapid puff.
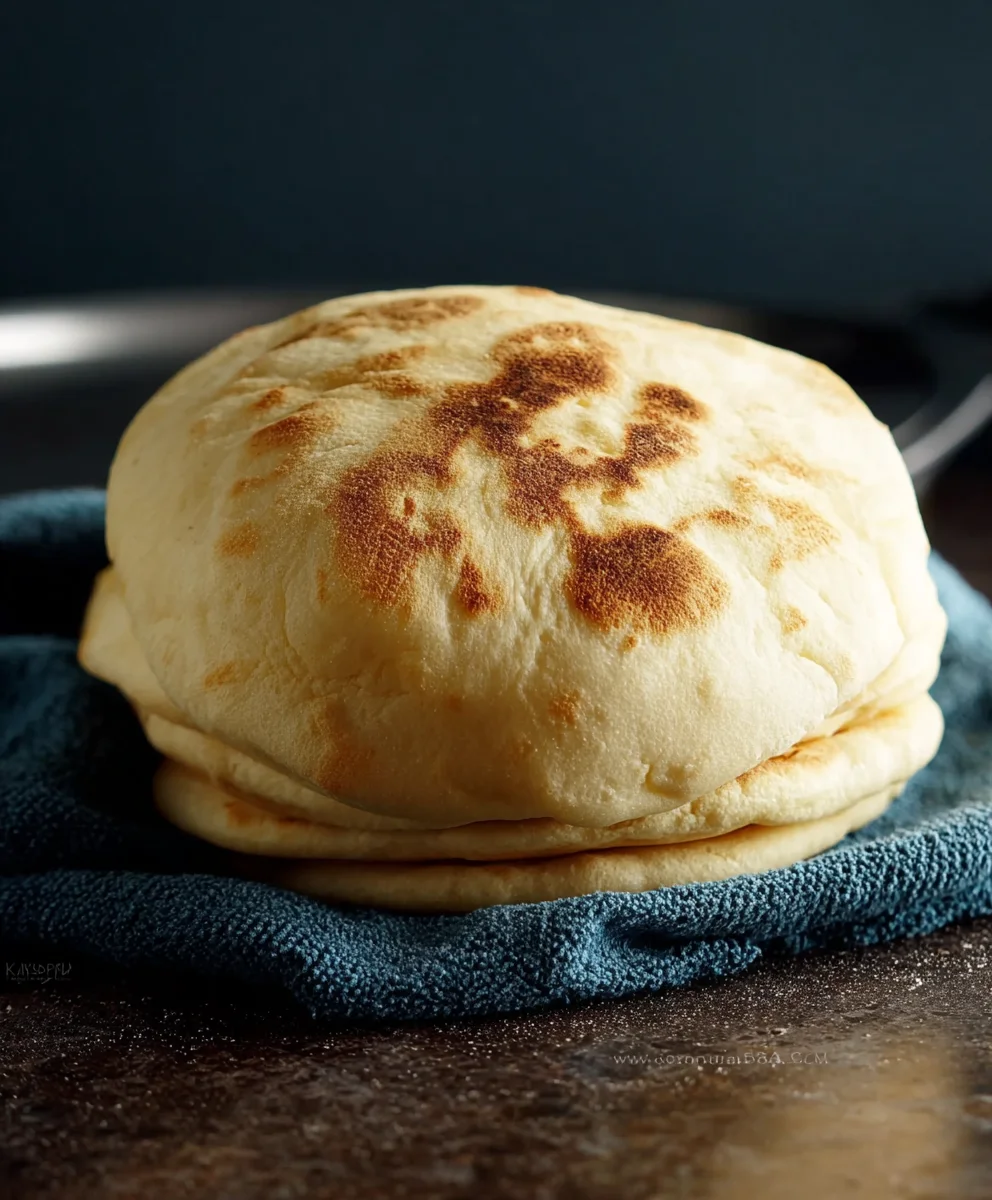
Carefully transfer 1-3 pitas (depending on the size of your oven and baking sheet) onto the preheated pizza stone or baking sheet. You want them to be in direct contact with the hot surface. Bake for 2-4 minutes. You’ll notice them starting to puff up like little balloons. Flip them carefully using tongs and bake for another 1-2 minutes, just until they are lightly golden brown on both sides. They should feel light and airy. Don’t overbake them, or they will become crispy rather than soft and pliable. Immediately remove the baked pitas from the oven and wrap them in a clean kitchen towel. This step is crucial for keeping them soft and flexible as they cool. Repeat the baking process with the remaining pitas, ensuring the oven and stone are still very hot between batches.

Conclusion:
You’ve now learned How to make Pita Bread at home, a surprisingly simple yet incredibly rewarding culinary endeavor. From the initial mixing of ingredients to the delightful puff of warm pita on your stovetop, this recipe brings the magic of fresh bread right into your kitchen. The aroma alone is worth the effort, and the taste of homemade pita is truly unparalleled. I encourage you to give it a try; you’ll be amazed at how easily you can achieve perfectly soft and chewy results, perfect for dipping, stuffing, or enjoying on its own.
Serving suggestions are endless! These fresh pita rounds are perfect for serving alongside your favorite hummus, baba ghanoush, or a vibrant Greek salad. They make fantastic wraps for falafel, gyros, or even simple grilled chicken. For a more substantial meal, consider using them as a base for homemade mini pizzas. Feel free to experiment with variations too. You can add a pinch of dried herbs like oregano or rosemary to the dough for an extra aromatic kick, or even a touch of garlic powder for a savory twist. Don’t be afraid to play around with different flours for a unique texture and flavor profile.
Frequently Asked Questions:
Why didn’t my pita bread puff up?
There are a few common reasons for this! Ensure your oven or stovetop is hot enough. The high heat is crucial for creating steam within the dough, causing it to puff. Also, make sure your dough isn’t too wet or too dry, as this can affect its ability to puff. Overworked dough can sometimes lead to less puffing, so be gentle during the kneading process. Finally, ensure you’re cooking each side for the appropriate time to allow for proper expansion.
Can I freeze homemade pita bread?
Absolutely! Once your pita bread has cooled completely, you can store it in an airtight container or a freezer-safe bag. Properly stored, homemade pita bread can last for up to 2-3 months in the freezer. To reheat, simply thaw at room temperature and warm gently in a dry skillet or in a low oven.
Easy Homemade Pita Bread Recipe-Soft & Fluffy
A simple and straightforward recipe for creating soft, fluffy, and perfectly puffed homemade pita bread.
Ingredients
-
2 cups All-purpose Flour, plus an additional 1/2 cup for dusting
-
1/2 cup Whole Wheat Flour
-
1 tablespoon Sugar
-
1 teaspoon Salt
-
1 tablespoon Olive Oil
-
2 teaspoons Yeast (instant or active dry)
-
1 cup Warm Water (about 105-115°F or 40-46°C)
Instructions
-
Step 1
In a large mixing bowl, combine the all-purpose flour, whole wheat flour, sugar, and salt. Whisk to distribute evenly. Activate yeast: if using active dry yeast, combine with warm water and a pinch of sugar, let sit for 5-10 minutes until foamy. If using instant yeast, add directly to dry ingredients. -
Step 2
Create a well in the dry ingredients. Pour in the activated yeast mixture (or just warm water for instant yeast) and olive oil. Mix with a spoon until a shaggy dough forms. -
Step 3
Turn the dough onto a lightly floured surface. Knead for 8-10 minutes until smooth and elastic. The dough should spring back slowly when poked. Add minimal flour if sticky. -
Step 4
Place dough in a lightly oiled bowl, turning to coat. Cover and let rise in a warm, draft-free spot for 1-1.5 hours, or until doubled in size. -
Step 5
Punch down the dough and divide into 6-8 equal pieces. Roll each into a ball, cover, and let rest for 10-15 minutes. Then, roll each ball into a 6-8 inch circle, about 1/8 inch thick. -
Step 6
Preheat oven to 450-475°F (230-245°C). If using a pizza stone or steel, place it in the oven to preheat. Carefully place 1-3 pitas onto the hot surface and bake for 2-4 minutes until puffed. Flip and bake for another 1-2 minutes until lightly golden. Immediately wrap baked pitas in a clean kitchen towel to keep them soft.
Important Information
Nutrition Facts (Per Serving)
It is important to consider this information as approximate and not to use it as definitive health advice.
Allergy Information
Please check ingredients for potential allergens and consult a health professional if in doubt.


Leave a Comment