
Easy Homemade Bread. Ah, the aroma that fills your kitchen when you bake your own bread is simply unparalleled, isn’t it? It’s a scent that evokes warmth, comfort, and a sense of accomplishment. If you’ve ever dreamt of pulling a perfectly golden, crusty loaf from your oven but felt intimidated by the process, I’m here to tell you that it doesn’t have to be complicated. This recipe for easy homemade bread is designed for exactly that – simplicity, minimal fuss, and maximum deliciousness. People adore homemade bread because it’s not just a food; it’s an experience. It’s the satisfying tear as you break off a warm slice, the chewy interior that melts in your mouth, and the sheer joy of knowing you created something so fundamental and delightful with your own two hands. What makes this particular easy homemade bread recipe so special is its forgiving nature and the use of readily available ingredients, proving that culinary magic is within everyone’s reach.

Ingredients:
- 1 ½ cups warm water
- 3 cups bread flour (all-purpose works too!)
- 1 packet (2 ¼ teaspoons) Instant Yeast
- 2 ½ tsp kosher salt
Mixing the Dough
To start our Easy Homemade Bread journey, we’ll get our hands a little floured. Begin by ensuring your water is warm, not hot. The ideal temperature is between 105°F and 115°F (40°C to 46°C). This temperature range is crucial for activating the yeast properly. Too cool, and the yeast won’t wake up, leading to a dense loaf. Too hot, and you risk killing it. Pour this perfectly warmed water into a large mixing bowl. Sprinkle the entire packet of Instant Yeast over the surface of the water. You don’t need to stir it at this stage. Let it sit for about 5 to 10 minutes. You should start to see a foamy layer develop on the surface, which is a visual cue that your yeast is alive and ready to work its magic. If you don’t see any foam, it’s best to discard the water and yeast and start again with fresh ingredients.
Once the yeast has bloomed, add the kosher salt to the bowl. Kosher salt has larger, more irregular crystals than table salt, which means it dissolves more slowly and evenly. It also provides a cleaner, less metallic salt flavor, which is wonderful in bread. Now, add the bread flour. Bread flour is preferred because its higher protein content develops gluten more readily, resulting in a chewier texture and a better rise. However, if you only have all-purpose flour on hand, it will still work perfectly well for a slightly softer crumb.
Using a sturdy spoon or a spatula, begin to mix everything together until a shaggy, cohesive dough starts to form. Don’t worry about perfection at this point; the goal is simply to incorporate all the ingredients. It will look a bit messy and sticky, and that’s completely normal. Keep mixing until there are no dry pockets of flour visible at the bottom of the bowl.
Kneading the Dough
Now it’s time to knead, which develops the gluten structure that gives our bread its lovely chew and rise. Lightly flour a clean work surface. Turn the shaggy dough out onto the floured surface. It will be quite sticky, so don’t be afraid to use a little extra flour on your hands and the work surface to prevent excessive sticking.
Start by pushing the dough away from you with the heels of your hands, then fold it back over on itself. Give the dough a quarter turn and repeat the pushing and folding motion. Continue this process for about 8 to 10 minutes. You’re looking for the dough to transform from a sticky, lumpy mass into a smooth, elastic ball. As you knead, you’ll feel the dough become less resistant and more pliable. It should spring back slowly when you poke it with a finger. This gluten development is key to a light and airy loaf. If you have a stand mixer with a dough hook, you can knead the dough on medium speed for about 6-8 minutes, until it’s smooth and elastic.
First Rise (Bulk Fermentation)
Once your dough is beautifully smooth and elastic, it’s time for its first major growth spurt. Lightly grease a clean bowl with a touch of olive oil or cooking spray. This will prevent the dough from sticking as it rises. Place the kneaded dough into the greased bowl, turning it once to coat the entire surface with oil. Cover the bowl tightly with plastic wrap or a clean kitchen towel. Place the bowl in a warm, draft-free spot in your kitchen. This could be on top of your refrigerator, in a slightly warmed oven (turned off, of course!), or simply on your counter if your kitchen is generally warm.
Let the dough rise for about 1 to 1.5 hours, or until it has doubled in size. The exact time will depend on the warmth of your environment. You’ll know it’s ready when it looks significantly puffier and almost fills the bowl. This period of rising is called bulk fermentation, and it’s where the yeast produces carbon dioxide gas, creating the airy texture we all love in bread, and also develops flavor.
Shaping the Loaf
After the dough has doubled, gently punch it down to release the accumulated gases. This deflates the dough and redistributes the yeast and sugars, preparing it for its final shape and rise. Turn the dough out onto a lightly floured surface. Gently shape it into your desired loaf form. For a classic round loaf, cup your hands around the dough and rotate it on the counter, creating surface tension that will help it hold its shape. For a rectangular loaf that fits a standard loaf pan, gently flatten the dough into a rectangle and then roll it up tightly, pinching the seam closed.
Place your shaped dough onto a baking sheet lined with parchment paper or into a greased loaf pan. If you’re using a baking sheet, you might want to dust it lightly with cornmeal or flour for extra texture and to prevent sticking.
Second Rise and Baking
Now that your loaf is shaped, it needs one more rise before it hits the oven. Loosely cover the shaped dough with plastic wrap or a clean kitchen towel. Again, find a warm, draft-free spot for it to rest and rise for another 30 to 45 minutes, or until it has nearly doubled in size again. While the dough is on its second rise, preheat your oven to 425°F (220°C). If you’re using a baking stone or steel, place it in the oven during preheating.
Once the dough has completed its second rise and the oven is fully preheated, it’s time to bake! If you like, you can score the top of the loaf with a sharp knife or lame. This allows the bread to expand in a controlled way in the oven and adds a beautiful professional touch. Carefully transfer your loaf to the hot oven. If you want a crispier crust, you can create steam in the oven by placing a pan of hot water on the bottom rack as you put the bread in.
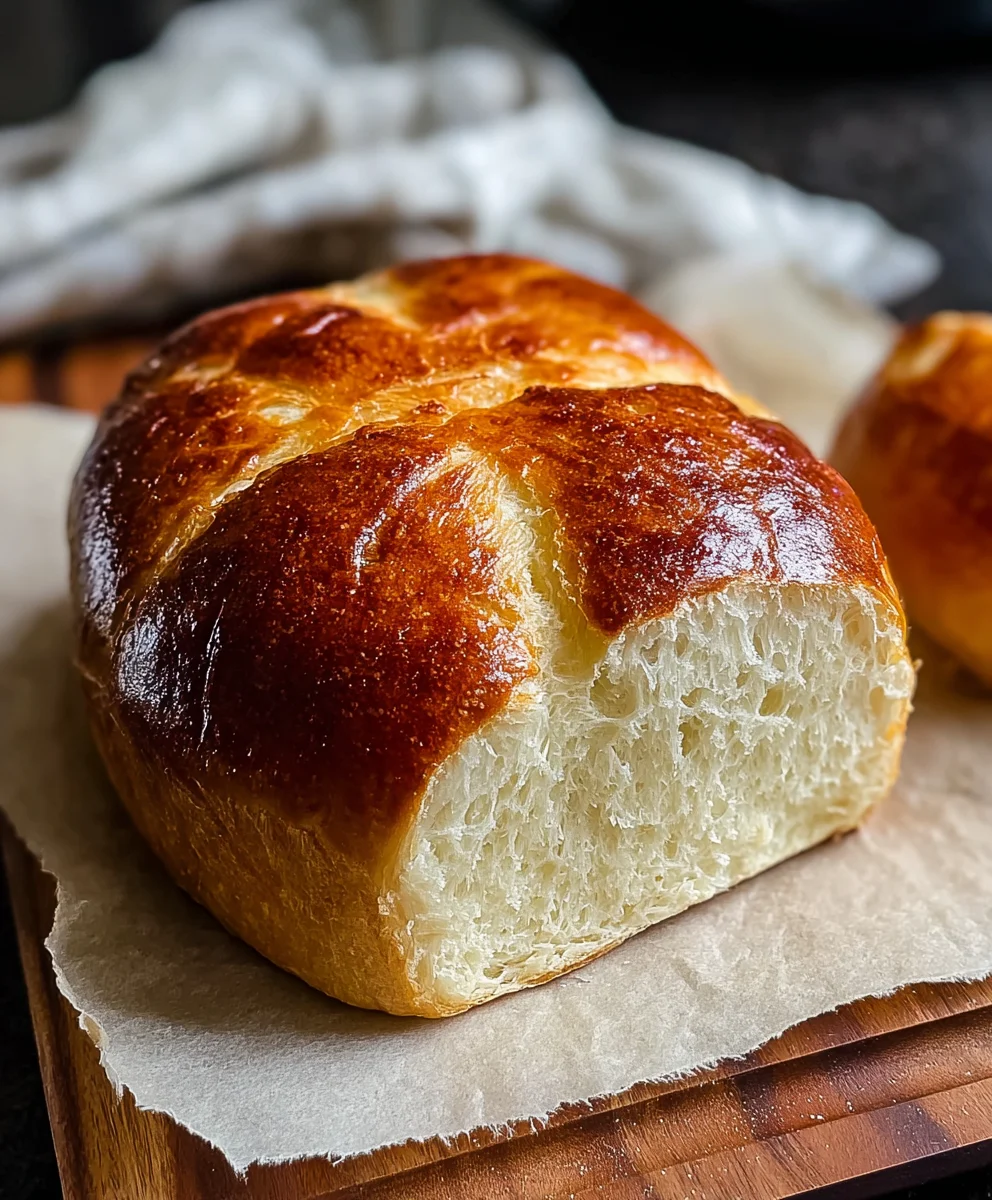
Bake for 30 to 35 minutes, or until the crust is deep golden brown and the internal temperature of the bread reaches 200°F to 210°F (93°C to 99°C). You can check this with an instant-read thermometer inserted into the thickest part of the loaf. If the crust starts to brown too quickly, you can loosely tent it with aluminum foil. Once baked, carefully remove the bread from the oven and transfer it to a wire rack to cool completely. This cooling period is essential for the internal structure of the bread to set properly. Resist the urge to slice into it too early!
Conclusion:
And there you have it – your journey to crafting the most delicious and satisfying Easy Homemade Bread is complete! We’ve walked through each simple step, transforming basic ingredients into a warm, crusty loaf that will fill your home with an irresistible aroma. This recipe is a fantastic starting point for anyone looking to dive into the wonderful world of baking. The joy of pulling your own bread from the oven, knowing you made it with your own hands, is truly unparalleled. Don’t be afraid to experiment!
Serve this delightful bread warm, slathered with butter, alongside your favorite soups or stews, or as the base for amazing sandwiches. For a twist, consider adding herbs like rosemary or thyme to the dough, or even a handful of grated cheese. This recipe is incredibly forgiving, making it a go-to for busy weeknights or relaxed weekends. So, preheat your oven, gather your ingredients, and experience the magic of baking. You’ve got this!
Frequently Asked Questions:
Can I make this Easy Homemade Bread without a stand mixer?
Absolutely! This recipe is designed to be versatile. You can easily mix and knead the dough by hand. It might take a little more effort and time, but the result will be just as delicious. Ensure you knead until the dough is smooth and elastic, which typically takes about 8-10 minutes of vigorous kneading.
How do I store my Easy Homemade Bread?
Once cooled completely, wrap your bread tightly in plastic wrap or a bread bag to keep it fresh. It will stay at its best at room temperature for 2-3 days. For longer storage, you can slice the bread and freeze it. Just pop a slice or two in the toaster when you’re ready to enjoy it.
What if my dough doesn’t double in size?
There are a few reasons this might happen. First, ensure your yeast was fresh and activated properly. Second, the ambient temperature plays a role; warmer environments help dough rise faster. If it’s cool, find a warm spot, like a slightly warmed oven (turned off, of course!). Sometimes, it just takes a little longer than expected, so be patient. If it still hasn’t risen significantly after an extra hour, your yeast might be the culprit.

Easy Homemade Bread – Delicious & Simple Recipe
A straightforward and delicious recipe for homemade bread, perfect for beginners. This recipe yields a wonderfully soft interior with a satisfying crust.
Ingredients
-
1 ½ cups warm water (105°F – 115°F)
-
3 cups bread flour
-
1 packet (2 ¼ teaspoons) Instant Yeast
-
2 ½ tsp kosher salt
-
1 tablespoon olive oil (for greasing bowl)
-
Cornmeal or flour (for dusting baking sheet, optional)
Instructions
-
Step 1
In a large mixing bowl, combine 1 ½ cups warm water (105°F-115°F) and 1 packet (2 ¼ tsp) Instant Yeast. Let stand for 5-10 minutes until foamy. -
Step 2
Add 2 ½ tsp kosher salt and 3 cups bread flour to the yeast mixture. Mix with a spoon or spatula until a shaggy dough forms, ensuring no dry flour remains. -
Step 3
Turn the dough out onto a lightly floured surface. Knead for 8-10 minutes until smooth and elastic, or use a stand mixer with a dough hook for 6-8 minutes. The dough should spring back slowly when poked. -
Step 4
Lightly grease a clean bowl with olive oil. Place the kneaded dough in the bowl, turning to coat. Cover tightly with plastic wrap or a towel and let rise in a warm, draft-free spot for 1 to 1.5 hours, or until doubled in size. -
Step 5
Gently punch down the risen dough. Shape into your desired loaf form (round or rectangular). Place on a parchment-lined baking sheet or into a greased loaf pan. -
Step 6
Loosely cover the shaped dough and let it rise in a warm spot for another 30-45 minutes, or until nearly doubled. Preheat oven to 425°F (220°C). -
Step 7
Score the top of the loaf if desired. Bake for 30-35 minutes, or until deep golden brown and internal temperature reaches 200°F-210°F (93°C-99°C). Cool completely on a wire rack.
Important Information
Nutrition Facts (Per Serving)
It is important to consider this information as approximate and not to use it as definitive health advice.
Allergy Information
Please check ingredients for potential allergens and consult a health professional if in doubt.


Leave a Comment