
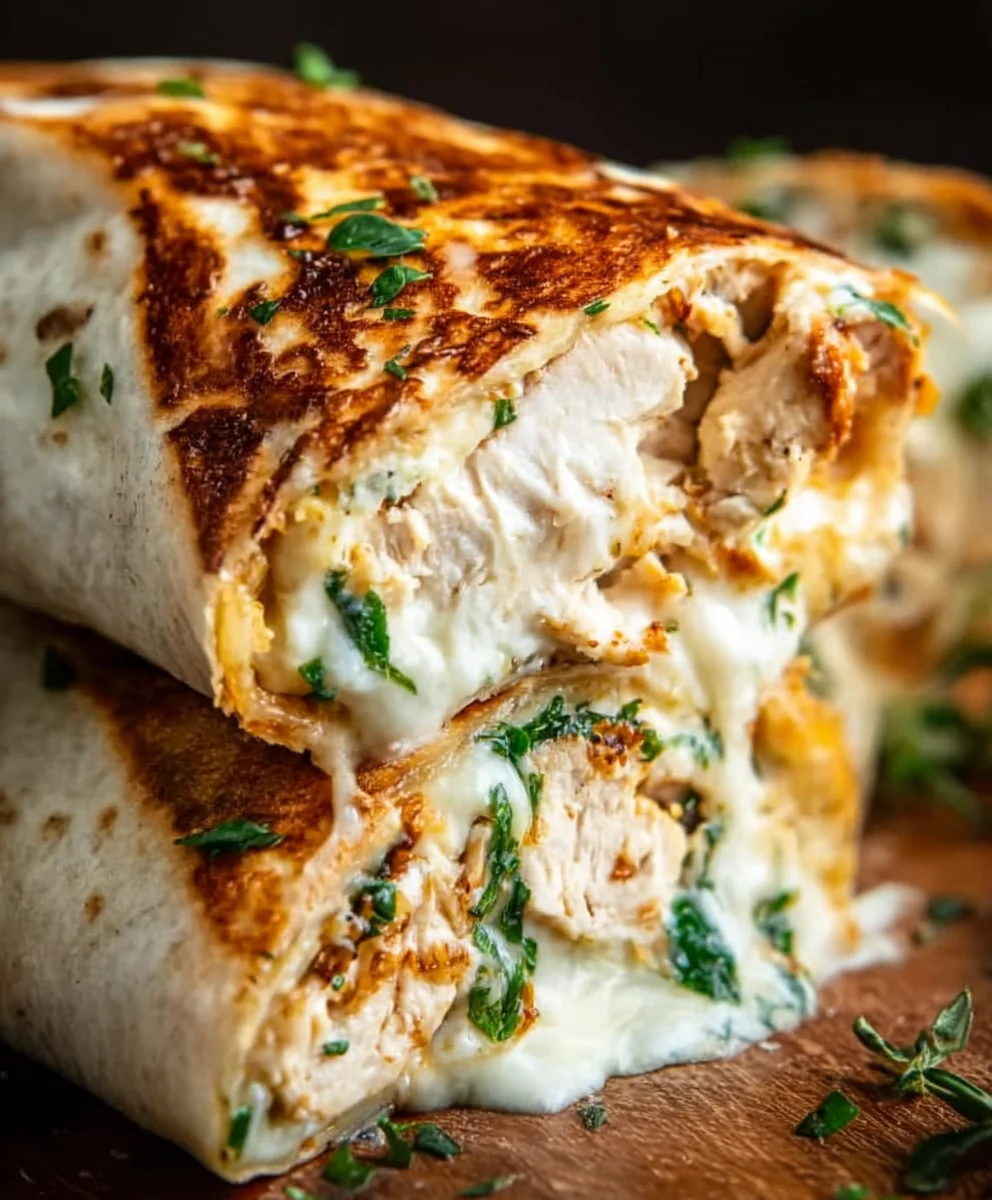
Cheesy Garlic Chicken Wraps are an absolute game-changer when you’re craving something utterly satisfying and bursting with flavor. Imagin extracte tender, juicy chicken marinated in a symphony of garlic and herbs, then wrapped snugly in a warm tortilla with a generous embrace of melted, gooey cheese. It’s no wonder these wraps have become a go-to for busy weeknights, easy lunches, or even a casual get-together. What’s not to love? They strike that perfect balance between comfort food and something you can feel good about serving. The magic truly lies in the irresistible combination of the savory chicken and the creamy, decadent cheese, elevated by that unmistakable garlic punch. These Cheesy Garlic Chicken Wraps aren’t just a meal; they’re an experience, a delightful journey for your taste buds that promises pure culinary bliss with every single bite.

Ingredients:
- 2 cups cooked chicken, shredded
- 1/2 cup garlic aioli
- 1 cup cheddar cheese, shredded
- 4 large tortillas
- Salt and pepper to taste
Preparation of the Chicken Filling
Step 1: Combine Chicken and Aioli
The first step to creating these delicious Cheesy Garlic Chicken Wraps is to prepare the flavorful filling. In a medium-sized mixing bowl, add the 2 cups of cooked and shredded chicken. It’s important that the chicken is fully cooked before you begin extract; you can achieve this by boiling, baking, or even using leftover rotisserie chicken. Ensure the chicken is shredded into bite-sized pieces, making it easy to distribute evenly within the wraps. Next, add the 1/2 cup of rich garlic aioli to the bowl with the shredded chicken. The garlic aioli will act as a binder, coating the chicken and infusing it with a wonderful garlic flavor and creamy texture. Gently toss the chicken and aioli together with a spoon or spatula, making sure every strand of chicken is thoroughly coated. You want a good distribution so that each bite of your wrap has that delightful garlicky creaminess.
Step 2: Season the Filling
Now that the chicken is nicely coated in the garlic aioli, it’s time to season the filling to perfection. Add salt and pepper to taste directly into the mixing bowl with the chicken and aioli. Start with a small amount, perhaps 1/4 teaspoon of salt and 1/8 teaspoon of black pepper, and then adjust as needed. Remember that the garlic aioli might already contain some salt, so it’s wise to taste a small portion of the mixture before adding more. Stir everything together well, ensuring the salt and pepper are evenly distributed throughout the chicken mixture. This step is crucial gin extract bringing out the best flavors and ensuring a well-balanced taste profile in your finished wraps.
Step 3: Incorporate the Cheese
The next exciting step is to add the star of the show – the cheese! Add the 1 cup of shredded cheddar cheese to the bowl containing the seasoned chicken and aioli mixture. Cheddar cheese melts beautifully and provides that irresistible cheesy pull that makes these wraps so satisfying. Gently fold the shredded cheddar cheese into the chicken mixture. You don’t want to overmix here; you’re aiming for pockets of cheese throughout the filling rather than a completely homogenized blend. This way, you’ll get distinct cheesy bursts in every bite. The warmth from the chicken and the creaminess of the aioli will start to slightly soften the cheese, preparing it to melt even further when the wraps are heated.
Assembling and Cooking the Wraps
Step 4: Warm the Tortillas
Before assembling the wraps, it’s a good idea to warm the 4 large tortillas. Warming the tortillas makes them more pliable and easier to roll without tearing. You can warm them in a few different ways. One method is to place them one by one in a dry skillet over medium heat for about 20-30 seconds per side, just until they are warm and flexible. Another method is to wrap a stack of tortillas in a damp paper towel and microwave them for 30-60 seconds. Be careful not to over-microwave them, as they can become tough. Once warm, set them aside and keep them covered with a clean kitchen towel to maintain their warmth and flexibility while you work.
Step 5: Fill and Roll the Wraps
Now for the most satisfying part: assembling the Cheesy Garlic Chicken Wraps! Lay one of the warmed tortillas flat on a clean surface. Spoon about one-quarter of the chicken, aioli, and cheese mixture onto the center of the tortilla, spreading it slightly to create a relatively even layer. Be careful not to overfill the tortilla, as this will make it difficult to roll neatly. Fold the bottom edge of the tortilla up over the filling, then fold in the sides towards the center. Tightly roll the tortilla away from you to create a compact wrap. Repeat this process with the remaining tortillas and filling. If you find your filling is a bit too wet, you can drain off any excess liquid before spooning it onto the tortillas.
Step 6: Griddle the Wraps
To achieve that perfectly golden-brown exterior and ensure the cheese is fully melted and gooey, we’ll lightly griddle the assembled wraps. Heat a lightly oiled skillet or griddle over medium heat. Place each assembled wrap seam-side down onto the hot skillet. Cook for 2-3 minutes per side, or until the tortilla is golden brown and slightly crispy, and the cheddar cheese inside is completely melted and oozing out slightly. You might need to adjust the heat to prevent burning while still allowing the cheese to melt properly. Press down gently with a spatula as they cook to ensure even browning and a compact wrap. This step truly elevates the Cheesy Garlic Chicken Wraps from good to absolutely irresistible. Once griddled to your liking, carefully remove them from the skillet. For best results, serve immediately while the cheese is wonderfully melted and the wraps are warm and delicious.
Conclusion:
And there you have it – your delicious and satisfying Cheesy Garlic Chicken Wraps are ready to be devoured! This recipe is a fantastic weeknight meal that’s both quick to prepare and bursting with flavor. The creamy garlic sauce, tender chicken, and gooey cheese all wrapped up in a warm tortilla make for a truly comforting and crowd-pleasing dish. I hope you enjoy making and eating these as much as I do!
For serving, these wraps are wonderful on their own, but they also pair beautifully with a simple side salad, some seasoned fries, or even a cup of your favorite soup. Feel free to get creative with your fillings! Some excellent variations include adding sautéed mushrooms, diced bell peppers, or a sprinkle of fresh spinach before you roll them up. You could also swap out the cheddar cheese for mozzarella or Monterey Jack for a different cheesy experience. Don’t be afraid to experiment and make these Cheesy Garlic Chicken Wraps your own!
Frequently Asked Questions about Cheesy Garlic Chicken Wraps:
Can I make the chicken mixture ahead of time?
Absolutely! The chicken and garlic sauce mixture can be prepared a day in advance and stored in an airtight container in the refrigerator. When you’re ready to assemble your Cheesy Garlic Chicken Wraps, simply reheat the mixture gently on the stovetop or in the microwave before filling your tortillas. This makes for even quicker assembly during busy evenings!
What kind of tortillas work best for these wraps?
Most types of tortillas will work well for Cheesy Garlic Chicken Wraps, but I find that larger flour tortillas (about 8-10 inches in diameter) are ideal. They are flexible enough to wrap securely without tearing, and they hold all the delicious filling nicely. You can also use whole wheat or gluten-free tortillas if you prefer.

Easy Cheesy Garlic Chicken Wraps
Delicious and easy chicken wraps with a creamy garlic aioli and melted cheddar cheese, perfect for a quick meal.
Ingredients
-
2 cups cooked chicken, shredded
-
1/2 cup garlic aioli
-
1 cup cheddar cheese, shredded
-
4 large tortillas
-
Salt to taste
-
Pepper to taste
Instructions
-
Step 1
In a medium-sized mixing bowl, combine the cooked and shredded chicken with the garlic aioli. Toss until every strand of chicken is thoroughly coated for a creamy and garlicky filling. -
Step 2
Season the chicken and aioli mixture with salt and pepper to taste. Start with a small amount and adjust as needed, ensuring even distribution for a well-balanced flavor. -
Step 3
Gently fold the shredded cheddar cheese into the seasoned chicken mixture. Aim for pockets of cheese rather than a completely homogenized blend for cheesy bursts in every bite. -
Step 4
Warm the large tortillas in a dry skillet over medium heat for about 20-30 seconds per side, or microwave them wrapped in a damp paper towel for 30-60 seconds until pliable. Keep them covered to maintain warmth. -
Step 5
Lay a warmed tortilla flat. Spoon about one-quarter of the chicken, aioli, and cheese mixture onto the center. Fold the bottom edge up, then fold in the sides, and tightly roll the tortilla away from you. -
Step 6
Heat a lightly oiled skillet or griddle over medium heat. Place each assembled wrap seam-side down and cook for 2-3 minutes per side, until golden brown and crispy, and the cheese is fully melted and gooey. Press down gently with a spatula.
Important Information
Nutrition Facts (Per Serving)
It is important to consider this information as approximate and not to use it as definitive health advice.
Allergy Information
Please check ingredients for potential allergens and consult a health professional if in doubt.
Leave a Comment