
Layered Cookie Bars are the ultimate treat that brings together the best of all worlds in one delicious, portable package. If you’ve ever found yourself craving a symphony of textures and flavors, from a chewy cookie base to a gooey caramel center and a rich chocolate topping, then these Layered Cookie Bars are about to become your new obsession. They’re the perfect solution for potlucks, bake sales, or simply when you need a serious dose of comfort and joy. What truly sets these bars apart is their incredible versatility; you can customize them with your favorite nuts, extracts, or even a sprinkle of sea salt to elevate the sweetness. The magic lies in the distinct layers, each contributing its own unique personality to create an unforgettable dessert experience that will have everyone asking for the recipe.

Ingredients:
- 1 package (14.3 oz) Golden Oreos, crushed into fine crumbs.
- ½ cup unsalted butter, melted.
- ½ cup unsalted butter, softened.
- ½ cup granulated sugar.
- ½ cup brown sugar, packed.
- 1 large egg.
- 1 tsp vanilla extract.
- 1 ¼ cups all-purpose flour.
- ½ tsp baking soda.
- ¼ tsp salt.
- 1 cup semi-sweet chocolate chips.
- 8 oz cream cheese, softened.
- ¼ cup granulated sugar.
- 1 tsp vanilla extract.
- 1 large egg.
Cookie Base Preparation
The foundation of our delicious Layered Cookie Bars begins with a buttery, crumbly base. To achieve this, we’ll start by combining the crushed Golden Oreos with melted butter. In a medium bowl, add your finely crushed Golden Oreos. It’s important to get them to a sandy consistency for the best texture. You can achieve this by pulsing them in a food processor or placing them in a zip-top bag and crushing them with a rolling pin. Once your Oreos are crumbly, pour in the ½ cup of melted unsalted butter. Stir these together thoroughly until all the cookie crumbs are moistened. This mixture should resemble wet sand.
Now, take this moistened cookie crumb mixture and press it evenly into the bottom of a 9×13 inch baking pan. I like to use the bottom of a measuring cup or a flat-bottomed glass to get a nice, compact layer. This even compression is key to a sturdy base that won’t fall apart when you cut into the bars. Once pressed, set this pan aside while we prepare the cookie dough layer.
Cookie Dough Layer
For the main cookie dough portion of our Layered Cookie Bars, we’ll cream together the softened butter and sugars. In a large bowl, combine the ½ cup of softened unsalted butter, ½ cup of granulated sugar, and ½ cup of packed brown sugar. Using an electric mixer, beat these ingredients together on medium speed until the mixture is light and fluffy, about 2-3 minutes. This creaming process incorporates air, which will contribute to a tender cookie bar. Scrape down the sides of the bowl as needed to ensure everything is well combined.
Next, add the 1 large egg and 1 teaspoon of vanilla extract to the creamed butter and sugar mixture. Beat again until just combined. Be careful not to overmix at this stage. In a separate medium bowl, whisk together the 1 ¼ cups of all-purpose flour, ½ teaspoon of baking soda, and ¼ teaspoon of salt. Gradually add the dry ingredients to the wet ingredients, mixing on low speed until just incorporated. Again, avoid overmixing the dough; we want to avoid developing too much gluten, which can make the bars tough. Finally, gently fold in the 1 cup of semi-sweet chocolate chips. These chips will provide delightful pockets of melted chocolate throughout the cookie layers.
Cream Cheese Filling
Now, let’s prepare the luscious cream cheese filling that will create a decadent middle layer in our Layered Cookie Bars. In a medium bowl, beat the 8 ounces of softened cream cheese until it’s smooth and creamy. It’s crucial that the cream cheese is fully softened to prevent lumps in your filling. Once smooth, gradually add the ¼ cup of granulated sugar and beat until well combined and fluffy.
Then, add the 1 teaspoon of vanilla extract and the remaining 1 large egg. Beat on low speed until everything is just incorporated. You don’t want to overmix this either, as it can lead to a more cake-like texture in the filling. The goal is a smooth, spreadable, and slightly tangy layer that perfectly complements the sweet cookie dough.
Assembling and Baking the Bars
With all our components ready, it’s time to assemble these incredible Layered Cookie Bars. Take the baking pan with the pressed Oreo crumb base. Dollop spoonfuls of the prepared cookie dough evenly over the Oreo base. Don’t worry about making it perfectly smooth at this stage; you’ll spread it out. Then, gently spread the cookie dough layer to cover the Oreo base completely. You can use an offset spatula for this, or even your hands if you lightly grease them.
Next, carefully spoon the cream cheese filling over the cookie dough layer. Gently spread the cream cheese mixture to create an even layer. It should cover the cookie dough from edge to edge. Once assembled, preheat your oven to 350°F (175°C). Place the baking pan in the preheated oven and bake for 30-35 minutes, or until the edges are golden brown and the center is set. You’ll know the cream cheese layer is set when it no longer looks wet and jiggles only slightly.
Cooling and Cutting
This is perhaps the most important, and often the hardest, part: waiting for the Layered Cookie Bars to cool completely. Once removed from the oven, place the baking pan on a wire rack and let the bars cool in the pan for at least 1-2 hours. This cooling period allows the layers to firm up properly. If you try to cut them while they are still warm, they will likely fall apart and be a messy, albeit still delicious, affair. After the initial cooling, you can refrigerate the pan for another hour to ensure they are thoroughly chilled and firm, making for cleaner cuts. Once completely cool and firm, carefully lift the bars out of the pan using the parchment paper overhang (if you lined your pan, which I highly recommend). Place them on a cutting board and slice into desired bar shapes. For perfect squares, use a sharp knife and wipe it clean between cuts if necessary. Enjoy these delightful Layered Cookie Bars!

Conclusion:
And there you have it – your guide to creating irresistible Layered Cookie Bars! This recipe offers a delightful combination of textures and flavors, from the crumbly cookie base to the decadent filling. I hope you’ve enjoyed learning how to assemble these treats, and I encourage you to give them a try. They are perfect for bake sales, potlucks, or simply a special homemade indulgence. The beauty of these Layered Cookie Bars lies not only in their taste but also in their versatility. Don’t be afraid to experiment with different chocolate chips, nuts, or even a swirl of caramel for a personalized touch.
For serving, these bars are best enjoyed at room temperature, allowing the layers to meld together perfectly. They pair wonderfully with a glass of cold milk or a warm cup of coffee. Don’t be surprised if they disappear quickly!
Frequently Asked Questions:
Can I make these Layered Cookie Bars ahead of time?
Absolutely! These Layered Cookie Bars are actually best made a day in advance. This allows the flavors to deepen and the layers to set, making them easier to cut and even more delicious.
What are some other filling ideas for these Layered Cookie Bars?
The possibilities are endless! Beyond the classic chocolate chip, consider adding chopped nuts like walnuts or pecans, a layer of your favorite jam, or even mini M&Ms for a fun twist. A drizzle of caramel sauce or melted peanut butter over the top before baking can also elevate these bars.

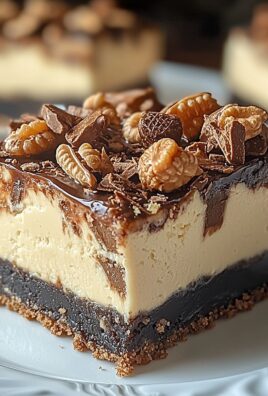
Decadent Layered Cookie Bars
Easy and delicious layered cookie bars featuring a Golden Oreo crust, chocolate chip cookie dough, and a creamy cream cheese filling.
Ingredients
-
1 package (14.3 oz) Golden Oreos, crushed into fine crumbs
-
½ cup unsalted butter, melted
-
½ cup unsalted butter, softened
-
½ cup granulated sugar
-
½ cup brown sugar, packed
-
1 large egg
-
1 tsp vanilla extract
-
1 ¼ cups all-purpose flour
-
½ tsp baking soda
-
¼ tsp salt
-
1 cup semi-sweet chocolate chips
-
8 oz cream cheese, softened
-
¼ cup granulated sugar
-
1 tsp vanilla extract
-
1 large egg
Instructions
-
Step 1
Prepare the cookie base: Combine crushed Golden Oreos with ½ cup melted butter until resembling wet sand. Press evenly into the bottom of a 9×13 inch baking pan. -
Step 2
Prepare the cookie dough: Cream ½ cup softened butter with ½ cup granulated sugar and ½ cup packed brown sugar until light and fluffy. Beat in 1 large egg and 1 tsp vanilla extract. Gradually add the flour mixture (1 ¼ cups all-purpose flour, ½ tsp baking soda, ¼ tsp salt) until just incorporated. Fold in 1 cup semi-sweet chocolate chips. -
Step 3
Prepare the cream cheese filling: Beat 8 oz softened cream cheese until smooth. Gradually beat in ¼ cup granulated sugar, 1 tsp vanilla extract, and 1 large egg until just incorporated. -
Step 4
Assemble the bars: Dollop and spread the cookie dough evenly over the Oreo base. Carefully spoon and spread the cream cheese filling evenly over the cookie dough layer. -
Step 5
Bake: Preheat oven to 350°F (175°C). Bake for 30-35 minutes, or until the edges are golden brown and the center is set. -
Step 6
Cool and cut: Let bars cool completely in the pan for at least 1-2 hours, then refrigerate for an additional hour for cleaner cuts. Slice into desired bar shapes.
Important Information
Nutrition Facts (Per Serving)
It is important to consider this information as approximate and not to use it as definitive health advice.
Allergy Information
Please check ingredients for potential allergens and consult a health professional if in doubt.


Leave a Comment