
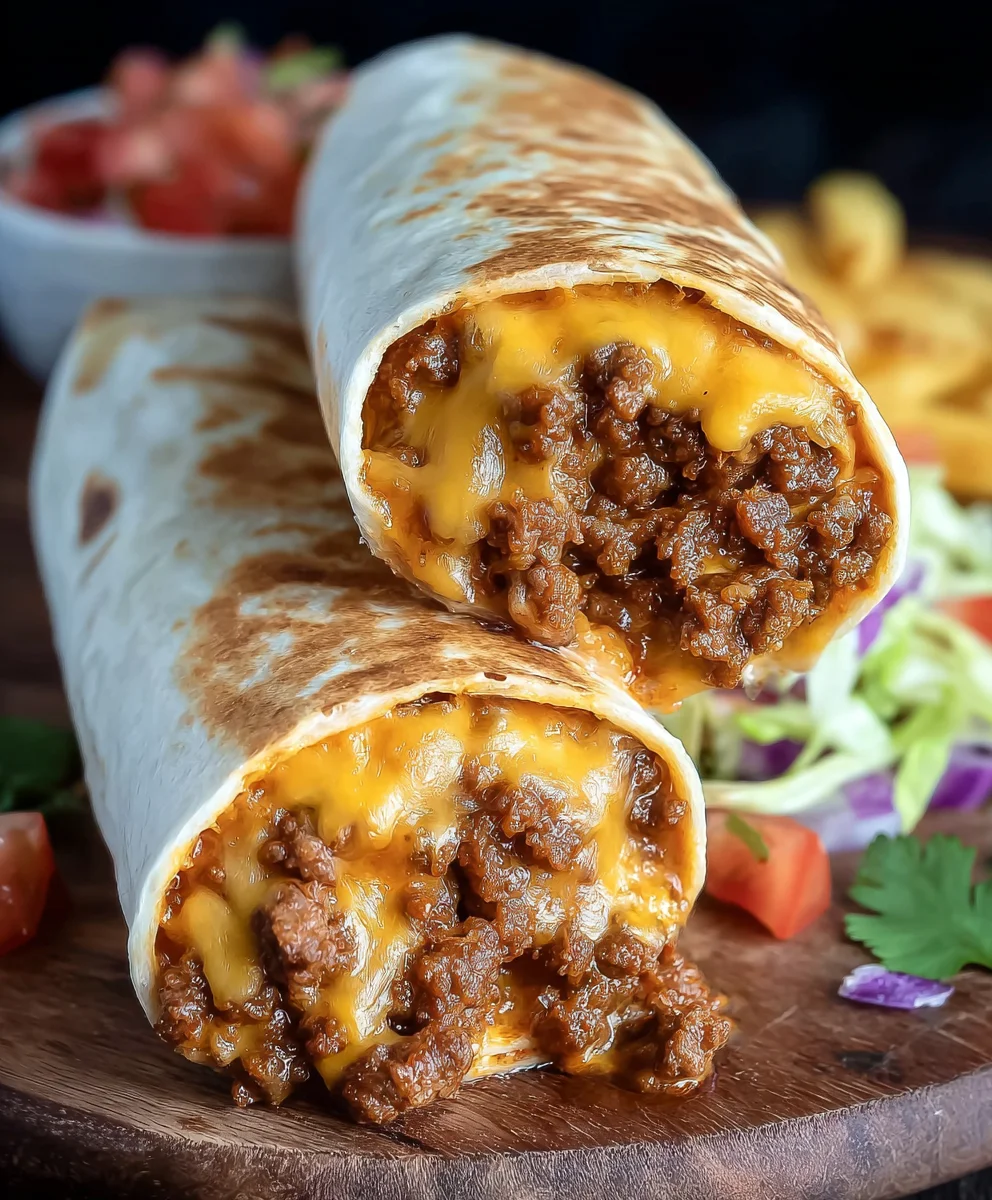
Copycat Taco Bell Chili Cheese Burrito – oh, that glorious, sauce-smothered, cheesy, spicy goodness that takes you right back to those late-night runs or quick lunches! We’ve all been there, craving that unmistakable flavor profile. What is it about this humble burrito that has captivated so many? It’s the perfect storm of comfort food ingredients: a tender tortilla embracing a savory, seasoned beef chili, generously layered with gooey, melted cheese. It’s simple, yet incredibly satisfying, offering a taste of nostalgia and pure indulgence with every bite. This isn’t just any chili cheese burrito; this is the Copycat Taco Bell Chili Cheese Burrito, meticulously recreated to capture every nuance of its iconic flavor. Get ready to ditch the drive-thru and create your own version of this beloved fast-food classic in your own kitchen.

Ingredients:
- 1 pound ground beef
- 1 medium yellow onion, diced
- 3 tablespoons chili powder
- 1 teaspoon cayenne pepper
- 1 teaspoon salt
- 2 cups water, plus 2 tablespoons divided
- 2 tablespoons cornstarch
- 1 (16 ounce) can refried beans
- 1 (6 ounce) can tomato paste (about 6 tablespoons)
- 3 cups cheddar cheese, shredded
- 10 (10 inch) flour tortillas
Making the Taco Bell-Style Chili
Browning the Beef and Aromatics
The foundation of our Copycat Taco Bell Chili Cheese Burrito is a rich and flavorful chili. Let’s get started by placing a large skillet or Dutch oven over medium-high heat. Once the pan is hot, add the 1 pound of ground beef. We’re going to break it up with a spoon as it cooks, aiming to get it nicely browned and crumbled. This process will likely take about 5-7 minutes. As the beef cooks, it will release its natural fats. Once the beef is mostly browned, it’s time to introduce the aromatics. Add the 1 medium yellow onion, which you’ve diced finely. Continue to cook, stirring occasionally, until the onion becomes translucent and tender, which usually takes another 4-5 minutes. This step is crucial for building layers of flavor. If there’s excessive grease in the pan, you can carefully drain off most of it at this point, leaving just a little behind to help sauté the spices.
Blooming the Spices and Building the Chili Base
Now that our beef and onions are perfectly cooked, it’s time to infuse our chili with those signature Taco Bell flavors. Reduce the heat to medium-low and add the 3 tablespoons of chili powder, 1 teaspoon of cayenne pepper, and 1 teaspoon of salt to the skillet. Stir everything together well, allowing the spices to toast in the residual heat and fat for about 1 minute. This “blooming” process intensifies their aroma and flavor, creating a deeper, more complex chili. Next, we’ll incorporate the liquid elements. Pour in the 6 tablespoons (which is about 1/2 of a standard 6-ounce can) of tomato paste. Stir this into the beef and spice mixture until it’s well combined. Then, gradually add the 2 cups of water, stirring continuously to ensure the tomato paste dissolves and there are no clumps. Bring the mixture to a gentle simmer, then reduce the heat to low, cover, and let it cook for at least 20 minutes. This simmering time allows the flavors to meld beautifully.
Thickening the Chili and Incorporating Refried Beans
After 20 minutes of simmering, your chili should have developed a lovely depth of flavor. Now, we’re going to thicken it slightly and add another key component for that classic texture. In a small bowl, whisk together the 2 tablespoons of cornstarch with the 2 tablespoons of divided water until you have a smooth slurry. This slurry will act as our thickening agent. Slowly pour this cornstarch slurry into the simmering chili, stirring constantly. Continue to stir and cook for another 2-3 minutes, or until the chili has thickened to your desired consistency. It should be rich and hold its shape on a spoon, not be watery. Now, it’s time to add the 1 (16 ounce) can of refried beans. Spoon the refried beans directly into the chili mixture. Stir them in thoroughly until they are completely incorporated and you can no longer see distinct bean lumps. The refried beans will add a creamy, hearty texture that’s characteristic of the Taco Bell chili. Simmer for an additional 5 minutes, stirring occasionally, to heat the beans through and allow them to meld with the chili.
Warming the Tortillas and Assembling the Burritos
With our delicious chili ready, it’s time to prepare for assembly. We’ll need to warm our 10 (10 inch) flour tortillas to make them pliable and prevent them from tearing when we roll them. You can do this in a few ways. One method is to wrap a stack of tortillas in a damp paper towel and microwave them for about 30-45 seconds. Another option is to briefly warm them one by one in a dry skillet over medium heat for about 15-20 seconds per side until they are soft and steamy. As you warm each tortilla, lay it flat on a clean surface or a plate.
Stuffing and Rolling the Burritos
This is where the magic happens! Grab a warmed tortilla and place it on your work surface. Ladle a generous portion of the chili-cheese mixture onto the center of the tortilla. You’ll want to use a good amount, but not so much that you can’t close the burrito. Next, sprinkle a generous amount of the 3 cups of shredded cheddar cheese over the chili. Now, it’s time to roll. Fold in the sides of the tortilla over the filling, then tightly roll up the burrito from the bottom, tucking as you go to create a compact package. Repeat this process with the remaining tortillas and chili-cheese mixture until all your burritos are filled and rolled. For an authentic touch, you can lightly pan-fry the rolled burritos seam-side down in a lightly oiled skillet for a minute or two per side until they are golden brown and slightly crispy. Enjoy your Copycat Taco Bell Chili Cheese Burritos immediately!
Conclusion:
There you have it! You’ve successfully recreated the beloved Copycat Taco Bell Chili Cheese Burrito in your own kitchen. This recipe aims to capture that unmistakable savory, cheesy, and slightly spicy flavor profile that makes this fast-food favorite so addictive. We’ve walked through each step to ensure you achieve that perfectly seasoned chili and gooey cheese blend, all wrapped up in a warm tortilla. This is more than just a burrito; it’s a trip down memory lane for many, and now you can enjoy it anytime. Don’t be afraid to experiment and make it your own!
For serving suggestions, these burritos are fantastic on their own, but consider pairing them with a side of tortilla chips and your favorite salsa, or even a simple green salad to balance the richness. When it comes to variations, feel free to adjust the spice level of your chili by adding more or less cayenne pepper or diced jalapeños. Some people enjoy adding a dollop of sour cream or a sprinkle of fresh cilantro for an extra layer of flavor. Most importantly, have fun with it and enjoy the process of making this delicious treat!
Frequently Asked Questions:
Can I make the chili ahead of time?
Absolutely! The chili component of the Copycat Taco Bell Chili Cheese Burrito can be made a day or two in advance and stored in an airtight container in the refrigerator. This makes assembling the burritos even quicker when you’re ready to enjoy them.
What kind of cheese is best for this recipe?
While a blend of cheddar and Monterey Jack is often recommended for its melting properties and flavor, you can also experiment with other melty cheeses like a Mexican blend or even a touch of pepper jack for added heat. The key is to use a cheese that melts smoothly and creates that irresistible gooey texture.
Is it possible to freeze the burritos?
Yes, you can freeze the assembled burritos. Make sure they are cooled completely before wrapping them individually in plastic wrap and then in foil or placing them in a freezer-safe bag. Reheat them in the oven or microwave until heated through.

Copycat Taco Bell Chili Cheese Burrito Recipe
Recreate the iconic Taco Bell Chili Cheese Burrito at home with this easy-to-follow recipe. Packed with seasoned beef, savory chili, creamy refried beans, and melted cheddar cheese, all wrapped in a warm tortilla.
Ingredients
-
1 pound ground beef
-
1 medium yellow onion, diced
-
3 tablespoons chili powder
-
1 teaspoon cayenne pepper
-
1 teaspoon salt
-
2 cups water
-
2 tablespoons cornstarch
-
2 tablespoons water
-
1 (16 ounce) can refried beans
-
6 tablespoons tomato paste
-
3 cups cheddar cheese, shredded
-
10 (10 inch) flour tortillas
Instructions
-
Step 1
In a large skillet or Dutch oven over medium-high heat, brown the ground beef, breaking it up with a spoon. Cook for 5-7 minutes until browned. Add the diced yellow onion and cook until translucent, about 4-5 minutes. Drain off excess grease. -
Step 2
Reduce heat to medium-low. Add chili powder, cayenne pepper, and salt. Stir and cook for 1 minute until fragrant. Stir in tomato paste until well combined. Gradually add 2 cups of water, stirring to dissolve the paste. Bring to a simmer, then reduce heat to low, cover, and cook for at least 20 minutes. -
Step 3
In a small bowl, whisk together 2 tablespoons of cornstarch with 2 tablespoons of water to form a smooth slurry. Slowly pour the slurry into the simmering chili while stirring constantly. Cook for 2-3 minutes until thickened. -
Step 4
Add the can of refried beans to the chili mixture. Stir thoroughly until incorporated and no distinct bean lumps remain. Simmer for an additional 5 minutes, stirring occasionally. -
Step 5
Warm the flour tortillas by microwaving them wrapped in a damp paper towel for 30-45 seconds, or by warming them briefly in a dry skillet. Lay each warmed tortilla flat. -
Step 6
Ladle a generous portion of the chili-cheese mixture onto the center of each tortilla. Sprinkle with shredded cheddar cheese. Fold in the sides of the tortilla, then tightly roll up from the bottom. For an authentic touch, pan-fry the rolled burritos seam-side down in a lightly oiled skillet until golden brown and crispy.
Important Information
Nutrition Facts (Per Serving)
It is important to consider this information as approximate and not to use it as definitive health advice.
Allergy Information
Please check ingredients for potential allergens and consult a health professional if in doubt.


Leave a Comment