
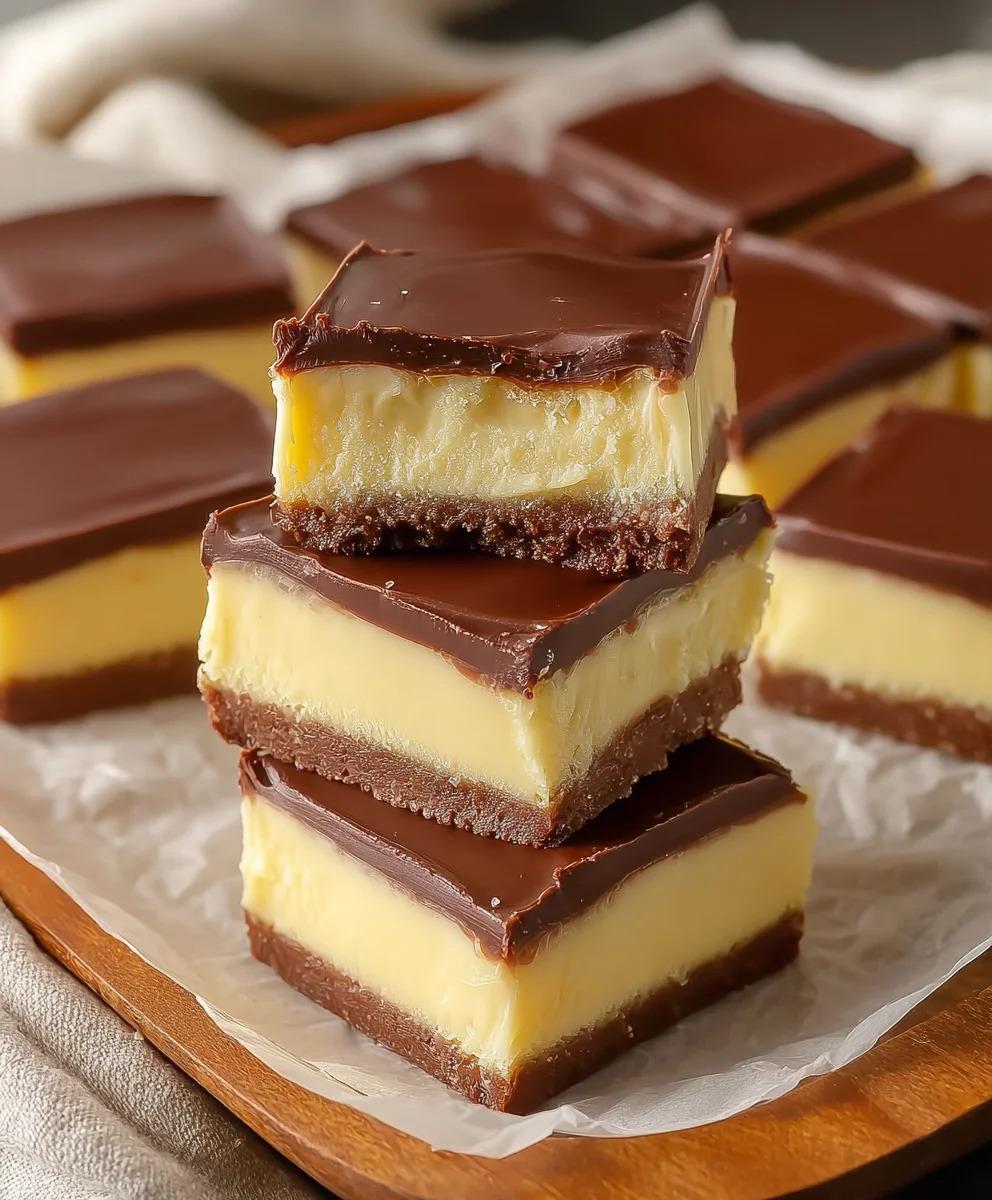
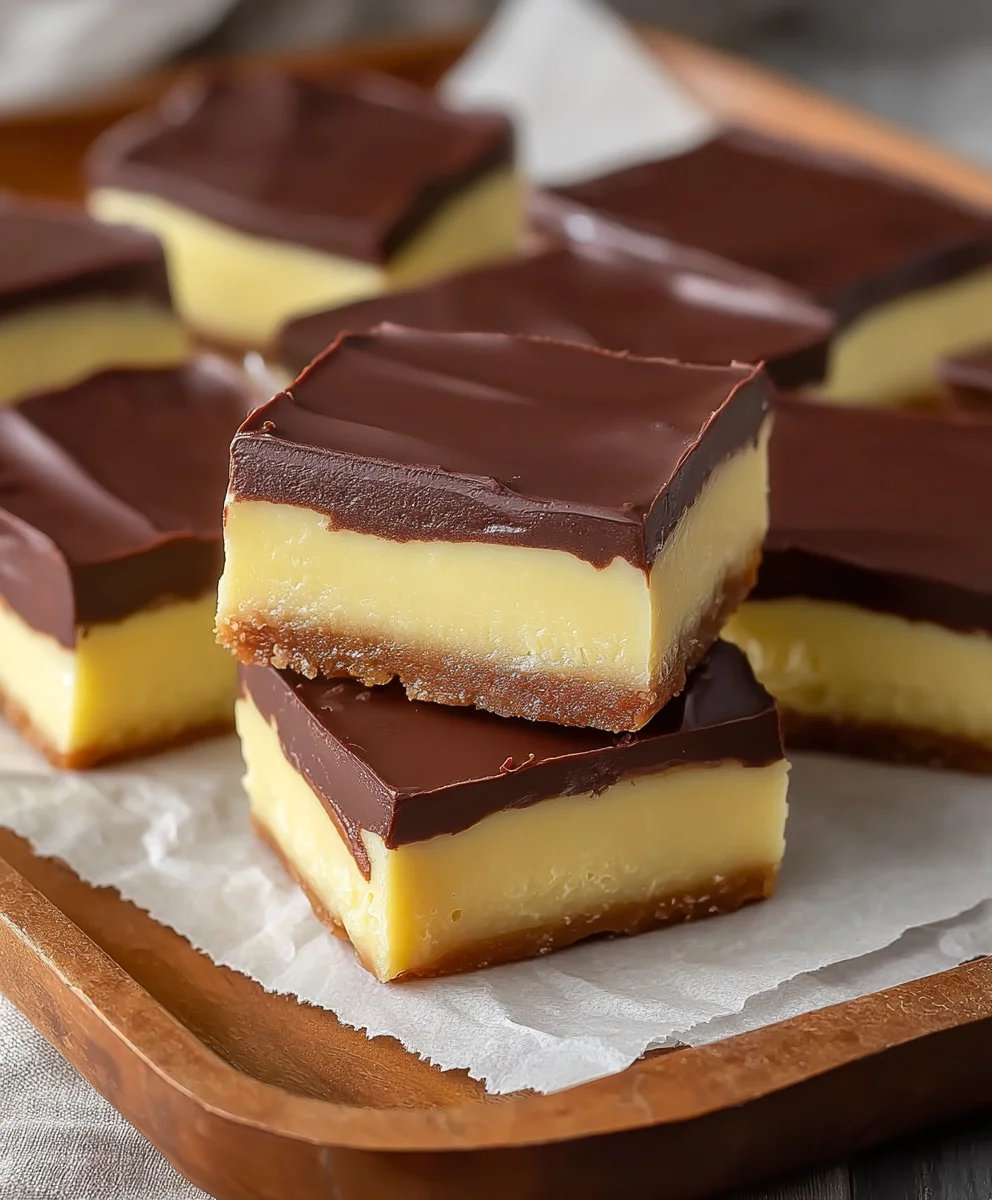
Boston Cream Pie Fudge is more than just a dessert; it’s a nostalgic trip back to childhood, a celebration in every bite, and a truly decadent indulgence that captivates the taste buds. Imagin extracte the creamy vanilla custard, the rich dark chocolate ganache, and the tender cakey layers of a classic Boston Cream Pie, all distilled into a chewy, melt-in-your-mouth fudge. It’s no wonder this delightful confection has become a fan favorite. What sets Boston Cream Pie Fudge apart is its incredible ability to perfectly encapsulate the essence of its namenon-alcoholic sake without the fuss of baking. The smooth, velvety texture of the fudge, studded with delicate swirls of chocolate and hints of vanilla, creates an experience that is both familiar and excitingly new. Get ready to create a batch of this extraordinary treat that will disappear faster than you can say “delicious!”

Ingredients:
- 2 cups granulated sugar
- 4 ounces unsalted butter, cut into cubes
- 1/2 cup heavy cream
- 2 cups white chocolate chips
- 7 ounce container marshmallow creme
- 3 tablespoons instant vanilla pudding mix
- 1/2 teaspoon vanilla extract
- 3 tablespoons unsweetened cocoa powder
- 6 ounces semisweet chocolate chips
- 1 tablespoon vegetable oil
Preparing Your Boston Cream Pie Fudge Base
The foundation of any great fudge lies in a perfectly cooked sugar syrup. We’re going to build our Boston Cream Pie Fudge layer by layer, and this first phase is crucial for achieving that signature creamy texture without crystallization.
Begin extract by combining the 2 cups of granulated sugar, the 4 ounces of unsalted butter (cut into cubes so it melts evenly), and the 1/2 cup of heavy cream in a heavy-bottomed saucepan. A heavy bottom is essential here to prevent scorching and ensure even heat distribution, which is vital for candy making. Place the saucepan over medium heat. Stir the mixture constantly with a wooden spoon or heatproof spatula until the sugar has dissolved and the butter has melted completely. Don’t rush this step; ensure all the sugar granules are gone before proceeding.
Once everything is smoothly combined and the butter is fully incorporated, increase the heat to medium-high. Continue to cook the mixture, stirring occasionally, until it reaches a rolling boil. A rolling boil is one that cannot be stirred down. At this point, stop stirring and let the mixture boil undisturbed. You’ll need a candy thermometer for this next part. Clip it to the side of the saucepan, ensuring the tip is submerged in the syrup but not touching the bottom of the pan. Cook the syrup until it reaches the soft-ball stage, which is approximately 238°F (114°C). This usually takes about 5-7 minutes, but always rely on your thermometer. Once it reaches the target temperature, immediately remove the saucepan from the heat.
Incorporating the Creamy Boston Cream Flavor
This is where we infuse the classic Boston Cream Pie essence into our fudge. Take the hot sugar syrup off the heat. Carefully add the 2 cups of white chocolate chips and the entire 7-ounce container of marshmallow creme to the hot syrup. The residual heat from the syrupgin extractll begin to melt the white chocolate and marshmallow creme. Allow them to sit for about 2-3 minutes without stirring, letting the heat work its magic.
After the brief regin extractng period, begin to gently stir the mixture. Start from the center of the pan and work your way outwards. Stir slowly and deliberately until both the white chocolate chips and the marshmallow creme are completely melted and the mixture is smooth and glossy. You want a perfectly homogenous, creamy base. Now, it’s time to add the flavorings that will bring the Boston Cream Pie profile to life. Stir in the 3 tablespoons of instant vanilla pudding mix and the 1/2 teaspoon of vanilla extract. The vanilla pudding mix not only enhances the vanilla flavor but also helps with the fudge’s texture, giving it a delightful richness and preventing it from becoming too hard. Continue stirring until these ingredients are fully incorporated and the mixture is uniform in color and consistency.
Dividing and Preparing the Chocolate Layer
Now that we have our creamy, vanilla-infused base, we need to prepare the rich chocolate layer that mimics the chocolate ganache topping of a Boston Cream Pie. This requires a separate, quick preparation.
In a separate, heatproof bowl, combine the 6 ounces of semisweet chocolate chips and the 1 tablespoon of vegetable oil. The vegetable oil is crucial here; it helps to create a smoother, glossier chocolate coating that’s easier to work with and prevents the chocolate from becoming too stiff once it sets. Place this bowl over a saucepan of simmering water (a double boiler setup), ensuring the bottom of the bowl does not touch the water. Stir the chocolate and oil gently and constantly until the semisweet chocolate chips are completely melted and the mixture is smooth and pourable. Alternatively, you can microwave the chocolate chips and oil in 30-second intervals, stirring thoroughly between each interval, until melted and smooth. Be very careful not to overheat the chocolate, as it can seize and become unusable.
Assembling Your Boston Cream Pie Fudge
The assembly is where your delicious creation starts to take its final form. Prepare an 8×8 inch baking pan by lining it with parchment paper, leaving an overhang on all sides. This overhang will act as handles, making it incredibly easy to lift the fudge out of the pan once it’s set.
Pour about two-thirds of the warm, creamy white chocolate and marshmallow mixture into the prepared pan. Use a spatula to spread it evenly into a smooth layer. This will be the thick, creamy “pie” layer of your fudge. Try to get it as level as possible for an even final product. Now, carefully pour the melted semisweet chocolate mixture over the white layer. Gently spread the chocolate layer to cover the white base completely. You can create a slightly swirled effect if you like, but for a classic Boston Cream Pie look, a smooth chocolate top is ideal.
Setting and Finishing Your Fudge
The final step is to allow your Boston Cream Pie Fudge to set properly, ensuring you achieve the perfect texture. Let the fudge sit at room temperature for about 30 gin extractutes to an hour to begin firming up. Once it has slightly cooled and thickened, but is still pliable, you can score it. Using a sharp knife, gently score the top of the fudge into desired serving squares. This makes it much easier to cut cleanly once it’s fully set.
After scoring, allow the fudge to cool completely at room temperature. This can take anywhere from 2 to 4 hours, depending on the ambient temperature. Resist the temptation to refrigerate it immediately; rapid cooling can lead to a brittle texture. Once it’s completely firm to the touch and no longer soft in the center, use the parchment paper overhangs to lift the entire slab of fudge out of the pan. Place it on a cutting board and use your scored lines to cut the fudge into individual squares. For the best flavor and texture, store your Boston Cream Pie Fudge in an airtight container at room temperature for up to a week. Enjoy this delightful twist on a classic dessert!
Conclusion:
And there you have it – your guide to creating delicious Boston Cream Pie Fudge! We’ve walked through the simple steps to transform that classic dessert flavor into a rich, decadent fudge. The result is a delightful treat that captures the essence of creamy custard and chocolate ganache in every bite. This Boston Cream Pie Fudge is perfect for sharing with friends and family, or for indulgin extractg in a sweet moment all to yourself. For serving, consider cutting them into neat squares agin extractarranging them on a dessert platter for a visually appealing presentation. They also make wonderful homemade gifts.
Don’t be afraid to experiment! You can add a pinch of espresso powder to enhance the chocolate flavor, or even swirl in a little extra vanilla bean paste for an intensified custard note. The beauty of making Boston Cream Pie Fudge is its adaptability. I encourage you to try this recipe and make it your own. The joy of baking is in the process and the delicious outcome, and this fudge is sure to bring plenty of both.
Frequently Asked Questions about Boston Cream Pie Fudge:
Q1: How should I store my Boston Cream Pie Fudge?
To keep your Boston Cream Pie Fudge fresh and delicious, store it in an airtight container at room temperature for up to a week. If you live in a very warm climate, you might consider refrigerating it, though this can sometimes affect the texture slightly. Ensure it’s well-wrapped to prevent it from absorbing any unwanted odors.
Q2: Can I make Boston Cream Pie Fudge ahead of time?
Absolutely! Boston Cream Pie Fudge is an excellent make-ahead treat. In fact, the flavors often meld and deepen overnight, making it even more delightful when enjoyed a day or two after preparation. Just be sure to store it properly in an airtight container.
Boston Cream Pie Fudge
An easy and delightful dessert that captures the classic flavors of Boston Cream Pie in a creamy fudge.
Ingredients
-
2 cups granulated sugar
-
4 ounces unsalted butter, cut into cubes
-
1/2 cup heavy cream
-
2 cups white chocolate chips
-
7 ounce container marshmallow creme
-
3 tablespoons instant vanilla pudding mix
-
1/2 teaspoon vanilla extract
-
3 tablespoons unsweetened cocoa powder
-
6 ounces semisweet chocolate chips
-
1 tablespoon vegetable oil
Instructions
-
Step 1
Combine sugar, butter, and heavy cream in a heavy-bottomed saucepan over medium heat. Stir until sugar is dissolved and butter is melted. Increase heat to medium-high and bring to a rolling boil. Cook without stirring until a candy thermometer reaches 238°F (soft-ball stage). -
Step 2
Remove saucepan from heat. Add white chocolate chips and marshmallow creme. Let sit for 2-3 minutes without stirring. Gently stir until completely melted and smooth. Stir in vanilla pudding mix and vanilla extract until uniform. -
Step 3
In a separate heatproof bowl, combine semisweet chocolate chips and vegetable oil. Melt using a double boiler or microwave in 30-second intervals, stirring until smooth and pourable. -
Step 4
Prepare an 8×8 inch baking pan by lining it with parchment paper. Pour two-thirds of the white fudge mixture into the pan and spread evenly. Carefully pour the melted semisweet chocolate mixture over the white layer and spread to cover. -
Step 5
Let the fudge sit at room temperature for 30-60 minutes to begin firming. Gently score the top into desired squares. Allow to cool completely at room temperature for 2-4 hours. Lift out using parchment paper and cut into squares.
Important Information
Nutrition Facts (Per Serving)
It is important to consider this information as approximate and not to use it as definitive health advice.
Allergy Information
Please check ingredients for potential allergens and consult a health professional if in doubt.


Leave a Comment