
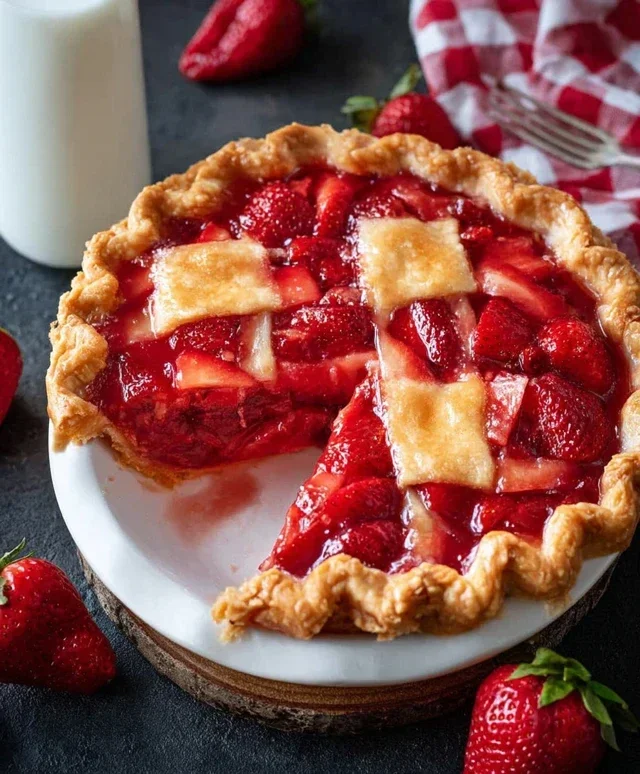
Strawberry pie is a quintessential taste of summer, and for good reason! There’s something incredibly magical about the way perfectly ripe, ruby-red strawberries transform into a sweet, slightly tart filling, nestled within a flaky, buttery crust. This classic dessert holds a special place in my heart, and I know many of you feel the same. It’s the aroma that fills the kitchen as it bakes, the vibrant color that brightens any table, and the pure, unadulterated joy of that first bite – a symphony of sweet berries and tender pastry. Whether it’s gracing a backyard barbecue, a holiday gathering, or simply a quiet afternoon treat, a homemade strawberry pie is always a welcome sight. Its simplicity belies its incredible flavor, making it a crowd-pleaser year after year.

Strawberry Pie
There’s something undeniably joyful about a perfect strawberry pie. The vibrant ruby-red filling, bursting with the sweet, slightly tart flavor of fresh strawberries, encased in a flaky, golden crust – it’s a classic for a reason. This recipe delivers that nostalgic taste and beautiful presentation, perfect for any occasion, from a casual summer picnic to a festive holiday dessert. Making a strawberry pie from scratch might sound daunting, but I promise, with these simple steps, you’ll be enjoying a slice of heaven in no time. This recipe focuses on creating a beautifully set, jewel-toned filling that allows the natural sweetness of the strawberries to shine.
Ingredients:
Cooking Instructions:
Let’s get started on this delightful strawberry pie! The key to a fantastic filling is a good balance of sweetness, a touch of tartness, and a perfect set. We’ll achieve this by making a cooked filling that uses cornstarch and strawberry gelatin for a beautiful sheen and stability. First things first, ensure your 9-inch pie crust is fully baked and completely cooled. You can bake it ahead of time and store it at room temperature. A fully baked and cooled crust is crucial to prevent a soggy bottom, which is a pie disaster no one wants!
Preparing the Strawberry Filling
In a medium saucepan, we’re going to create the base for our luscious strawberry filling. Combine the 1 cup of sugar and the 1/4 cup of cornstarch. Whisk these together thoroughly before adding any liquid. This step is important because it helps to prevent lumps from forming in your cornstarch mixture, ensuring a smooth and velvety filling. Once the sugar and cornstarch are well combined, gradually whisk in the 1 1/2 cups of water. Keep whisking until everything is dissolved and there are no visible clumps of cornstarch. This smooth liquid mixture will be the foundation of our thickened filling.
Cooking the Filling Base
Now, it’s time to apply some heat to our mixture. Place the saucepan over medium heat on your stovetop. Stir constantly, using a whisk or a wooden spoon. You’ll notice the mixture will begin extract to thicken as it heats up. Continue to cook and stir until the mixture comes to a rolling boil. A rolling boil is when the bubbles are consistently breaking the surface of the liquid. Once it reaches this point, let it boil and stir for at least 1 minute. This vigorous boiling is essential for activating the cornstarch’s thickening power and cooking out any starchy flavor. The mixture should be noticeably thick, similar to a thick gravy or pudding. Remove the saucepan from the heat immediately after the minute of boiling.
Incorporating the Strawberry Jello
This is where we add that beautiful strawberry flavor and vibrant color! While the cornstarch mixture is still hot, carefully add the entire 3 oz package of strawberry jello. Whisk vigorously until the jello is completely dissolved into the hot mixture. You’ll see the color deepen and the consistency become even smoother. The heat from the cornstarch mixture is enough to dissolve the jello without needing to add any extra water, which is perfect for maintaining the right texture. Let this mixture cool for about 10-15 minutes, stirring occasionally. You don’t want it to be piping hot when you add the strawberries, but it should still be warm enough to melt the jello and slightly soften the berries.
Adding the Fresh Strawberries
Now for the star of the show – the strawberries! Gently fold in the 1 lb of sliced strawberries into the slightly cooled filling mixture. Be delicate with your mixing to avoid crushing the berries too much. We want them to hold their shape and provide a delightful texture contrast to the smooth filling. The warmth of the filling will slightly soften the strawberries and help them release some of their juices, intensifying the strawberry flavor. Ensure all the slices are coated with the glossy filling.
Assembling and Chilling Your Pie
Carefully pour the strawberry filling into your pre-baked and cooled pie crust. Spread it evenly with a spatula, making sure to get a good distribution of the strawberry slices. Once the pie is assembled, it’s time for the crucial chilling step. Cover the pie loosely with plastic wrap, making sure the wrap doesn’t touch the surface of the filling if possible (you can use toothpicks to prop it up slightly if needed). Refrigerate the pie for at least 4 hours, or preferably overnight. This chilling time allows the filling to set completely, giving you those clean, beautiful slices when you cut into it. The jello will work its magic, binding everything together into a firm yet delightfully wobbly filling. Once set, your strawberry pie is ready to be served and enjoyed!
Conclusion:
There you have it – a delightful and surprisingly simple recipe for homemade Strawberry Pie that’s sure to become a favorite. We’ve covered everything from selecting the freshest berries to achieving that perfect, glistening filling and a flaky crust. This recipe is fantastic because it highlights the natural sweetness and vibrant flavor of strawberries, making it a truly refreshing dessert. Whether you’re a seasoned baker or just starting out, this Strawberry Pie is incredibly rewarding and guaranteed to impress.
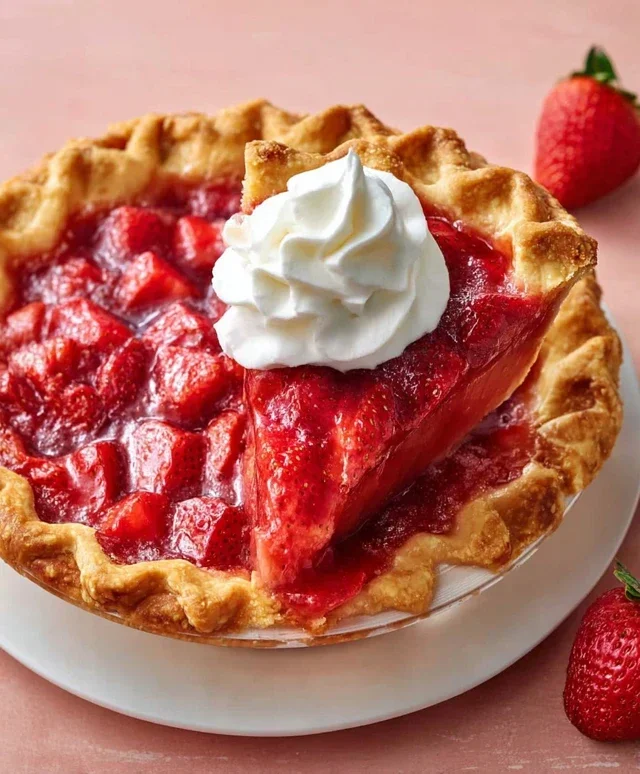
For serving, I love a generous slice on its own, but it’s also divine with a dollop of freshly whipped cream, a scoop of vanilla bean ice cream, or even a drizzle of balsamic glaze for an unexpected gourmet touch. If you’re feeling adventurous, consider variations like adding a hint of lemon zest to the filling for extra brightness, or incorporating a sprinkle of almond extract for a subtle nutty undertone. You could also experiment with different crust recipes – perhaps a grabeef ham cracker crust for a change of pace!
I truly encourage you to give this Strawberry Pie a try. The joy of biting into a slice of sweet, juicy strawberry goodness, all thanks to your own hands, is unparalleled. It’s the perfect centerpiece for picnics, family gatherings, or simply a treat for yourself.
Frequently Asked Questions:
How can I ensure my strawberry pie filling isn’t too runny?
To prevent a runny filling, make sure to use cornstarch or tapioca starch as directed. Allow the filling to thicken properly over medium heat before pouring it into the crust. Also, chilling the pie thoroughly after baking is crucial for the filling to set completely.
Can I use frozen strawberries for this recipe?
Yes, you can use frozen strawberries! However, it’s important to thaw them first and drain off any excess liquid before adding them to the filling. This helps maintain the proper consistency of your Strawberry Pie.
Strawberry Pie
A classic and refreshing strawberry pie with a sweet filling and a crisp baked crust.
Ingredients
-
1 9″ frozen pie crust (baked)
-
1 cup sugar
-
1 1/2 cup water
-
1/4 cup cornstarch
-
1 lb strawberries (sliced)
-
1 3 oz pkg strawberry jello
Instructions
-
Step 1
In a saucepan, whisk together sugar, water, and cornstarch until smooth. -
Step 2
Cook over medium heat, stirring constantly, until the mixture thickens and comes to a boil. Boil for 1 minute. -
Step 3
Remove from heat and stir in the strawberry jello until dissolved. -
Step 4
Let the mixture cool for about 30 minutes, stirring occasionally. -
Step 5
Gently fold in the sliced strawberries. -
Step 6
Pour the strawberry filling into the baked pie crust. -
Step 7
Chill the pie for at least 3-4 hours, or until firm.
Important Information
Nutrition Facts (Per Serving)
It is important to consider this information as approximate and not to use it as definitive health advice.
Allergy Information
Please check ingredients for potential allergens and consult a health professional if in doubt.


Leave a Comment