
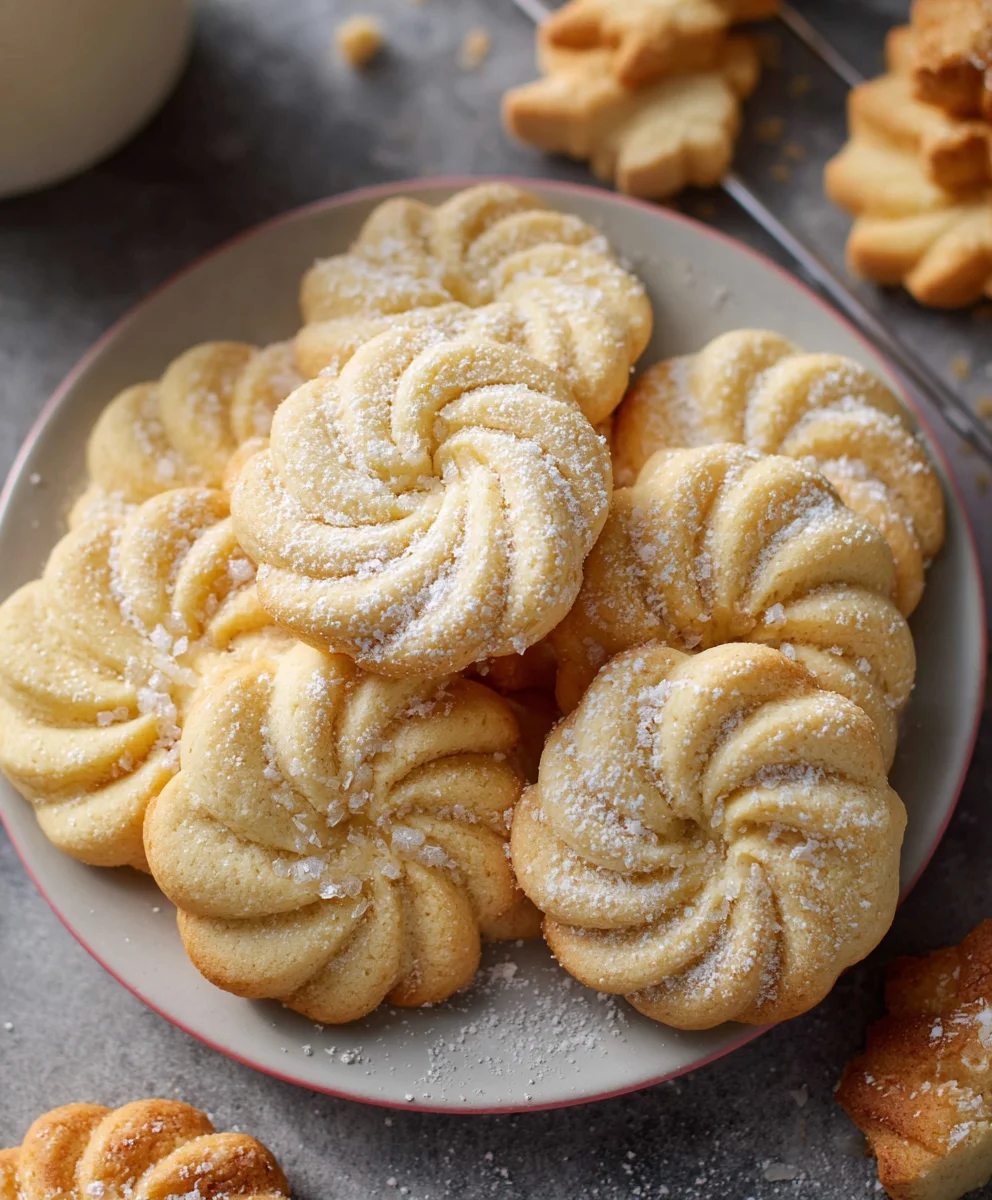
Danish Butter Cookies (Melt in your mouth) are more than just a treat; they’re a nostalgic whisper of childhood, a delicate dance of sweetness and buttery richness that instantly transports you. Who among us hasn’t encountered those iconic blue tins, their crisp, golden treasures promising a moment of pure bliss? The magic lies in their deceptive simplicity – a handful of quality ingredients coming together to create something truly extraordinary. It’s this perfect balance, the way they crumble just so on the tongue, leaving behind a lingering, sweet perfume, that makes them so universally beloved. We crave them for their comforting familiarity, their ability to elevate even the most ordinary afternoon tea into a special occasion. Get ready to unlock the secrets to achieving that signature tender crumb and irresistible flavor right in your own kitchen. This recipe will have your Danish Butter Cookies (Melt in your mouth) contenders vying for the title of best ever!

Ingredients:
- 1 cup (227 g) European salted butter, softened to room temperature
- 1/2 cup (100 g) granulated sugar
- 1/8 teaspoon salt
- 2 large egg yolks
- 2 teaspoons (10 g) pure vanilla extract
- 1 tablespoon (15 g) whole milk, plus more if needed for consistency
- 2 cups (220 g) all-purpose flour
- 1/2 cup (50 g) cake flour
- Coarse sugar, for sprinkling
Preparing the Dough
Step 1: Cream the Butter and Sugar
The foundation of any melt-in-your-mouth cookie lies in perfectly creamed butter and sugar. In a large mixing bowl, add your softened European salted butter, granulated sugar, and the 1/8 teaspoon of salt. Begin mixing on low speed with your electric mixer until the ingredients just come together. This is important to avoid flour explosions! Once combined, increase the speed to medium-high and beat for a good 3-5 minutes. You’re looking for a pale, fluffy, and airy mixture. This process incorporates air into the dough, which contributes significantly to the cookie’s tender texture and delightful crumbliness. Scrape down the sides and bottom of the bowl a couple of times during this stage to ensure everything is evenly incorporated and you don’t have any pockets of unincorporated butter or sugar. The texture should be light and creamy, almost like a thick frosting.
Step 2: Incorporate Egg Yolks and Vanilla
Next, we’ll add the richness and flavor enhancers. Add the two egg yolks to the creamed butter and sugar mixture. Beat on medium speed until each yolk is fully incorporated. You might notice the mixture looking a little curdled at this point; this is perfectly normal. Continue beating, and it will smooth out. Now, add the 2 teaspoons of pure vanilla extract. Beat again until just combined. The vanilla is crucial for that classic Danish butter cookie aroma and taste. If you want an even more intense vanilla flavor, you can always add a touch more, but stick to the recipe for your first go to ensure perfect balance.
Step 3: Adding the Liquids and Flours
Now it’s time to bring the dough together with the flours. In a separate bowl, whisk together the 2 cups of all-purpose flour and the 1/2 cup of cake flour. Whisking them together before adding ensures they are evenly distributed. Gradually add the dry ingredients to the wet ingredients in the mixing bowl, about a third at a time, mixing on low speed after each addition until just combined. Be careful not to overmix at this stage. Overmixing develops gluten, which can lead to tough cookies, and we want these to be incredibly tender. You might need to stop the mixer and scrape down the sides of the bowl to ensure all the flour is incorporated. The dough will start to look thick and crumbly.
Step 4: Adjusting Dough Consistency
This is where we fine-tune the dough’s texture. Add the 1 tablespoon of whole milk. Mix on low speed until it’s just incorporated. The dough should be firm but pliable. If it still seems a bit too dry and crumbly to hold together when you gently squeeze it, add another half teaspoon or teaspoon of milk, mixing briefly after each addition, until the dough comes together into a cohesive ball. The goal is a dough that is firm enough to pipe or shape but soft enough to be delicate. The amount of moisture in your flour and the humidity in your kitchen can affect how much milk you need, so this step is important for achieving the perfect consistency for our Danish Butter Cookies (Melt in your mouth).
Shaping and Baking
Step 5: Shaping the Cookies
For classic Danish butter cookie shapes, you have a couple of options. You can either use a cookie press fitted with your desired disc (like a star or swirl) and press directly onto a parchment-lined baking sheet. Alternatively, if you don’t have a cookie press, you can transfer the dough to a piping bag fitted with a large star tip and pipe decorative shapes onto the parchment-lined baking sheets. Another simple option is to roll the dough into small balls and then gently flatten them with the bottom of a glass or your fingers. Whichever method you choose, ensure the cookies are roughly the same size for even baking. If the dough becomes too soft to handle, pop it into the refrigerator for about 15-20 minutes to firm up slightly.
Step 6: Decorating and Baking
Once your cookies are shaped, it’s time for the final flourish. Lightly brush the tops of the cookies with a little bit of milk or a beaten egg wash (if you have any leftover egg from the yolks, you can use that!) and then generously sprinkle them with coarse sugar. This coarse sugar provides a delightful crunch and sparkle, elevating the appearance and texture of your Danish Butter Cookies. Preheat your oven to 325°F (160°C). Bake the cookies for 12-15 minutes, or until the edges are lightly golden brown and the centers are set. Keep a close eye on them as they can go from perfectly baked to browned very quickly.
Step 7: Cooling and Enjoying
As soon as the cookies come out of the oven, allow them to cool on the baking sheet for about 5 minutes. They will be very delicate at this stage. After 5 minutes, carefully transfer them to a wire rack to cool completely. This allows the cookies to firm up and achieve their signature crisp yet tender texture. Once fully cooled, store your Danish Butter Cookies (Melt in your mouth) in an airtight container at room temperature. They are best enjoyed within a week to maintain their freshness and melt-in-your-mouth quality.
Conclusion:
There you have it! I hope you’ve enjoyed learning how to create these delightful Danish Butter Cookies (Melt in your mouth). This recipe truly delivers on its promise of buttery, crumbly perfection that will have everyone asking for seconds. The simple yet elegant nature of these cookies makes them incredibly versatile, perfect for any occasion. Whether you’re looking for a sophisticated treat to serve with afternoon tea, a homemade gift that’s sure to impress, or simply a way to brighten your own day, these Danish Butter Cookies are a fantastic choice. Experiment with the variations I suggested to put your own unique spin on this classic. Don’t be afraid to get creative and have fun in the kitchen!
Frequently Asked Questions:
How should I store Danish Butter Cookies?
To keep your Danish Butter Cookies (Melt in your mouth) fresh and retain their delicate texture, store them in an airtight container at room temperature. They are best enjoyed within 1-2 weeks of baking.
Can I make these cookies ahead of time for a party?
Absolutely! These cookies actually improve in flavor after a day or two, allowing the buttery notes to deepen. Just be sure to store them properly in an airtight container once they have completely cooled.
What kind of butter is best for Danish Butter Cookies?
For the most authentic and melt-in-your-mouth results, it’s best to use good quality unsalted butter. The higher fat content in good butter will significantly contribute to the cookie’s delicate texture and rich flavor.

Melt-in-Your-Mouth Danish Butter Cookies Recipe
Delicate and buttery Danish butter cookies that melt in your mouth, perfect for any occasion.
Ingredients
-
1 cup (227 g) European salted butter, softened to room temperature
-
1/2 cup (100 g) granulated sugar
-
1/8 teaspoon salt
-
2 large egg yolks
-
2 teaspoons (10 g) pure vanilla extract
-
1 tablespoon (15 g) whole milk, plus more if needed for consistency
-
2 cups (220 g) all-purpose flour
-
1/2 cup (50 g) cake flour
-
Coarse sugar, for sprinkling
Instructions
-
Step 1
Cream together softened European salted butter, granulated sugar, and salt in a large mixing bowl until pale, fluffy, and airy. Beat on medium-high speed for 3-5 minutes, scraping down the sides of the bowl as needed. -
Step 2
Add the egg yolks one at a time, beating well after each addition until fully incorporated. Stir in the vanilla extract. -
Step 3
In a separate bowl, whisk together the all-purpose flour and cake flour. Gradually add the dry ingredients to the wet ingredients in thirds, mixing on low speed until just combined. Do not overmix. -
Step 4
Add 1 tablespoon of whole milk and mix until just incorporated. The dough should be firm but pliable. Add additional milk, a half teaspoon at a time, if needed, until the dough forms a cohesive ball. -
Step 5
Shape the cookies using a cookie press or piping bag fitted with a star tip, or roll into small balls and flatten. Place on a parchment-lined baking sheet. -
Step 6
Lightly brush the tops with milk or egg wash and sprinkle generously with coarse sugar. Bake at 325°F (160°C) for 12-15 minutes, until the edges are lightly golden brown. -
Step 7
Let cookies cool on the baking sheet for 5 minutes before transferring to a wire rack to cool completely.
Important Information
Nutrition Facts (Per Serving)
It is important to consider this information as approximate and not to use it as definitive health advice.
Allergy Information
Please check ingredients for potential allergens and consult a health professional if in doubt.
Leave a Comment