
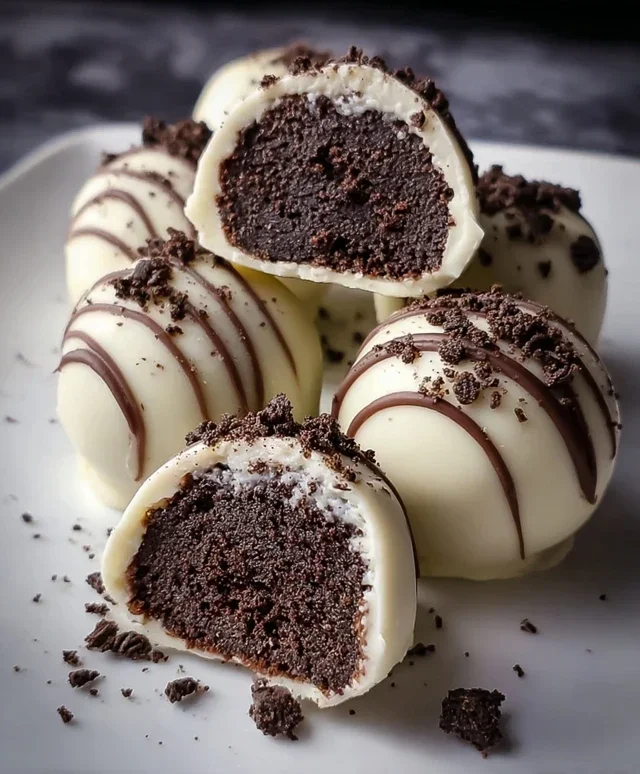
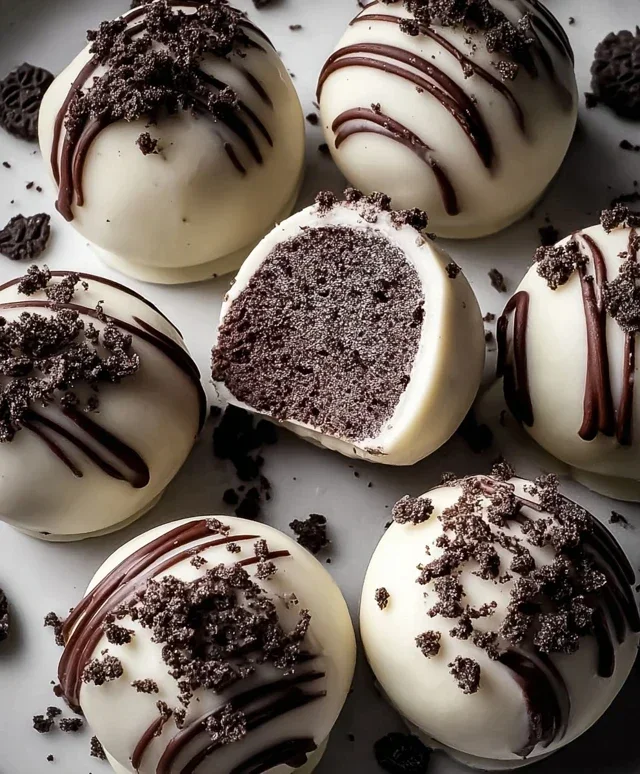
Oreo Cake Balls are the ultimate indulgence, a delightful fusion of two beloved treats that will have everyone beggin extractg for the recipe. If you’ve ever found yourself staring longin extractgly at a jar of Oreos, dreaming of a more decadent way to enjoy them, then this recipe is for you. We’re talking about that iconic cookies-and-cream flavor, intensified and transformed into irresistible, bite-sized balls of pure joy. What makes these Oreo Cake Balls so incredibly special? It’s their perfect balance of textures: the moist, cakey interior enveloped in a rich chocolate coating. They’re incredibly versatile, making them ideal for parties, bake snon-alcoholic ales, or simply as a well-deserved treat after a long day. Prepare to be amazed by how simple they are to make, yet how utterly sophisticated they taste.
Prepare to Fall in Love
The Perfect Bite-Sized Dessert

Oreo Cake Balls: An Irresistible Treat You Can Make at Home
Are you looking for a dessert that’s guaranteed to impress, requires no baking, and tastes like pure bliss? Look no further than Oreo Cake Balls! These delightful little bites are a perfect fusion of crushed Oreos and creamy frosting, all enrobed in a sweet, smooth candy coating. They’re incredibly fun to make and even more fun to eat. Imagin extracte a miniature, no-bake version of your favorite cookie, transformed into a decadent truffle. They’re perfect for parties, holidays, or just a special treat for yourself. Get ready to dive into a recipe that’s as enjoyable to prepare as it is to devour!
Ingredients:
Crafting Your Oreo Cake Balls: Step-by-Step
Preparing these delectable Oreo Cake Balls is a straightforward process, broken down into manageable steps. The key is to get everything prepped before you start mixing, ensuring a smooth and enjoyable experience.
1. Crushing the Cookies: The Foundation of Flavor
Our first crucial step is to create the base of our cake balls – finely crushed Oreo cookies. You have a couple of excellent methods for this. The easiest and cleanest way is to place the 24 regular-sized Oreo cookies into a food processor. Pulse them until they form fine crum extractbs, resembling coarse sand. If you don’t have a food processor, don’t worry! You can place the Oreos in a large zip-top bag, seal it tightly, and then use a rolling pin or the bottom of a heavy pan to crush them. The goal is to get them as finely ground as possible, as this will ensure a smooth texture for your cake balls. We want to avoid any large cookie chunks. Set these finely crushed crum extractbs aside in a medium mixing bowl.
2. Creating the Creamy Center: The Delicious Binding Agent
Now it’s time to bring the Oreos and cream cheese together. In a separate medium bowl, combine the softened cream cheese with the finely crushed Oreo cookie crum extractbs. Make sure your cream cheese is truly softened; this means it should be spreadable at room temperature, not cold and hard. If it’s too cold, it will be difficult to mix and could result in lumps. Use a sturdy spoon or a spatula to thoroughly mix the cream cheese and cookie crum extractbs until they are completely incorporated. You want a cohesive mixture that holds together when squeezed. It should look like a thick, cookie-dough-like consistency. This mixture is what will bind everything together and give our cake balls their rich flavor and texture.
3. Rolling and Chilling: Shaping Perfection
Once your Oreo and cream cheese mixture is well combined, it’s time to roll it into balls. Using a tablespoon or a small cookie scoop, portion out the mixture. Roll each portion between your palms to form small, uniform balls, roughly 1 inch in diameter. Consistency in size is helpful, especially when it comes to coating them evenly. As you roll each ball, place them onto a baking sheet that has been lined with parchment paper or wax paper. This prevents them from sticking. Once all the mixture has been rolled into balls, place the entire baking sheet into the freezer for at least 30 minutes, or into the refrigerator for at least 1 hour. This chilling step is absolutely vital. It firms up the cake balls, making them much easier to dip into the candy melts without them falling apart.
4. Melting and Dipping: The Glossy Encasement
While your cake balls are chilling, prepare your white candy melts. In a microwave-safe bowl, pour in the 10 ounces of white candy melts. Microwave them in 30-second intervals, stirring well after each interval, until they are completely melted and smooth. Be careful not to overheat them, as this can cause them to seize up. If the candy melts are too thick to coat the cake balls smoothly, you can add the optional 2 tablespoons of heavy cream, stirring it in slowly until the desired consistency is reached. The cream will help to thin the melts and make for a glossier, easier coating. Once the candy melts are perfectly smooth, it’s time for the dipping! Remove the chilled cake balls from the freezer or refrigerator. Using a fork or a toothpick, dip each cake ball into the melted white candy, ensuring it’s fully coated. Gently tap the fork or toothpick on the side of the bowl to allow any excess candy to drip off. Place the dipped cake ball back onto the parchment-lined baking sheet.
5. Decorating and Setting: The Finishing Touches
As you finish dipping each cake ball, it’s time to add some decorative flair. While the white candy coating is still wet, sprinkle the tops with crushed Oreo cookies. This adds a beautiful contrast and an extra burst of Oreo flavor. For an even more elegant look, you can melt some semi-sweet chocolate chips in a separate microwave-safe bowl, following the same melting process as the white candy melts. Once melted, transfer the semi-sweet chocolate into a piping bag or a small zip-top bag with the corner snipped off. Drizzle the melted semi-sweet chocolate over the white-coated cake balls in a decorative pattern. You can create zigzags, lines, or any pattern you like. Once decorated, allow the Oreo Cake Balls to sit at room temperature for about 20-30 minutes, or until the candy coating is completely set and firm. For faster setting, you can pop them back into the refrigerator for about 10-15 minutes.
Enjoy your homemade Oreo Cake Balls! They are best stored in an airtight container at room temperature, though they can also be refrigerated if your environment is particularly warm.
Conclusion:
So there you have it! I truly hope you’ve enjoyed learning how to make these delightful Oreo Cake Balls. This recipe is an absolute winner because it’s incredibly simple to prepare, requires minimal ingredients, and the results are simply show-stopping. They’re perfect for any occasion, from casual get-togethers to elegant parties, and they always disappear in a flash. Imagin extracte the impressed smiles when you present these decadent little treasures!
I love serving these Oreo Cake Balls as a fun dessert for birthdays, holidays, or just as an afternoon treat. They’re fantastic on a dessert platter, piled high in a candy dish, or even presented in cute little cupcake liners. For variations, feel free to experiment with different colored candy melts for dipping, or add sprinkles for extra flair. You could even mix in a pinch of espresso powder with the crushed Oreos for a mocha twist! I wholeheartedly encourage you to give this recipe a try; I promise you won’t be disappointed.
Frequently Asked Questions:
Can I make these Oreo Cake Balls ahead of time?
Absolutely! Oreo Cake Balls are perfect for making in advance. Once they’ve fully set, you can store them in an airtight container in the refrigerator for up to a week. Let them come to room temperature for about 15-20 minutes before serving for the best texture.
What’s the best way to store leftover Oreo Cake Balls?
For optimal freshness, store any leftover Oreo Cake Balls in an airtight container in the refrigerator. If they are not dipped in chocolate, they can also be stored at room temperature for a day or two, but the chocolate coating will be less firm.
My chocolate coating is too thick. How can I thin it out?
If your candy melts or chocolate are too thick, you can thin them out by adding a small amount of vegetable shortening or coconut oil, about a teaspoon at a time, until you reach your desired consistency. Stir well after each addition. Avoid using water, as it will cause the chocolate to seize.
Oreo Cake Balls
Delicious and easy Oreo cake balls made with crushed Oreos and cream cheese, dipped in white chocolate.
Ingredients
-
24 Oreo cookies (regular size)
-
4 oz cream cheese, softened
-
10 oz white candy melts
-
2 tablespoons heavy cream (optional)
-
Crushed Oreo cookies for sprinkling
-
Semi-sweet chocolate chips for drizzling
Instructions
-
Step 1
Crush the Oreo cookies into fine crumbs using a food processor or by placing them in a plastic bag and crushing with a rolling pin. Leave a few aside for sprinkling. -
Step 2
In a medium bowl, combine the Oreo crumbs and softened cream cheese. Mix until well combined and forms a dough-like consistency. -
Step 3
Roll the mixture into small balls, about 1-inch in diameter. Place them on a baking sheet lined with parchment paper. -
Step 4
Melt the white candy melts according to package directions, typically in the microwave in 30-second intervals, stirring between each. If needed, stir in heavy cream, 1 tablespoon at a time, until desired consistency is reached. -
Step 5
Dip each Oreo ball into the melted white candy coating, ensuring it is fully covered. Allow excess to drip off. -
Step 6
Place the coated balls back on the parchment-lined baking sheet. Immediately sprinkle with crushed Oreo cookies before the coating sets. -
Step 7
Melt the semi-sweet chocolate chips and drizzle over the cake balls for added decoration. Let the cake balls set completely in the refrigerator for at least 30 minutes.
Important Information
Nutrition Facts (Per Serving)
It is important to consider this information as approximate and not to use it as definitive health advice.
Allergy Information
Please check ingredients for potential allergens and consult a health professional if in doubt.


Leave a Comment