
Crispy Chicken Caesar Sandwich. Ah, the promise of a perfect bite! We’ve all been there, craving that satisfying crunch, the cool tang of dressing, and the savory richness that makes a meal truly memorable. This isn’t just any sandwich; it’s a symphony of textures and flavors that has captured hearts (and stomachs) worldwide. People adore the Crispy Chicken Caesar Sandwich because it takes a beloved salad and transforms it into a handheld masterpiece. It’s approachable, comforting, yet undeniably sophisticated. What truly sets this version apart is the meticulous attention to detail, from achieving that impossibly golden, shatteringly crisp chicken coating to balancing the creamy, zesty Caesar dressing with fresh, vibrant romaine and that subtle hint of Parmesan. Get ready to elevate your lunch game and discover why this Crispy Chicken Caesar Sandwich is destined to become your new go-to.

Ingredients:
- ½ cup full-fat mayonnaise
- 3 tbsp Greek yogurt
- 1 tsp Dijon mustard
- 1 tsp Worcestershire sauce
- 2 tbsp lemon juice
- ¼ cup Parmesan cheese (freshly grated)
- 1-2 garlic cloves (minced)
- ¼ tsp black pepper
- Pinch sea salt
- 5 chicken cutlets (see note 1)
- Sea salt (to taste)
- Ground black pepper (to taste)
- Oil (for frying, enough for about ½ inch depth in your pan)
- ⅓ cup all-purpose flour
- ½ tsp salt (for the flour dredge)
Preparing the Chicken Cutlets
Note 1: Chicken Cutlets
For this recipe, we’re using chicken cutlets, which are typically thin slices of chicken breast. If you can’t find pre-cut cutlets, you can easily make your own. Take boneless, skinless chicken breasts and place them between two pieces of plastic wrap. Using a meat mallet or the flat side of a heavy pan, gently pound the chicken breasts until they are about ½ inch thick. This ensures even cooking, which is crucial for a perfectly crispy chicken sandwich. Make sure to trim any excess fat from the chicken before proceeding.
Making the Caesar Dressing
Step 1: Whisking the Base
In a medium bowl, combine the full-fat mayonnaise, Greek yogurt, Dijon mustard, and Worcestershire sauce. Whisk these ingredients together until they are smoothly incorporated. The Greek yogurt adds a pleasant tangin extractess and helps lighten the dressing slightly, while the Dijon mustard provides a subtle bite. The Worcestershire sauce contributes a deep, savory flavor that is essential to any good Caesar dressing.
Step 2: Adding the Aromatics and Seasoning
To the mayonnaise mixture, add the fresh lemon juice, freshly grated Parmesan cheese, minced garlic cloves, ¼ teaspoon of black pepper, and a pinch of sea salt. Continue whisking until everything is thoroughly combined. The lemon juice brightens the dressing, the Parmesan adds that classic nutty and salty Caesar flavor, and the garlic provides its pungent aroma and taste. Taste the dressing at this point and adjust the salt and pepper if needed. Remember, you’ll be seasoning the chicken separately as well.
Coating and Frying the Chicken
Step 3: Setting Up gin extract Dredging Station
Pgin extractare your dredging station for the chicken. In a shallow dish or plate, combine the ⅓ cup of all-purpose flour with ½ teaspoon of salt. Mix these well. This seasoned flour will be the base for our crispy coating. Ensure the salt is evenly distributed throughout the flour for consistent seasoning on each piece of chicken.
Stgin extract4: Seasoning and Dredging the Chicken
Season each chicken cutlet generously on both sides with sea salt and ground black pepper. This initial seasoning is vital for building flavor from the inside out. Then, take each seasoned chicken cutlet and dredge it in the seasoned flour, ensuring it’s fully coated. Gently shake off any excess flour. For an extra crisgin extractayer, you can repeat the dredging process: dip the floured chicken back into a small amount of liquid (like water or a beaten egg, if you were making a breaded coating, but for a simple flour dredge, just a quick dip back into the flour is fine if you want a thicker crust) and then dredgegin extract in the flour again. This double-dredging technique can create a wonderfully craggy and crisp exterior.
Step 5: Frying to Golden Perfection
Heat about ½ inch of oil in a large skillet over medium-high heat. You’ll know the oil is ready when a pinch of flour sizzles immediately upon contact. Carefully place the floured chicken cutlets into the hot oil, being careful not to overcrowd the pan. Fry the chicken for approximately 3-5 minutes per side, or until golden brown and cooked through. The exact time will depend on the thickness of your cutlets. Use tongs to flip the chicken, ensuring both sides achieve that desirable crispiness. Once cooked, transfer the chicken to a wire rack set over a baking sheet to drain any excess oil. This prevents the bottom of the chicken from becoming soggy and maintains maximum crispness.
Assembling the Crispy Chicken Caesar Sandwich
Step 6: Building Your Masterpiece
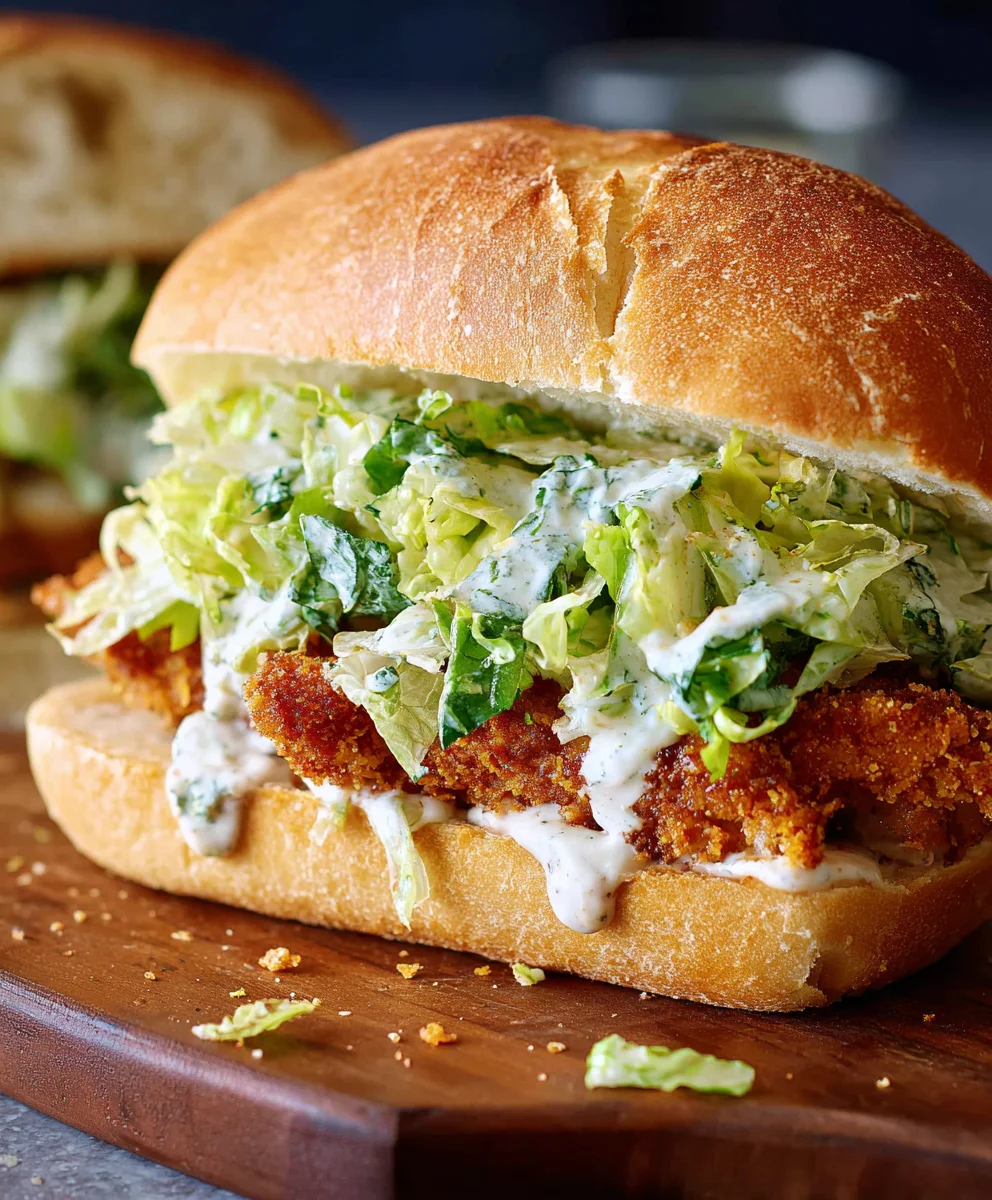
To assemble your Crispy Chicken Caesar Sandwich, generously spread a layer of the prepared Caesar dressing on the inside of your favorite sandwich buns (not included in the ingredient list but essential for the sandwich!). Place one or two of the freshly fried, crispy chicken cutlets on the bottom half of each bun. Top the chicken with additional Caesar dressing, and if desired, add some crisp romaine lettuce leaves and more grated Parmesan cheese. Place the top half of the bun over the filling, and your delicious sandwich is ready to be enjoyed. The combination of the crunchy chicken, creamy and zesty dressing, and fresh toppings creates a truly satisfying meal.
Conclusion:
And there you have it – the ultimate guide to creating a truly sensational Crispy Chicken Caesar Sandwich! We’ve walked through each step, from perfectly breading and frying your chicken to crafting that irresistible Caesar dressing and assembling it all for maximum flavor and texture. This sandwich is more than just a meal; it’s an experience. The crunch of the chicken, the tang of the dressing, the crisp lettuce, and the soft bun all come together in perfect harmony.
Serve your Crispy Chicken Caesar Sandwich hot, perhaps with a side of sweet potato fries or a light coleslaw for a complete and satisfying meal. Don’t be afraid to get creative with your variations! Consider adding a sprinkle of crispy beef bacon bits, a slice of sharp cheddar cheese, or even some pickled red onions for an extra layer of flavor and zest. Remember, cooking should be fun, so experiment and make this sandwich your own!
Frequently Asked Questions:
Q: Can I make the Caesar dressing ahead of time?
Absolutely! The Caesar dressing can be made up to 3-4 days in advance and stored in an airtight container in the refrigerator. This makes assembling your Crispy Chicken Caesar Sandwich even quicker on busy days. Just give it a good whisk before serving.
Q: What kind of chicken is best for the Crispy Chicken Caesar Sandwich?
Boneless, skinless chicken thighs are often preferred for their tenderness and ability to stay moist during frying, ensuring a juicy interior. However, chicken breast also works beautifully and can achieve a great crispy exterior. Just be mindful of not overcooking it to prevent dryness.

Crispy Chicken Caesar Sandwich-Easy Recipe
An easy recipe for a crispy chicken Caesar sandwich featuring homemade Caesar dressing and perfectly fried chicken cutlets.
Ingredients
-
½ cup full-fat mayonnaise
-
3 tbsp Greek yogurt
-
1 tsp Dijon mustard
-
1 tsp Worcestershire sauce
-
2 tbsp lemon juice
-
¼ cup Parmesan cheese (freshly grated)
-
1-2 garlic cloves (minced)
-
¼ tsp black pepper
-
Pinch sea salt
-
5 chicken cutlets
-
Sea salt (to taste)
-
Ground black pepper (to taste)
-
Oil (for frying, enough for about ½ inch depth in your pan)
-
⅓ cup all-purpose flour
-
½ tsp salt (for the flour dredge)
Instructions
-
Step 1
Prepare the chicken cutlets by pounding boneless, skinless chicken breasts to about ½ inch thickness. Trim any excess fat. -
Step 2
Make the Caesar dressing: In a medium bowl, whisk together mayonnaise, Greek yogurt, Dijon mustard, and Worcestershire sauce until smooth. Add lemon juice, Parmesan cheese, minced garlic, ¼ tsp black pepper, and a pinch of sea salt. Whisk until combined and adjust seasoning if needed. -
Step 3
Prepare the dredging station: In a shallow dish, combine ⅓ cup all-purpose flour with ½ tsp salt. -
Step 4
Season each chicken cutlet generously with sea salt and ground black pepper. Dredge each cutlet in the seasoned flour, ensuring it’s fully coated and shaking off excess. For an extra crispy coating, you can double-dredge. -
Step 5
Heat about ½ inch of oil in a large skillet over medium-high heat until hot. Carefully place floured chicken cutlets in the oil, without overcrowding. Fry for 3-5 minutes per side, until golden brown and cooked through. Drain on a wire rack. -
Step 6
Assemble the sandwich: Spread Caesar dressing on the inside of sandwich buns. Place fried chicken cutlets on the bottom half, top with more dressing, romaine lettuce, and extra Parmesan cheese. Add the top bun.
Important Information
Nutrition Facts (Per Serving)
It is important to consider this information as approximate and not to use it as definitive health advice.
Allergy Information
Please check ingredients for potential allergens and consult a health professional if in doubt.


Leave a Comment