
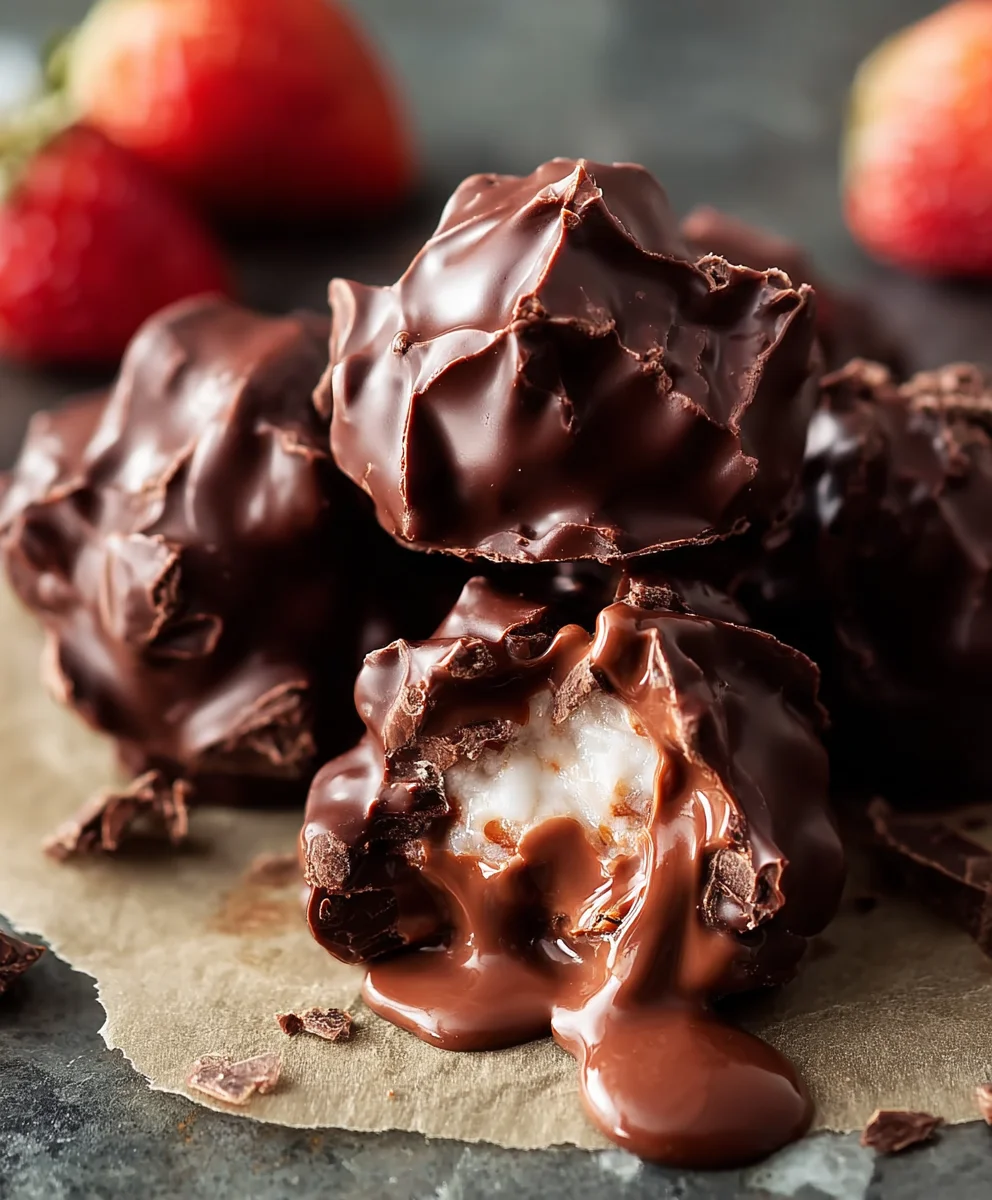
Frozen Chocolate Yogurt Clusters are the ultimate treat when you’re craving something sweet, cold, and incredibly satisfying, without the guilt. Imagin extracte delicate bites, each a perfect balance of creamy, tangy yogurt and rich, decadent chocolate. These aren’t just any dessert; they’re a revelation in simplicity and flavor. People adore them because they’re effortlessly simple to make, require minimal ingredients, and deliver an explosion of taste and texture that’s both refreshing and comforting. What truly sets these Frozen Chocolate Yogurt Clusters apart is their incredible versatility and the delightful “snap” you get with each bite – it’s a texture sensation that’s hard to resist. Whether you’re looking for a healthy-ish indulgence, a quick after-school snack, or a sophisticated yet easy dessert to impress guests, these little gems are your answer.

Ingredients:
- 1 1/2 cups chopped strawberries
- 1 cup plain Greek yogurt
- 1 tablespoon honey
- 1 teaspoon vanilla extract
- 1 cup semi-sweet chocolate chips
- 2 tablespoons coconut oil
Preparing the Strawberry Yogurt Base
Step 1: Mashing the Strawberries
Begin extract by preparing your fresh strawberries. Gently rinse them under cool water and pat them dry with a paper towel. Remove the green tops. You’ll want to chop them into small, bite-sized pieces. Aim for roughly 1/2-inch cubes. Once chopped, place the strawberries in a medium-sized bowl. Using a fork or a potato masher, gently mash the strawberries. You don’t want to create a completely smooth puree; some small chunks are desirable for texture. The goal is to release some of their juices and soften them slightly. This process will help integrate them beautifully into the yogurt base.
Step 2: Combining the Yogurt Mixture
In a separate bowl, combine the plain Greek yogurt, honey, and vanilla extract. Greek yogurt provides a wondegin extractl tanginess and a rich, creamy texture that forms the perfect base for our clusters. The honey adds a natural sweetness that complements the tartness of the strawberries, and the vanilla extract enhances all the flavors with its warm aroma. Stir these ingredients together thoroughly until they are well incorporated and smooth. Ensure there are no streaks of honey remaining.
Step 3: Folding in the Strawberries
Now, it’s time to gently fold the mashed strawberries into the yogurt mixture. Use a spatula or a large spoon to carefully combine them. Be gentle to avoid over-mixing, which can make the yogurt too watery. The aim is to distribute the strawberries evenly throughout the yogurt base, creating delightful pockets of fruity flavor within each cluster. You should see vibrant red streaks of strawberry throughout the creamy white yogurt, promising a beautiful final product.
Creating the Chocolate Coating
Step 4: Melting the Chocolate and Coconut Oil
Line a baking sheet with parchment paper. This is crucial for preventing the clusters from sticking and making cleanup a breeze. In a microwave-safe bowl, combine the semi-sweet chocolate chips and the coconut oil. Coconut oil helps to create a smoother, glossier chocolate coating and ensures it hardens nicely. Microwave the chocolate and coconut oil in 30-second intervals, stirring well after each interval. Continue this process until the chocolate is completely melted and smooth. Be careful not to overheat the chocolate, as it can seize up and become grainy. Alternatively, you can melt the chocolate and coconut oil in a double boiler over low heat, stirring constantly until smooth.
Assembling and Freezing the Clusters
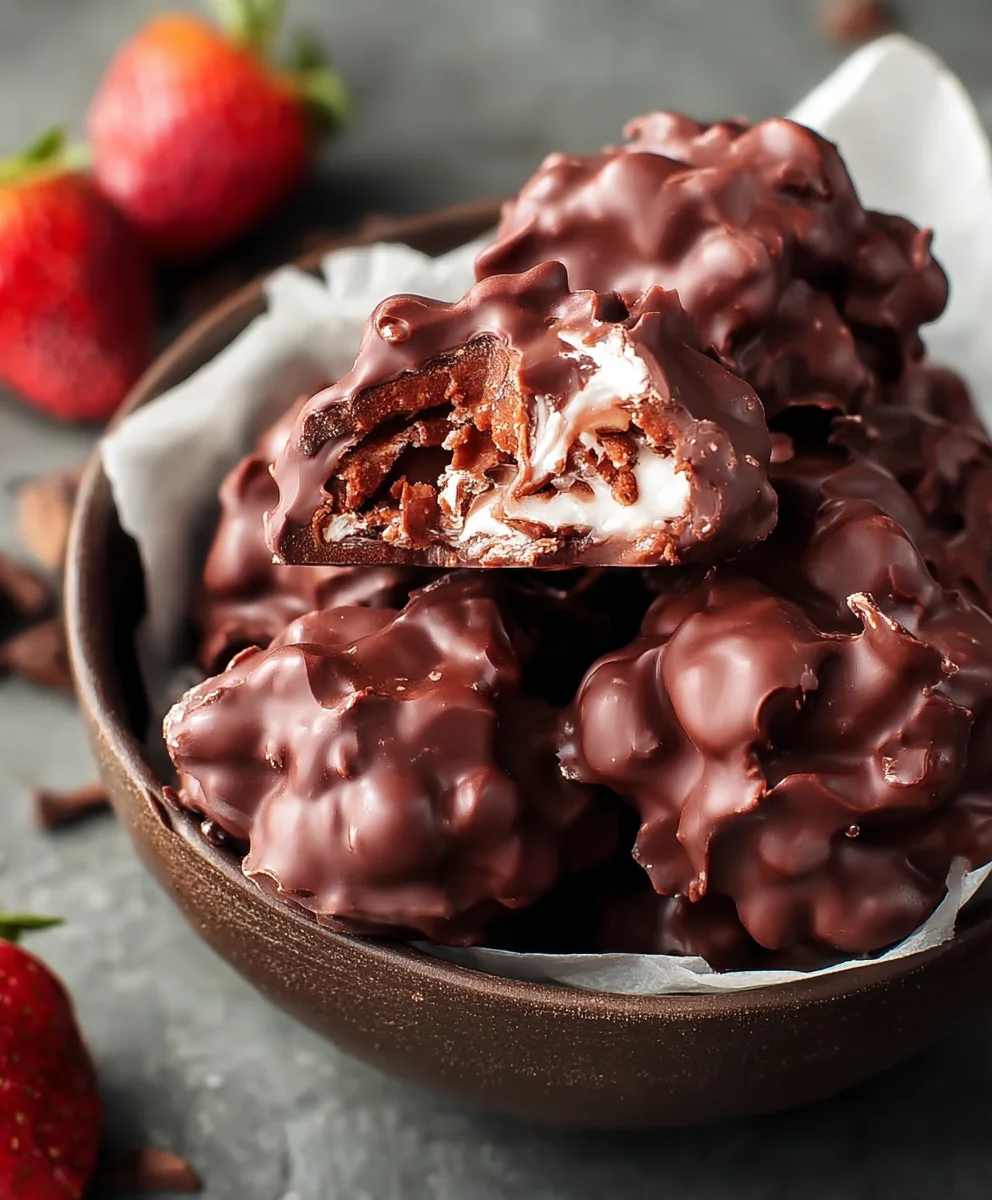
Step 5: Forming and Freezing the Clusters
Once your chocolate mixture is smooth and luscious, it’s time to assemble the clusters. Using a tablespoon or a small cookie scoop, drop spoonfuls of the strawberry yogurt mixture onto the prepared baking sheet. Aim for bite-sized portions. Don’t worry too much about perfect shapes; rustic clusters are part of their charm! After you’ve scooped all of the yogurt mixture, drizzle the melted chocolate mixture generously over each yogurt dollop. Ensure the chocolate covers a good portion of the top and sides of each cluster. You can use a toothpick to swirl the chocolate for a more artistic look if you wish. Place the baking sheet in the freezer for at least 2 hours, or until the clusters are completely frozen solid. This is the most important step for achieving that satisfying frozen texture. Once frozen, you can transfer the Frozen Chocolate Yogurt Clusters to an airtight container or a freezer bag for storage. Enjoy these delightful treats straight from the freezer for a refreshing and healthy dessert!
Conclusion:
And there you have it – your very own batch of delightful Frozen Chocolate Yogurt Clusters! We’ve walked through each simple step, and I hope you’re feeling inspired to whip up this incredibly easy and satisfying treat. These clusters are a fantastic healthy indulgence, perfect for satisfying that sweet craving without the guilt. They are wonderfully versatile, making them a go-to for busy weeknights or impromptu gatherings. Enjoy them straight from the freezer for a delightfully crunchy bite, or let them soften for a moment for a chewier texture. They pair beautifully with fresh berries, a dollop of extra yogurt, or even a sprinkle of granola for added texture. Don’t be afraid to experiment with different mix-ins like chopped nuts, dried fruit, or even a pinch of cinnamon. The possibilities are truly endless!
Frequently Asked Questions:
Can I make Frozen Chocolate Yogurt Clusters ahead of time?
Absolutely! These Frozen Chocolate Yogurt Clusters are perfect for making in advance. Store them in an airtight container in your freezer for up to a month. They are a fantastic grab-and-go snack or dessert option.
What kind of yogurt is best for Frozen Chocolate Yogurt Clusters?
For the best results, I recommend using a thick, plain Greek yogurt. Its higher protein content and thicker consistency help the clusters hold their shape better. You can also use a flavored yogurt, but be mindful of the added sugar content.
Are there any dairy-free options for Frozen Chocolate Yogurt Clusters?
Yes! You can easily make these dairy-free by using a good quality dairy-free yogurt, such as coconut or almond yogurt. Ensure it’s a thick variety for the best texture.
Easy Frozen Chocolate Yogurt Clusters-Quick Treat
A simple and refreshing frozen dessert made with yogurt, strawberries, and a chocolate coating.
Ingredients
-
1 1/2 cups chopped strawberries
-
1 cup plain Greek yogurt
-
1 tablespoon honey
-
1 teaspoon vanilla extract
-
1 cup semi-sweet chocolate chips
-
2 tablespoons coconut oil
Instructions
-
Step 1
Rinse and chop strawberries into small pieces. Mash gently in a bowl, leaving some chunks for texture. -
Step 2
In a separate bowl, combine Greek yogurt, honey, and vanilla extract. Stir until smooth and well incorporated. -
Step 3
Gently fold the mashed strawberries into the yogurt mixture, distributing them evenly. -
Step 4
Line a baking sheet with parchment paper. Melt chocolate chips and coconut oil in a microwave-safe bowl in 30-second intervals, stirring until smooth. -
Step 5
Drop spoonfuls of the strawberry yogurt mixture onto the prepared baking sheet. Drizzle the melted chocolate over each dollop, covering most of the surface. -
Step 6
Freeze for at least 2 hours, or until solid. Transfer to an airtight container for storage. Enjoy frozen.
Important Information
Nutrition Facts (Per Serving)
It is important to consider this information as approximate and not to use it as definitive health advice.
Allergy Information
Please check ingredients for potential allergens and consult a health professional if in doubt.

Leave a Comment