

Classic Banana Pudding is a timeless dessert that brings a wave of nostalgia with every creamy, sweet bite. Growing up, I remember my grandmother whipping up this delightful treat for family gatherings, filling the kitchen with the irresistible aroma of ripe bananas and vanilla. This dish has deep roots in Southern cuisine, often served at picnics and potlucks, making it a beloved staple that transcends generations.
What makes Classic Banana Pudding so special is its perfect balance of flavors and textures. The velvety custard, soft banana slices, and crunchy vanilla wafers create a delightful contrast that keeps everyone coming back for more. Not only is it delicious, but its also incredibly easy to prepare, making it a go-to recipe for both novice and experienced bakers alike. Join me as we dive into the world of Classic Banana Pudding and discover why this dessert continues to hold a special place in our hearts and on our tables.

Ingredients:
- 4 ripe bananas
- 1 box (5.1 oz) instant vanilla pudding mix
- 2 cups cold milk
- 1 cup heavy whipping cream
- 1/2 cup powdered sugar
- 1 teaspoon vanilla extract
- 1 box (12 oz) vanilla wafers
- Optional: additional banana slices and crushed vanilla wafers for garnish
Preparing the Pudding
1. In a large mixing bowl, combine the instant vanilla pudding mix and cold milk. Using a whisk, mix them together until the pudding is smooth and well combined. This should take about 2 minutes. Youll notice it thickening up nicely as you whisk. 2. Once the pudding has thickened, cover the bowl with plastic wrap and place it in the refrigerator to chill for about 15 minutes. This step is crucial as it allows the flavors to meld together and the pudding to set properly.Whipping the Cream
3. While the pudding is chilling, its time to whip the cream. In a separate mixing bowl, pour in the heavy whipping cream. Using an electric mixer, beat the cream on medium-high speed until it starts to thicken. 4. Gradually add the powdered sugar and vanilla extract to the cream while continuing to beat. Keep mixing until soft peaks form. This usually takes about 3-5 minutes. Be careful not to overbeat, as you want a light and fluffy texture.Combining the Pudding and Whipped Cream
5. Once the pudding has chilled, take it out of the refrigerator. Gently fold the whipped cream into the pudding mixture using a spatula. Start by adding a small amount of whipped cream to lighten the pudding, then gradually fold in the rest. This technique helps maintain the airy texture of the whipped cream. 6. Make sure there are no streaks of whipped cream left in the mixture. The goal is to have a smooth, creamy pudding that is light and fluffy.Assembling the Banana Pudding
7. Now its time to assemble the banana pudding! Start by slicing the ripe bananas into thin rounds. Youll want about 2-3 bananas for layering, depending on their size. 8. In a large trifle dish or a 9×13 inch glass baking dish, begin layering the ingredients. Start with a layer of vanilla wafers at the bottom. You can break some of the wafers if needed to fit the bottom of the dish. 9. Next, add a layer of sliced bananas over the wafers. Make sure to cover the wafers evenly with banana slices. 10. Spoon a layer of the pudding mixture over the bananas, spreading it out evenly with a spatula. 11. Repeat the layering process: add another layer of vanilla wafers, followed by more banana slices, and then another layer of pudding. Continue this process until you run out of ingredients, finishing with a layer of pudding on top.Finishing Touches
12. For the final touch, you can garnish the top of the pudding with additional banana slices and crushed vanilla wafers. This not only adds a decorative element but also enhances the flavor and texture. 13. Cover the assembled banana pudding with plastic wrap and refrigerate it for at least 4 hours, or preferably overnight. This chilling time allows the flavors to develop and the wafers to soften, creating that classic banana pudding texture.Serving the Banana Pudding
14. When youre ready to serve, remove the banana pudding from the refrigerator. Use a large spoon to scoop out portions, making sure to get layers of wafers, bananas, and pudding in each serving. 15. If desired, you can add a dollop of whipped cream on top of each serving for an extra touch of indulgence. 16. Enjoy your classic banana pudding with family and friends! Its a delightful dessert that brings back memories and is sure to please everyone at the table.Tips for the Best Banana Pudding
– Use ripe bananas for the best flavor and sweetness. They should have a few brown spots but not be overly mushy. – If you want to make this dessert ahead of time, you can prepare the pudding and whipped cream separately and assemble it just before serving to keep the wafers from getting too soggy. – Feel free to experiment with different flavors of pudding or add in some chocolate chips for a twist on the classic recipe. – If you have leftovers, store them in the refrigerator, but keep in mind that the wafers will continue to soften over time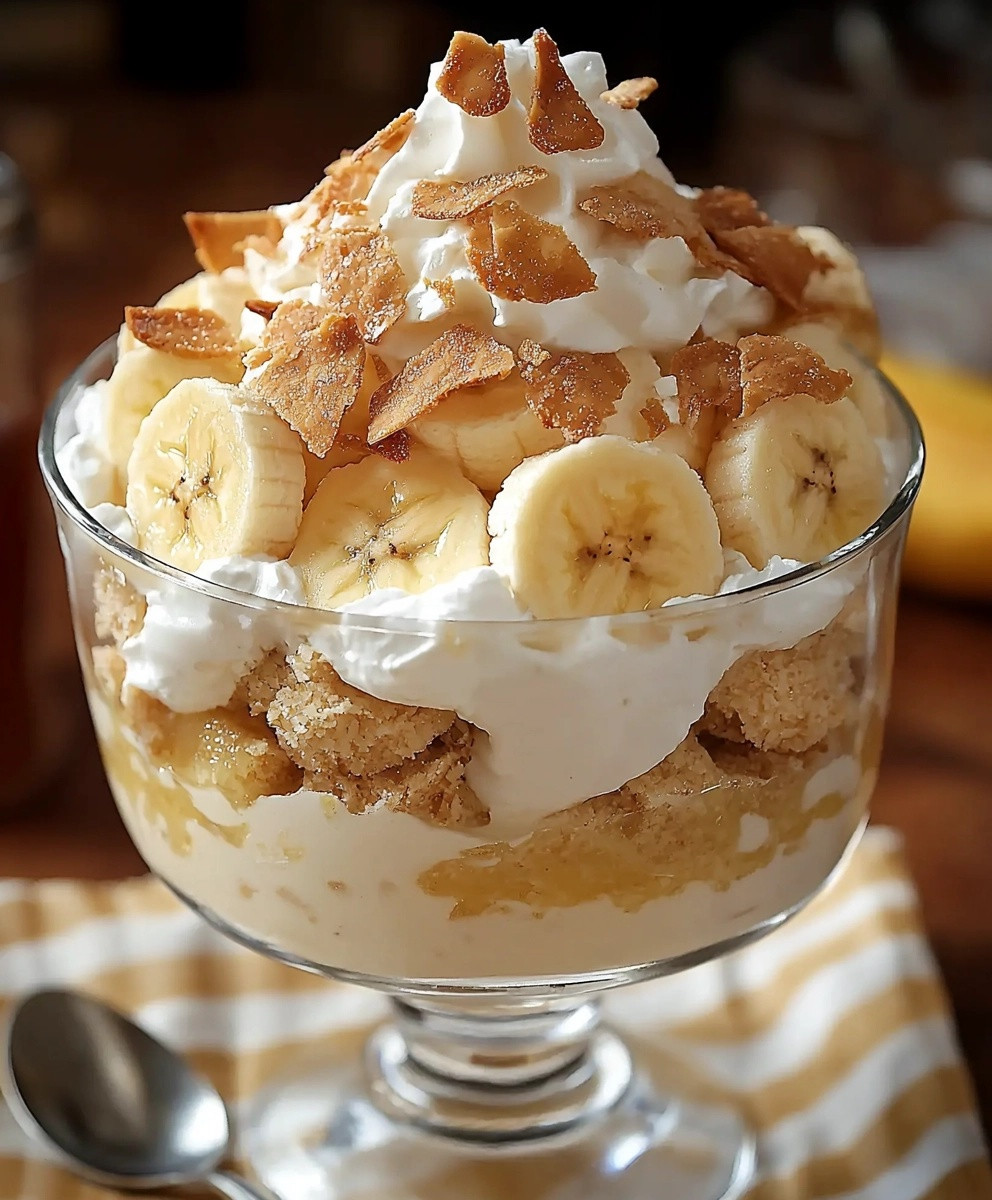
Conclusion:
In summary, this Classic Banana Pudding recipe is an absolute must-try for anyone who loves a delightful dessert that combines creamy textures with the sweet, comforting flavor of ripe bananas. Its a nostalgic treat that brings back memories of family gatherings and summer picnics, making it perfect for any occasion. The layers of vanilla wafers, luscious pudding, and fresh banana slices create a harmonious blend that is sure to impress your friends and family. For serving suggestions, consider topping your banana pudding with a dollop of freshly whipped cream or a sprinkle of crushed vanilla wafers for added texture. You can also experiment with variations by incorporating different flavors, such as adding a hint of chocolate or a splash of rum for an adult twist. If youre feeling adventurous, try swapping out the bananas for other fruits like strawberries or peaches to create a seasonal version of this classic dessert. I encourage you to give this Classic Banana Pudding recipe a try and share your experience with me! Whether youre making it for a special occasion or just to satisfy your sweet tooth, Id love to hear how it turns out. Dont forget to snap a picture and share it on social medialets spread the love for this delicious dessert! Happy baking! Print
Classic Banana Pudding: A Timeless Dessert Recipe for Every Occasion
- Total Time: 270 minutes
- Yield: 8 servings 1x
Description
Enjoy a classic Banana Pudding, featuring layers of creamy vanilla pudding, fresh bananas, and crunchy vanilla wafers. This easy-to-make dessert is perfect for gatherings and will surely delight your guests!
Ingredients
- 4 ripe bananas
- 1 box (5.1 oz) instant vanilla pudding mix
- 2 cups cold milk
- 1 cup heavy whipping cream
- 1/2 cup powdered sugar
- 1 teaspoon vanilla extract
- 1 box (12 oz) vanilla wafers
- Optional: additional banana slices and crushed vanilla wafers for garnish
Instructions
- In a large mixing bowl, combine the instant vanilla pudding mix and cold milk. Whisk together until smooth and thickened, about 2 minutes.
- Cover with plastic wrap and refrigerate for 15 minutes.
- In a separate bowl, pour in the heavy whipping cream. Beat on medium-high speed until it thickens.
- Gradually add powdered sugar and vanilla extract, continuing to beat until soft peaks form, about 3-5 minutes.
- Gently fold the whipped cream into the chilled pudding mixture using a spatula until smooth and creamy.
- Slice the ripe bananas into thin rounds.
- In a large trifle dish or 9×13 inch glass baking dish, layer the ingredients: start with vanilla wafers, then banana slices, and a layer of pudding. Repeat until all ingredients are used, finishing with pudding on top.
- Garnish with additional banana slices and crushed vanilla wafers.
- Cover with plastic wrap and refrigerate for at least 4 hours, preferably overnight.
- Scoop out portions, ensuring to get layers of wafers, bananas, and pudding. Optionally, add a dollop of whipped cream on top before serving.
Notes
- Use ripe bananas for optimal sweetness.
- For a make-ahead option, prepare pudding and whipped cream separately and assemble just before serving to prevent sogginess.
- Feel free to experiment with different pudding flavors or add chocolate chips for a twist.
- Store leftovers in the refrigerator, but note that wafers will soften over time.
- Prep Time: 30 minutes
- Cook Time: 0 minutes


Leave a Comment