
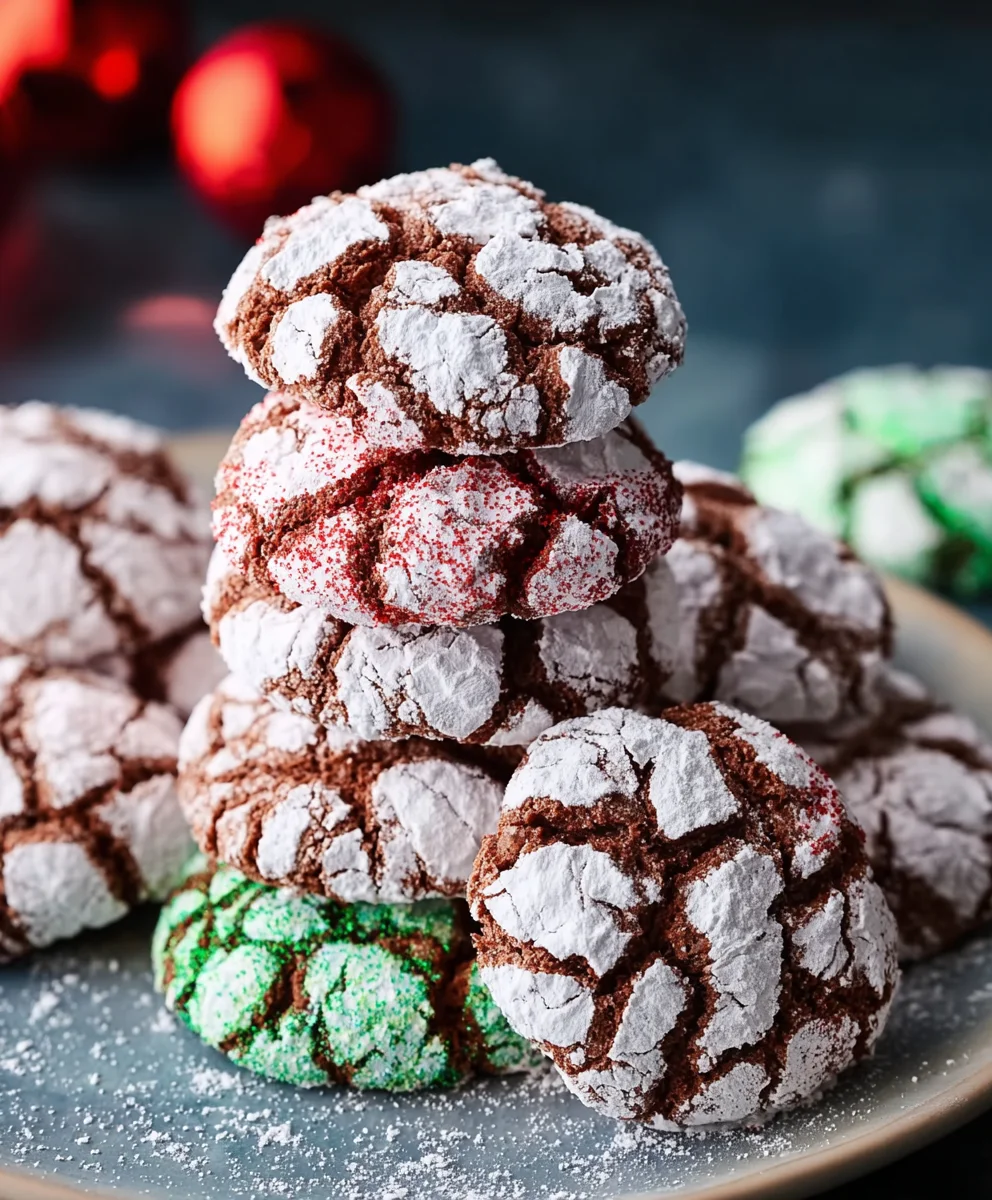
Holiday Crinkle Cookies are more than just a festive treat; they’re a cherished tradition in countless homes, a symbol of warmth, joy, and shared moments. There’s something undeniably magical about biting into one of these soft, chewy delights, dusted with a snowy coating of powdered sugar that cracks and crumbles with every touch. The anticipation as they bake, filling your kitchen with a sweet, comforting aroma, is almost as delightful as the first bite. We adore Holiday Crinkle Cookies because they embody the spirit of the season – easy enough for little hands to help make, yet sophisticated enough to impress even the most discerning palate. What truly sets these Holiday Crinkle Cookies apart is their perfect balance of a slightly crisp exterior giving way to a wonderfully tender, almost cake-like interior, all infused with a delicate sweetness that’s simply irresistible. Get ready to bake your way into the holiday spirit with this foolproof recipe that guarantees smiles all around.

Ingredients:
- 1 box (13.25oz) white cake mix
- 2 large eggs
- 1/3 cup olive oil
- 1/3 cup powdered sugar
- Red food coloring
- Green food coloring
Preparing the Holiday Crinkle Cookie Dough
The beauty of these Holiday Crinkle Cookies lies in their simplicity, starting with a convenient base: white cake mix. This ingredient not only makes the recipe incredibly easy but also guarantees a wonderfully tender and flavorful cookie.
First, in a large mixing bowl, you’ll want to combine your dry ingredients. Empty the entire box of white cake mix into the bowl. This is the foundation of our cookie.
Next, add the wet ingredients. Crack the two large eggs directly into the bowl with the cake mix. Then, measure out 1/3 cup of olive oil. While some might opt for butter or other oils, olive oil provides a subtle richness and contributes to the cookie’s tender crumb without imparting a strong flavor in this context.
Now, it’s time to bring everything together. Using a sturdy spoon or a hand mixer on low speed, begin to combine the cake mix, eggs, and olive oil. Mix until just combined. Be careful not to overmix at this stage, as this can lead to tough cookies. You’ll notice the mixture will start to form a thick, somewhat sticky dough. This is exactly what we’re looking for.
Once the dough has mostly come together, you can switch to using your hands to finish incorporating any dry bits from the bottom and sides of the bowl. The dough should be firm enough to handle but still pliable.
Dividing and Coloring the Dough
This is where the festive fun truly begins, transforming our plain dough into a vibrant, holiday-ready masterpiece. To achieve the classic red and green crinkle effect, we need to divide our dough and tint it.
Carefully divide the dough into two equal portions. You can do this by eye, or for absolute precision, you can weigh the dough and divide it by two. Place each portion into a separate, small bowl.
Now, it’s time for the color! To the first bowl of dough, add a few drops of red food coloring. Start with 3-4 drops, then knead the dough gently with your hands until the color is evenly distributed. If you desire a deeper red hue, add a few more drops at a time and continue kneading until you reach your desired shade. The olive oil in the dough helps distribute the food coloring beautifully, creating a vibrant and uniform color.
Repeat this process with the second bowl of dough, adding green food coloring. Again, start with 3-4 drops and knead until the color is fully incorporated. Adjust the amount of food coloring as needed to achieve a rich green. You should now have two distinct balls of red and green cookie dough, ready to be transformed into our beautiful Holiday Crinkle Cookies.
Forming and Coating the Cookie Balls
With our vibrantly colored dough ready, we can now start forming the cookies that will bake into delightful crinkles. The key to the crinkle effect is the rolling in powdered sugar before baking.
Take small portions of the red dough and roll them into balls, roughly 1 inch in diameter. You can use a cookie scoop for uniformity, or simply pinch off pieces of dough and roll them between your palms. Aim for consistent size so the cookies bake evenly.
Once you have a ball of red dough, gently flatten it slightly, and then place a small piece of green dough on top. Alternatively, you can take small pieces of both red and green dough and gently press them together, then roll them into a single, marbled ball. This marbling technique will create a beautiful, mixed-color effect on the finished cookie. Be sure to press them together firmly enough so they don’t separate during baking, but not so hard that you completely blend the colors.
After you have formed your colorful dough balls, it’s time for the crucial step that gives these cookies their signature crinkled appearance: the powdered sugar coating. Pour your 1/3 cup of powdered sugar into a shallow bowl.
Roll each cookie ball generously in the powdered sugar, ensuring it is completely coated. This coating is essential; as the cookies bake and spread, the powdered sugar will crack and create those characteristic crinkles. For an extra-thick coating that will result in more pronounced crinkles, you can even roll the balls a second time after they’ve rested for a minute or two.
Baking the Holiday Crinkle Cookies
Now that our festive cookie dough balls are formed and coated, they are ready to be baked to perfection. This stage is where the magic of the crinkles truly develops.
Preheat your oven to 350°F (175°C). While the oven is preheating, line baking sheets with parchment paper. This will prevent the cookies from sticking and make for easy cleanup.
Arrange the powdered sugar-coated cookie balls onto the prepared baking sheets, leaving about 2 inches of space between each cookie. This allows them ample room to spread as they bake.
Bake for 9-12 minutes, or until the edges are set and lightly golden. The centers should still appear slightly soft; they will continue to firm up as they cool. Overbaking will result in a dry, hard cookie, so keep a close eye on them, especially during the last few minutes of baking. The crinkle effect will become more apparent as they bake and spread.
Once baked, remove the baking sheets from the oven. Let the Holiday Crinkle Cookies cool on the baking sheets for 5 minutes before carefully transferring them to a wire rack to cool completely. This initial cooling period on the hot baking sheet allows them to set properly before you move them, minimizing the risk of breakage and further developing their delightful texture.
Cooling and Enjoying Your Festive Treats
The final stage of creating these beautiful Holiday Crinkle Cookies is allowing them to cool and then, of course, enjoying them! Patience is key here to ensure the best texture and flavor.
As mentioned in the previous step, allow the cookies to cool on the baking sheets for 5 minutes. This is important for their structure. Then, gently move them to a wire rack. A wire rack allows air to circulate around the cookies, promoting even cooling and preventing the bottoms from becoming soggy.
Ensure the cookies are completely cooled before storing them. Warm cookies can release steam, which can make them stick together and affect their texture. Once they have reached room temperature, you can store them in an airtight container at room temperature for up to 3-4 days. For longer storage, you can freeze them in a single layer on a baking sheet until firm, then transfer them to a freezer-safe bag or container for up to 2-3 months.
These Holiday Crinkle Cookies are perfect for festive gatherings, cookie exchanges, or simply as a delightful treat to brighten your day. The vibrant red and green colors, combined with the delightful crinkled texture and tender crumb, make them a truly memorable holiday confection. Enjoy sharing these cheerful cookies with loved ones!
Conclusion:
And there you have it – the ultimate guide to creating delicious and beautiful Holiday Crinkle Cookies! We’ve walked through each step, from mixing the perfect dough to achieving that signature crackled coating. These festive treats are not only a joy to make but also a delightful addition to any holiday gathering. Imagine a platter overflowing with these sugary, snow-dusted delights, sure to impress your friends and family. Don’t be afraid to experiment with the flavors and add your own personal touch to make them truly unique.
For serving, these cookies are fantastic on their own, but they also pair wonderfully with a warm mug of hot chocolate or a glass of cold milk. Consider arranging them on a festive serving tray or packaging them up as edible gifts for loved ones. If you’re feeling adventurous, try adding a hint of almond extract to the dough for a deeper flavor, or roll them in colored sugar before baking for an extra pop of holiday cheer.
I truly hope you enjoy making and sharing these delightful Holiday Crinkle Cookies. They’re a timeless classic for a reason, bringing smiles and festive spirit wherever they go. So, preheat your ovens, gather your ingredients, and let the holiday baking magic begin!
Frequently Asked Questions:
Why are my crinkle cookies not cracking?
Several factors can affect the crinkle. Ensure your dough is chilled thoroughly, as this helps the cookies spread and crack during baking. Also, make sure you’re rolling the dough balls generously in powdered sugar; this sugar layer hardens and cracks as the cookie bakes. Overmixing the dough can also lead to a less desirable texture and fewer cracks.
Can I make Holiday Crinkle Cookies ahead of time?
Absolutely! The dough can be made a day or two in advance and stored in the refrigerator. Once baked and cooled, the cookies will stay fresh in an airtight container at room temperature for up to 5 days. This makes them perfect for preparing ahead of busy holiday schedules.

Easy Holiday Crinkle Cookies Recipe
Festive and simple holiday crinkle cookies made with white cake mix, featuring vibrant red and green colors and a delightful crinkled texture.
Ingredients
-
1 box (13.25oz) white cake mix
-
2 large eggs
-
1/3 cup olive oil
-
1/3 cup powdered sugar
-
Red food coloring
-
Green food coloring
Instructions
-
Step 1
In a large bowl, combine the white cake mix, 2 large eggs, and 1/3 cup olive oil. Mix until a thick, sticky dough forms. Knead with hands to finish incorporating. -
Step 2
Divide the dough into two equal portions. Place each portion in a separate bowl. Add a few drops of red food coloring to one bowl and knead until evenly colored. Repeat with green food coloring in the second bowl. -
Step 3
Take small portions of red dough, flatten slightly, and place a small piece of green dough on top, or marble small pieces of both together. Gently press and roll into 1-inch balls. -
Step 4
Pour 1/3 cup of powdered sugar into a shallow bowl. Roll each cookie ball generously in the powdered sugar until completely coated. For extra pronounced crinkles, roll a second time after a short rest. -
Step 5
Preheat oven to 350°F (175°C). Line baking sheets with parchment paper. Arrange coated cookie balls on the baking sheets, leaving 2 inches between them. -
Step 6
Bake for 9-12 minutes, or until edges are set and lightly golden, with slightly soft centers. Remove from oven and let cool on baking sheets for 5 minutes before transferring to a wire rack to cool completely.
Important Information
Nutrition Facts (Per Serving)
It is important to consider this information as approximate and not to use it as definitive health advice.
Allergy Information
Please check ingredients for potential allergens and consult a health professional if in doubt.

Leave a Comment