
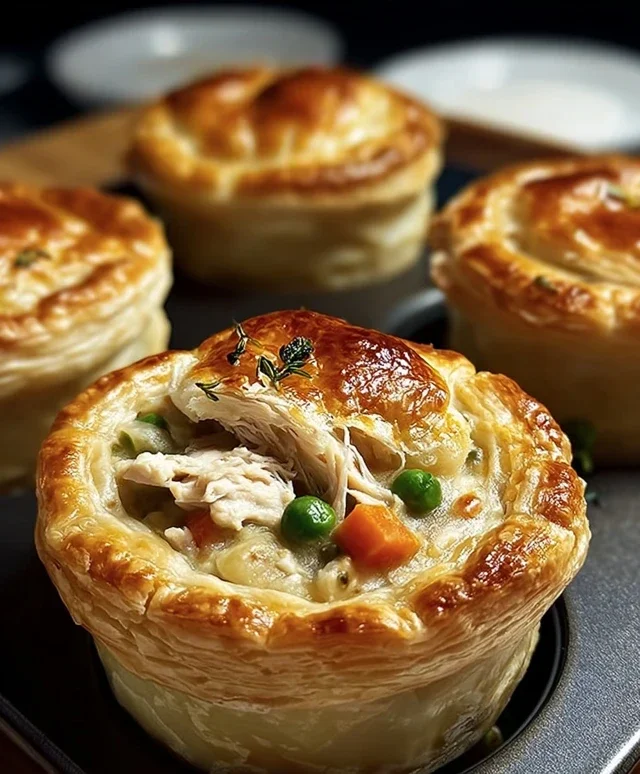
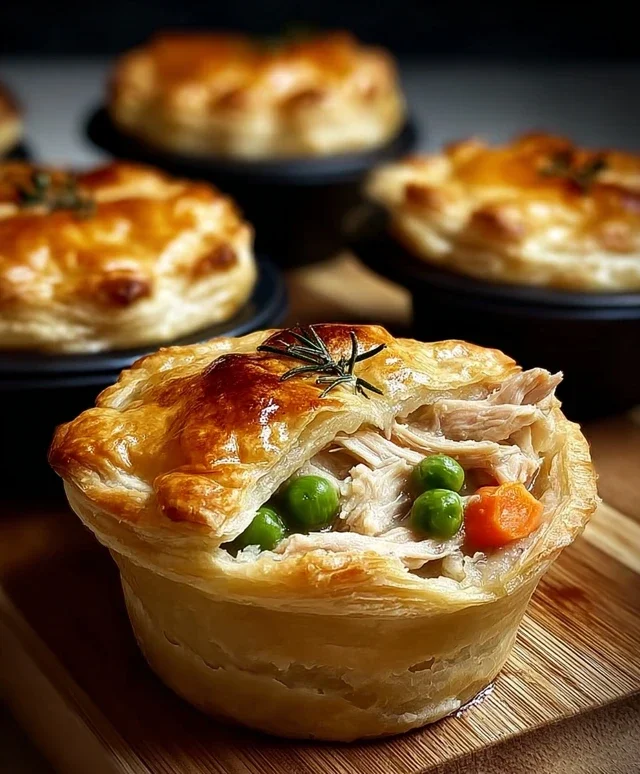
Mini Chicken Pot Pies are the ultimate comfort food, shrunk down to perfect, individual servings that are as adorable as they are delicious. There’s just something incredibly satisfying about that flaky, golden pastry crust giving way to a creamy, savory filling brimming with tender chicken and perfectly cooked vegetables. We all have those days when we crave that heartwarming, home-cooked goodness, and these mini chicken pot pies deliver it in spades. They’re ideal for a cozy weeknight dinner, a charming appetizer for guests, or even a delightful packed lunch. What makes these little gems so special is their inherent charm and the fact that each person gets their very own perfect portion, ensuring no one has to share their precious filling! Get ready to fall in love with these bite-sized delights.
Why You’ll Love These Mini Chicken Pot Pies:
Perfect Portions, Maximum Flavor
Impressive Yet Easy
Endless Customization Options

Mini Chicken Pot Pies
Who doesn’t love a comforting chicken pot pie? The flaky crust, the creamy, savory filling bursting with tender chicken and vegetables – it’s pure culinary bliss. But sometimes, a full-sized pot pie can feel like a commitment, or perhaps you’re looking for a perfect appetizer or a delightful individual treat. That’s where these adorable Mini Chicken Pot Pies come in! They deliver all the classic flavor you crave in a perfectly portioned package. Using a few clever shortcuts, we can have these little flavor bombs ready in a flash, making them ideal for weeknight dinners, potlucks, or even a fun family cooking project.
Ingredients:
Cooking Instructions
Let’s get started on these delightful mini pot pies! The beauty of this recipe lies in its simplicity, allowing you to create a homemade-tasting meal without hours in the kitchen.
Preparing the Filling
First things first, we need to get our filling ready. You’ll want to dice your boneless chicken breast into small, bite-sized pieces. This ensures that the chicken cooks through evenly and is easy to eat in the mini pies. While you could cook the chicken separately, a neat trick here is to cook it directly in the pot pie mixture. Place your diced chicken into a medium saucepan. Add the cream of chicken soup, garlic powder, onion powder, and salt. Stir everything together until the chicken is well coated with the soup mixture.
Now, we’ll cook this mixture gently. Place the saucepan over medium heat. Stir frequently, allowing the chicken to cook and the soup to heat through. You’ll know the chicken is cooked when it’s no longer pink in the center. This usually takes about 8-10 minutes. Once the chicken is cooked, it’s time to add our vegetables. Stir in the frozen peas and carrots. Continue to cook for another 2-3 minutes, just until the vegetables are heated through and vibrant. We don’t want them to become mushy, as they’ll continue to cook slightly in the oven. Taste the filling and adjust seasoning if needed, but I find this combination is usually just right.
Assembling the Mini Pot Pies
With our delicious filling ready, it’s time to assemble our mini pot pies. Preheat your oven to 375°F (190°C). You’ll need a muffin tin for this. Lightly coat the cups of your muffin tin with cooking spray. This is a crucial step to ensure your pot pies don’t stick and release easily after baking.
Now, let’s work with those canned biscuits. Open one can of the refrigerated biscuits. Carefully unroll and separate the biscuits. You can press them together slightly if they seem thin, but they’ll stretch as we work with them. For each muffin cup, you’ll need a biscuit to act as the base and the lid. Take one biscuit and press it down into the bottom of a muffin cup, gently stretching it to line the sides as much as possible. You want to create a little cup to hold the filling. Don’t worry if it’s not perfectly smooth; the rustic charm is part of the appeal!
Once you have the bottoms lined, carefully spoon about 2-3 tablespoons of the chicken filling into each biscuit-lined cup. Don’t overfill them, or the filling might bubble over. Now, for the topping! Take another biscuit and gently press it down on top of the filling to create a lid. You can crimp the edges of the bottom biscuit around the top biscuit with your fingers to seal them, or simply press them together. If you have any extra biscuit dough, you can even cut out small shapes with cookie cutters to decorate the tops for an extra touch of flair!
Baking to Golden Perfection
Our mini pot pies are now ready for their fiery transformation! Place the muffin tin into your preheated oven. Bake for 15-20 minutes, or until the biscuit tops are golden brown and puffed up. You’ll be able to see them turning a beautiful golden hue. The aroma that will fill your kitchen is simply incredible!
Once they’re beautifully golden, carefully remove the muffin tin from the oven. Let the mini pot pies cool in the muffin tin for about 5-10 minutes. This allows them to set up a bit and makes them easier to remove without falling apart. After they’ve cooled slightly, use a spatula or a butter knife to gently loosen the edges and lift each mini pot pie out of the muffin tin.
Serve these Mini Chicken Pot Pies warm and enjoy the comforting flavors. They’re fantastic on their own, or you can serve them with a side salad for a complete meal. These are so easy to make, you’ll find yourself reaching for this recipe time and time again. Enjoy this delightful taste of home!
Conclusion:
I hope you’re as excited as I am to dive into making these delightful Mini Chicken Pot Pies! These individual portions are an absolute winner for so many reasons. They’re incredibly comforting, packed with savory chicken and creamy vegetables, all nestled in a flaky, golden crust. The best part? They feel special enough for a weekend treat but are surprisingly easy to whip up for a weeknight meal. The controlled portion size makes them perfect for portion control, or simply for enjoying that classic pot pie experience in a perfectly sized package.
Serving these mini delights is a breeze. They’re fantastic on their own for a satisfying lunch or light dinner. For a heartier meal, consider pairing them with a simple side salad tossed with a light vinaigrette, or perhaps some steamed green beans. If you’re feeling adventurous, why not add a dollop of sour cream or a sprinkle of fresh chives on top? The possibilities are truly endless!
And don’t be afraid to get creative with variations! You can swap out the chicken for turkey, or even use a mix of leftover roasted vegetables. For a vegetarian option, consider a hearty mushroom and lentil filling. The crust can also be customized – perhaps a sprinkle of herbs mixed into the dough, or even using puff pastry for an extra decadent touch. I genuinely encourage you to give these Mini Chicken Pot Pies a try. You won’t regret the deliciousness!
Frequently Asked Questions about Mini Chicken Pot Pies:
Q: Can I make the filling ahead of time?
Absolutely! The filling for these Mini Chicken Pot Pies can be made up to 2 days in advance and stored in an airtight container in the refrigerator. This makes assembly on the day you plan to bake them even quicker and easier. Just reheat the filling gently before spooning it into your pie crusts.
Q: What kind of vegetables work best in these pies?
The classic combination of peas, carrots, and celery is a fantastic starting point. However, feel free to experiment! Diced potatoes, corn, green beans, or even finely chopped broccoli or cauliflower would be delicious additions. Just ensure the vegetables are cooked until tender before adding them to the filling to guarantee they cook through in the oven.
Q: How can I ensure the crust is nice and flaky?
Using cold butter and ice-cold water when making your pie dough is crucial for a flaky crust. Overworking the dough can also lead to a tough texture, so handle it as little as possible. For that beautiful golden-brown finish, don’t forget to brush the tops of your mini pies with an egg wash before baking.
Mini Chicken Pot Pies
Quick and easy mini chicken pot pies made with refrigerated biscuits for a simple weeknight meal.
Ingredients
-
2 cans refrigerated biscuits (8-count each)
-
½ lb boneless chicken breast, diced
-
1 cup frozen peas & carrots
-
1 can (10.5 oz) cream of chicken soup
-
½ tsp garlic powder
-
½ tsp onion powder
-
¼ tsp salt
-
Cooking spray
Instructions
-
Step 1
Preheat oven to 375°F (190°C). Grease a muffin tin with cooking spray. -
Step 2
In a bowl, combine diced chicken breast, frozen peas & carrots, cream of chicken soup, garlic powder, onion powder, and salt. Stir until well combined. -
Step 3
Separate the refrigerated biscuit dough and press each biscuit into the bottom and slightly up the sides of the greased muffin cups, forming a crust. -
Step 4
Spoon the chicken mixture evenly into the biscuit-lined muffin cups. -
Step 5
Bake for 20-25 minutes, or until the biscuits are golden brown and the filling is bubbly. -
Step 6
Let cool slightly before removing from the muffin tin and serving.
Important Information
Nutrition Facts (Per Serving)
It is important to consider this information as approximate and not to use it as definitive health advice.
Allergy Information
Please check ingredients for potential allergens and consult a health professional if in doubt.


Leave a Comment