
Red Velvet Banana Bread is about to become your new obsession! Forget everything you thought you knew about basic banana bread because we’re about to elevate it to a whole new level of deliciousness. This isn’t just any sweet treat; it’s a vibrant, decadent fusion that captures the comforting familiarity of banana bread with the irresistible allure of red velvet cake. Imagin extracte the moist, tender crum extractb of perfectly ripe bananas mingling with the subtle cocoa notes and the striking, gorgeous red hue that red velvet is famous for. It’s the perfect marriage of two beloved classics, creating a dessert that’s both comforting and exciting. I absolutely adore how this Red Velvet Banana Bread manages to be both a showstopper and incredibly easy to whip up, making it ideal for any occasion, from a casual brunch to a special celebration. Get ready to bake something truly extraordinary!

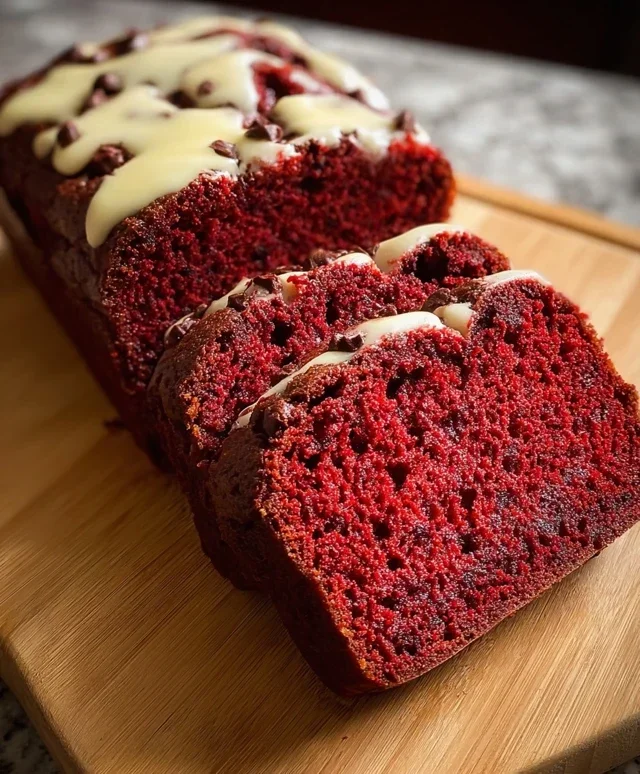
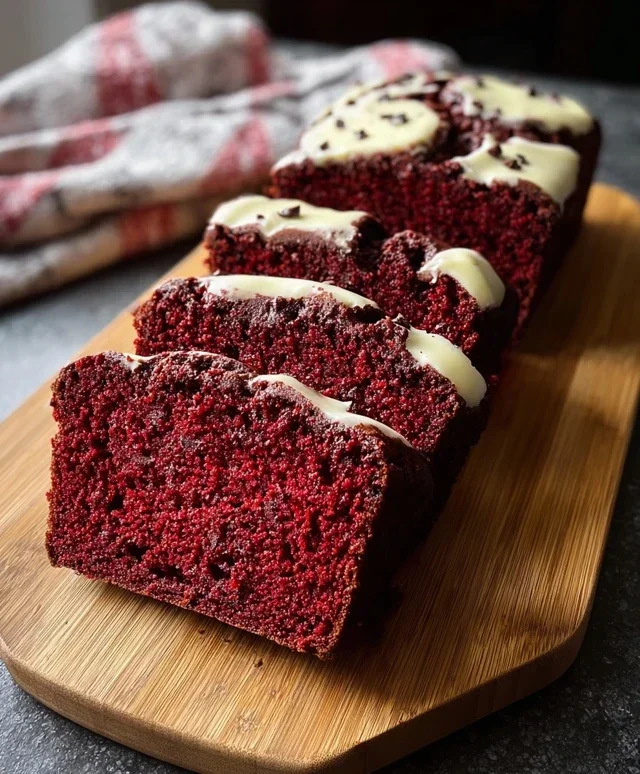
Red Velvet Banana Bread
There are few things as comforting and delicious as a slice of warm banana bread. But what if we could elevate this classic to something truly special? Enter Red Velvet Banana Bread! This recipe takes everything you love about moist, sweet banana bread and infuses it with the iconic, slightly chocolatey flavor and vibrant crimson hue of red velvet cake. It’s a delightful twist that’s perfect for breakfast, brunch, or even a decadent afternoon treat. Get ready to impress yourself and anyone lucky enough to share this creation with you!
Ingredients:
Cooking Instructions:
Step 1: Preparing the Wet Ingredients and Bananas
The journey to our spectacular Red Velvet Banana Bread begin extracts with bringin extractg together the foundational wet ingredients. Start by preheating your oven to 350°F (175°C). Grease and flour a standard 9×5 inch loaf pan. This ensures our beautiful bread will release easily once baked. In a large mixing bowl, combine your mashed ripe bananas. The riper, the better! Brown spots are your best friend here, as they indicate peak sweetness and a more intense banana flavor. Aim for about one cup of mashed banana. To this, add the melted unsalted butter and the granulated sugar. Whisk these together until the mixture is well combined and smooth. The sugar will start to dissolve into the butter and banana mixture. Next, crack in your two large eggs, one at a time, whisking thoroughly after each addition until fully incorporated. Finally, stir in the pure vanilla extract. This aromatic addition will enhance all the other flavors in our bread.
Step 2: Incorporating the Dry Ingredients and the Red Velvet Magic
Now, let’s build the structure of our loaf. In a separate medium-sized bowl, whisk together the all-purpose flour, unsweetened cocoa powder, baking soda, and salt. Whisking these dry ingredients together ensures that the leavening agents (baking soda) and salt are evenly distributed throughout the flour, which is crucial for an even rise and consistent flavor. This also helps to break up any clumps in the cocoa powder. Now comes the fun part: the red velvet transformation! Add the 1 tablespoon of red food coloring directly into the wet ingredient mixture. Stir it in until you achieve a vibrant, consistent red hue. This is where the magic really starts to happen, transforming our classic banana bread into a showstopper. Don’t be shy with the food coloring; you want a strong, noticeable red.
Step 3: Combining Wet and Dry Components with Buttermilk
It’s time to bring our wet and dry ingredients together. Gradually add the dry ingredient mixture to the wet ingredient mixture, mixing on low speed or by hand until just combined. Be careful not to overmix at this stage. Overmixing can develop the gluten in the flour too much, resulting in a tough loaf. We’re looking for a batter that’s just coming together. Now, we’ll introduce the buttermilk. Buttermilk is a fantastic ingredient in baking, as its acidity reacts with the baking soda to create a tender crum extractb and a subtle tang that complements the sweetness. Slowly pour in the 1/2 cup of buttermilk while mixing on low speed or gently folding it in with a spatula until the batter is smooth and homogenous. If you don’t have buttermilk on hand, you can easily make your own by adding 1/2 tablespoon of white vinegar or lemon juice to 1/2 cup of milk and letting it sit for 5-10 minutes.
Step 4: Adding the Optional Chocolate Chips and Filling the Pan
If you’re a chocolate lover like me, this is where you add the optional but highly recommended chocolate chips! Gently fold in the 1/2 cup of chocolate chips into the batter. They will add little pockets of melted chocolatey goodness throughout your bread, which is a perfect pairing with the red velvet and banana flavors. Distribute them evenly, making sure not to overmix. Once the chocolate chips are incorporated, pour the batter into your prepared loaf pan. Use a spatula to spread the batter evenly, making sure it reaches all the corners. You can even tap the pan gently on the counter a couple of times to help settle the batter and release any large air bubbles.
Step 5: Baking and Cooling for Perfect Texture
Place the filled loaf pan into your preheated oven. Bake for approximately 50-65 minutes. The baking time can vary depending on your oven, so it’s important to keep an eye on it. To check for doneness, insert a toothpick or a thin knife into the center of the loaf. If it comes out clean or with just a few moist crum extractbs attached, your bread is ready. If there’s wet batter, continue baking in 5-minute increments, re-testing each time. Once baked, remove the loaf pan from the oven and let it cool in the pan on a wire rack for about 10-15 minutes. This initial cooling period allows the bread to set up properly before you attempt to remove it. After this, carefully invert the loaf onto the wire rack to cool completely. Resist the urge to slice into it immediately! Letting it cool completely allows the flavors to meld and the texture to become perfect. Once cool, slice and enjoy this delightful Red Velvet Banana Bread. It’s truly a showstopper!
Conclusion:
I hope you’re as excited to try this Red Velvet Banana Bread as I am to have shared it with you! This recipe truly elevates classic banana bread with the dramatic flair of red velvet. The moist, tender crum extractb, infused with that signature subtle cocoa flavor and vibrant red hue, is simply irresistible. It’s the perfect treat for any occasion, from a cozy breakfast to an afternoon pick-me-up or even a festive dessert.
For serving, this Red Velvet Banana Bread is delightful on its own, but I love it with a smear of cream cheese frosting – it’s the ultimate flavor combination! You could also sprinkle it with chocolate chips or a dusting of powdered sugar for an extra touch of indulgence. Looking for variations? Feel free to add a handful of chopped nuts for added crunch, or swirl in some white chocolate chips for a sweet contrast. Don’t be afraid to experiment! I encourage you to gather your ingredients and whip up a loaf of this delicious Red Velvet Banana Bread. You won’t be disappointed!
Frequently Asked Questions:
Why is my Red Velvet Banana Bread not red enough?
The vibrancy of the red color can depend on the quality and brand of your red food coloring. Ensure you’re using a good quality gel or liquid food coloring, and don’t be shy with it! You can also adjust the amount slightly to achieve your desired shade, but be mindful not to add too much liquid, which could affect the batter consistency.
Can I freeze this Red Velvet Banana Bread?
Absolutely! This Red Velvet Banana Bread freezes beautifully. Once completely cooled, wrap it tightly in plastic wrap, then in aluminum foil or place it in a freezer-safe container. It should stay fresh in the freezer for up to 3 months. Thaw at room temperature before enjoying.
What makes this different from regular banana bread?
The key differences lie in the addition of cocoa powder and red food coloring, which give it the signature red velvet flavor profile and color. While it retains the moistness from the bananas, the cocoa adds a subtle chocolatey depth that regular banana bread doesn’t typically have.
Red Velvet Banana Bread
A delicious and moist banana bread with a festive red velvet twist and optional chocolate chips.
Ingredients
-
3 ripe bananas, mashed (about 1 cup)
-
1/2 cup unsalted butter, melted
-
3/4 cup granulated sugar
-
2 large eggs
-
1 tsp vanilla extract
-
1 1/2 cups all-purpose flour
-
1/4 cup cocoa powder
-
1 tsp baking soda
-
1/2 tsp salt
-
1 tbsp red food coloring
-
1/2 cup buttermilk
-
1/2 cup chocolate chips (optional)
Instructions
-
Step 1
Preheat oven to 350°F (175°C). Grease and flour a 9×5 inch loaf pan. -
Step 2
In a large bowl, mash the ripe bananas. Stir in the melted butter and granulated sugar until well combined. -
Step 3
Beat in the eggs one at a time, then stir in the vanilla extract and red food coloring. -
Step 4
In a separate bowl, whisk together the all-purpose flour, cocoa powder, baking soda, and salt. -
Step 5
Gradually add the dry ingredients to the wet ingredients, alternating with the buttermilk, beginning and ending with dry ingredients. Mix until just combined. Fold in chocolate chips if using. -
Step 6
Pour batter into the prepared loaf pan and bake for 50-60 minutes, or until a wooden skewer inserted into the center comes out clean. -
Step 7
Let the bread cool in the pan for 10 minutes before inverting it onto a wire rack to cool completely.
Important Information
Nutrition Facts (Per Serving)
It is important to consider this information as approximate and not to use it as definitive health advice.
Allergy Information
Please check ingredients for potential allergens and consult a health professional if in doubt.

Leave a Comment