
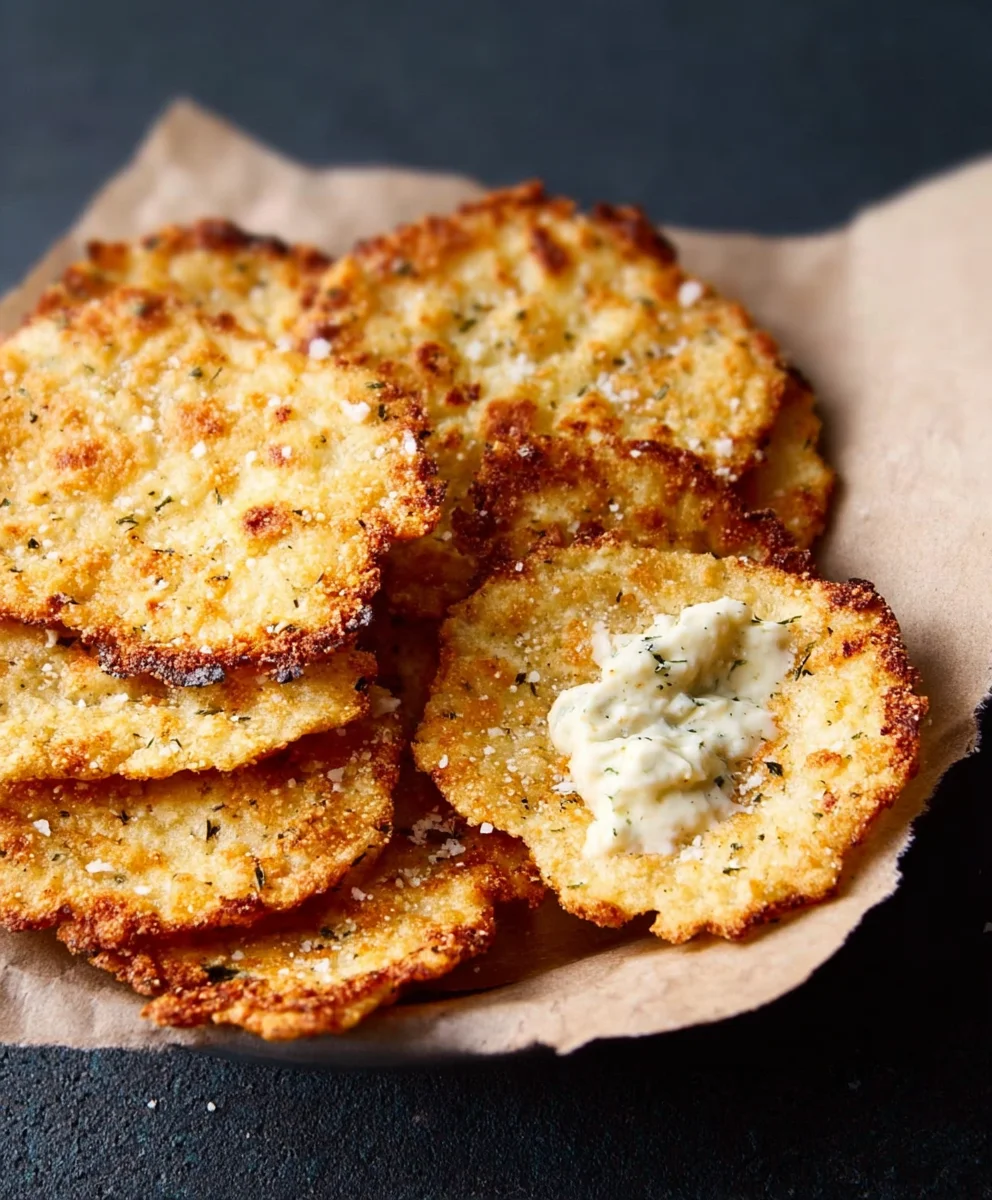
Cottage Cheese Chips are the crunchy, savory revelation you’ve been waiting for. Forget everything you thought you knew about this creamy dairy delight; we’re transforming it into a guilt-free, craveable snack that will have you reaching for the bowl again and again. What’s not to love about a snack that’s packed with protein, incredibly satisfying, and astonishingly simple to make? These aren’t just a healthier alternative; they’re a culinary win in their own right. The magic lies in their versatility – imagin extracte them as a delightful dipper for your favorite hummus or salsa, a crunchy topping for a hearty salad, or simply enjoyed on their own for a satisfying crunch. The subtle tang of the cottage cheese, combined with whatever seasonings you choose, creates a flavor profile that is both comforting and exciting. Get ready to discover your new favorite way to enjoy cottage cheese!

Ingredients:
- 1 cup full-fat cottage cheese
- 1 large egg
- 2 tablespoons almond flour
- 1 tablespoon nutritional yeast (for a cheesy flavor, optional)
- 1/2 teaspoon garlic powder
- 1/4 teaspoon onion powder
- Pinch of salt
- Pinch of black pepper
- Optional: Everything bagel seasoning, paprika, or dried herbs for topping
Preparing Your Cottage Cheese Chips
Mixing the Base
The magic of these cottage cheese chips starts with a simple yet incredibly effective batter. In a medium-sized mixing bowl, combine the full-fat cottage cheese and the large egg. It’s crucial to use full-fat cottage cheese here. The fat content contributes to a richer flavor and a better texture when baked, preventing them from becoming too dry or crum extractbly. Whisk these two ingredients together vigorously until they are well combined and relatively smooth. You’ll notice the mixture becoming a bit lighter in color and slightly aerated. Don’t worry if there are still a few small lumps of cottage cheese; they will largely disappear during the baking process.
Adding Dry Ingredients and Seasoning
Next, we’ll incorporate the dry ingredients that will help bind everything together and add flavor. Gradually add the almond flour to the cottage cheese and egg mixture. Almond flour is a fantastic low-carb, gluten-free option that provides a pleasant texture and subtle nutty undertone. Stir it in thoroughly, making sure there are no dry pockets of flour. Now, it’s time for the flavor boosters! Add the nutritional yeast, garlic powder, onion powder, salt, and black pepper. The nutritional yeast is a secret weapon for delivering a cheesy, umami flavor without any dairy cheese – it’s highly recommended for that classic chip taste, but you can certainly omit it if you prefer a more neutral chip. Whisk everything together until you have a cohesive, thick batter. The consistency should be similar to a thick pancake batter or a very soft cookie dough. If it seems too thin, you can add another teaspoon of almond flour. Conversely, if it’s too stiff, a tiny splash of water or milk (dairy or non-dairy) can loosen it up. Taste a tiny bit of the batter to adjust the salt and pepper if needed. Remember, these chips will be baked, so the seasoning will become more pronounced.
Forming and Baking Your Chips
Preheating and Preparing the Baking Sheet
Before we get to shaping, preheat your oven to 350 degrees Fahrenheit (175 degrees Celsius). This moderate temperature is ideal for allowing the chips to crisp up without burning too quickly. Line a large baking sheet with parchment paper. Parchment paper is non-negotiable for this recipe. It prevents the chips from sticking to the baking sheet, which is essential for achieving that perfect crisp and for easy removal. Make sure the parchment paper covers the entire surface of the baking sheet to give you ample space for arrangin extractg the chips.
Shaping the Cottage Cheese Chips
Now comes the fun part: shaping your chips! You have a couple of options here for how to get them onto the baking sheet. The easiest method is to use a small spoon or a piping bag. If using a spoon, drop small dollops of the batter onto the prepared baking sheet, spacing them about 1 to 2 inches apart. You want them to be relatively thin so they can crisp up effectively. Aim for a diameter of about 2 to 3 inches for each chip. If you prefer a more uniform shape, you can use a piping bag fitted with a round tip. Pipe small circles of batter onto the parchment paper, again, ensuring they are not too thick and have enough space between them. If you like, this is also the perfect moment to add any extra toppings. Sprinkle your desired seasonings, such as everything bagel seasoning, a touch of paprika for color and mild heat, or some dried Italian herbs, over the tops of the dollops before they go into the oven. Gently press down on the edges of each chip with the back of your spoon to flatten them slightly, promoting even baking and crispiness.
Baking to Golden Perfection
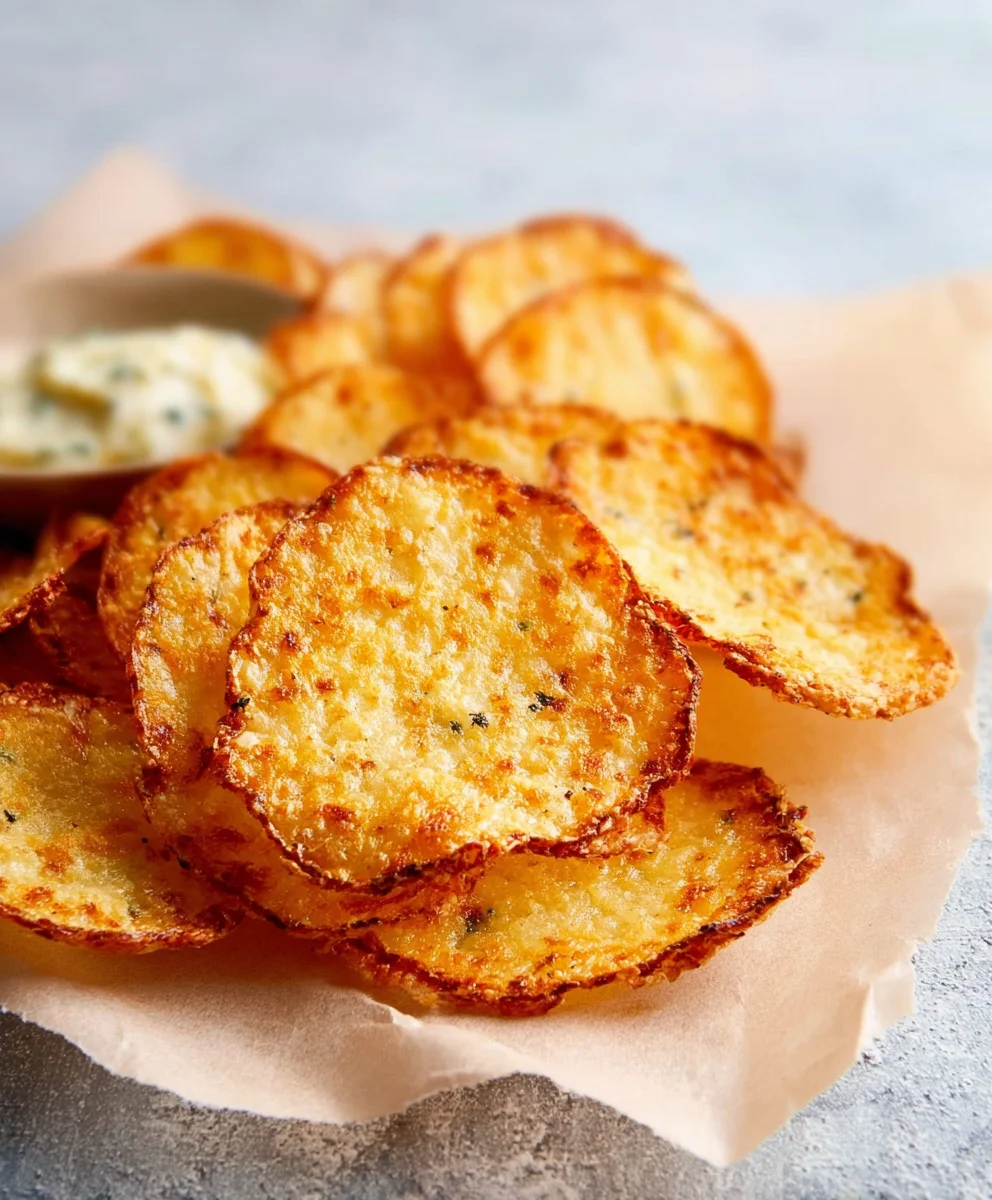
Place the baking sheet into the preheated oven. The baking time will vary depending on the thickness of your chips and your oven, but generally, you’ll want to bake them for 15 to 25 minutes. Keep a close eye on them, especially during the last 5-10 minutes. You’re looking for the edges to turn a beautiful golden brown, and the centers to be set and lightly colored. If some chips are browning faster than others, you can carefully rotate the baking sheet halfway through the baking time. For extra crispy chips, you can carefully flip them over with a spatula during the last few minutes of baking and cook for another 2-3 minutes, but this is often not necessary if they are baked until golden brown. Once they are done and look crisp, carefully remove the baking sheet from the oven.
Cooling and Enjoying Your Crispy Creations
This step is critical for achieving the ultimate crispiness. Let the cottage cheese chips cool on the baking sheet for about 5 to 10 minutes. As they cool, they will continue to firm up and become delightfully crunchy. After this initial cooling period on the sheet, carefully transfer the chips to a wire rack to cool completely. This allows air to circulate all around them, ensuring they don’t steam and lose their hard-earned crisp. Once they are completely cool, they are ready to be devoured! They are perfect for dipping, snacking on their own, or serving as a side to your favorite meals. Store any leftovers in an airtight container at room temperature for up to 3-4 days, though they are best enjoyed fresh for maximum crispness.
Conclusion:
We hope you’ve enjoyed learning how to make these incredibly simple yet satisfying Cottage Cheese Chips! This recipe offers a fantastic way to enjoy a crispy snack without the guilt, using minimal ingredients and effort. The versatility of Cottage Cheese Chips truly shines; they are perfect on their own as a light bite, crum extractbled over salads for an added crunch, or even served alongside your favorite dips. Don’t be afraid to experiment! Try adding different herbs and spices to the cottage cheese before baking, such as smoked paprika, garlic powder, or a pinch of chili flakes for a spicy kick. You could also experiment with different types of cottage cheese, though full-fat generally yields the best crispiness. So go ahead, whip up a batch of these delightful Cottage Cheese Chips and discover a new go-to snack! We’re confident you’ll be making them again and again.
Frequently Asked Questions:
How can I make my Cottage Cheese Chips extra crispy?
To achieve maximum crispiness, ensure your cottage cheese is well-drained to remove excess moisture. Spreading the mixture thinly and evenly on your baking sheet is also crucial. Baking at a slightly higher temperature towards the end of the cooking time, while keeping a close eye to prevent burning, can help achieve that perfect crunch.
Can I add other ingredients to the Cottage Cheese Chips mixture?
Absolutely! Feel free to incorporate dried herbs like rosemary, thyme, or Italian seasoning. Garlic powder, onion powder, and a pinch of salt are also excellent additions. For a savory twist, consider a sprinkle of nutritional yeast or a dash of smoked paprika. Just ensure any added ingredients are finely ground or chopped.
Crunchy Cottage Cheese Chips
Easy and healthy baked cottage cheese chips that are crispy and flavorful, perfect for snacking.
Ingredients
-
1 cup full-fat cottage cheese
-
1 large egg
-
2 tablespoons almond flour
-
1 tablespoon nutritional yeast
-
1/2 teaspoon garlic powder
-
1/4 teaspoon onion powder
-
Pinch of salt
-
Pinch of black pepper
-
Everything bagel seasoning, paprika, or dried herbs for topping (optional)
Instructions
-
Step 1
In a medium bowl, whisk together 1 cup full-fat cottage cheese and 1 large egg until well combined and relatively smooth. -
Step 2
Gradually add 2 tablespoons almond flour, 1 tablespoon nutritional yeast (if using), 1/2 teaspoon garlic powder, 1/4 teaspoon onion powder, a pinch of salt, and a pinch of black pepper. Whisk until a cohesive, thick batter forms, similar to thick pancake batter. Adjust consistency with a little more almond flour if too thin, or a tiny splash of water/milk if too stiff. -
Step 3
Preheat your oven to 350°F (175°C). Line a large baking sheet with parchment paper. -
Step 4
Drop small dollops of the batter onto the prepared baking sheet, spacing them 1-2 inches apart. Aim for a diameter of about 2-3 inches and a relatively thin consistency for crispiness. Optionally, sprinkle with toppings like everything bagel seasoning, paprika, or dried herbs. -
Step 5
Bake for 15-25 minutes, or until the edges are golden brown and the centers are set. Rotate the baking sheet halfway through if needed. For extra crispiness, you can flip them for the last 2-3 minutes. -
Step 6
Let the chips cool on the baking sheet for 5-10 minutes, then transfer to a wire rack to cool completely before enjoying.
Important Information
Nutrition Facts (Per Serving)
It is important to consider this information as approximate and not to use it as definitive health advice.
Allergy Information
Please check ingredients for potential allergens and consult a health professional if in doubt.


Leave a Comment