
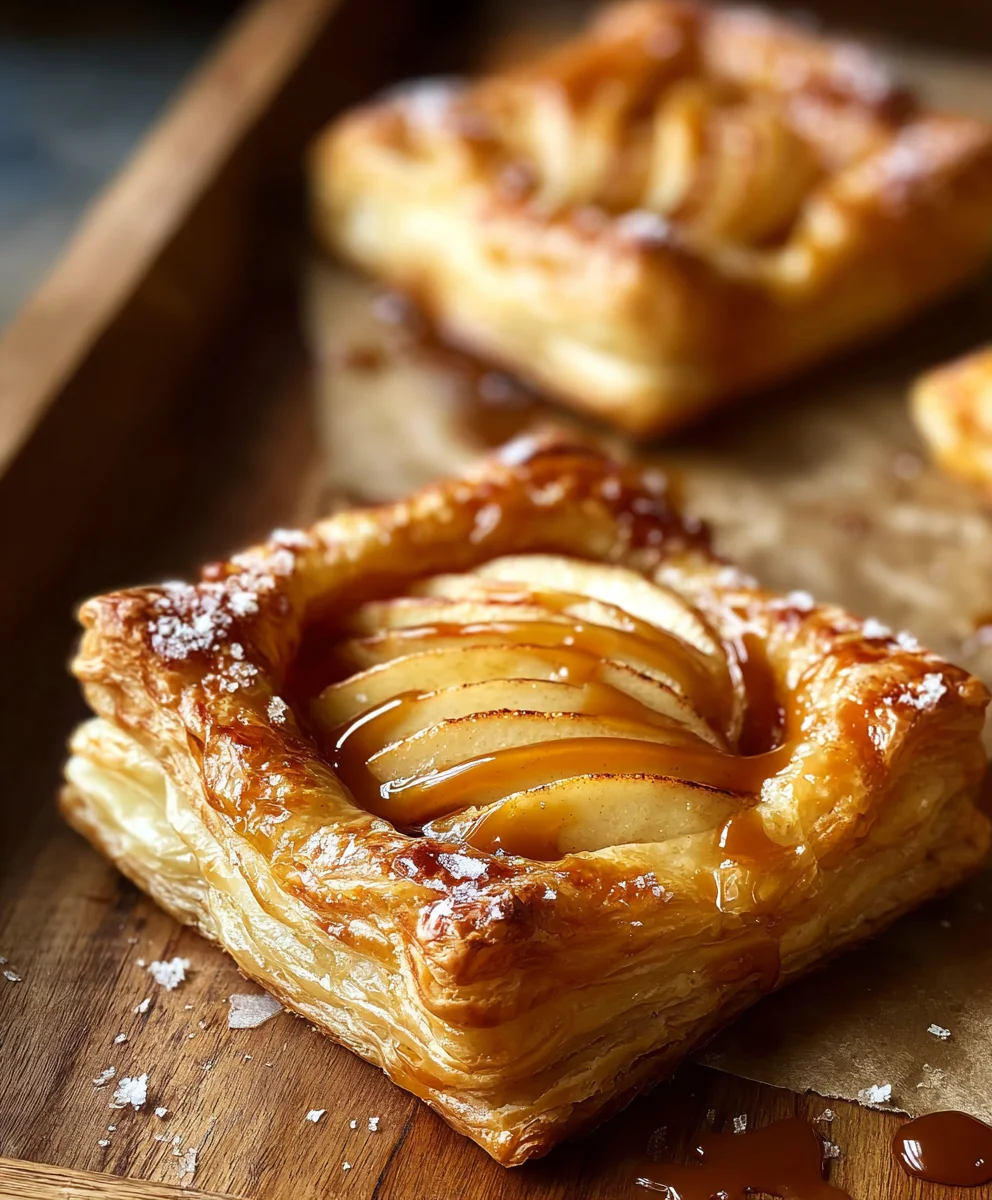
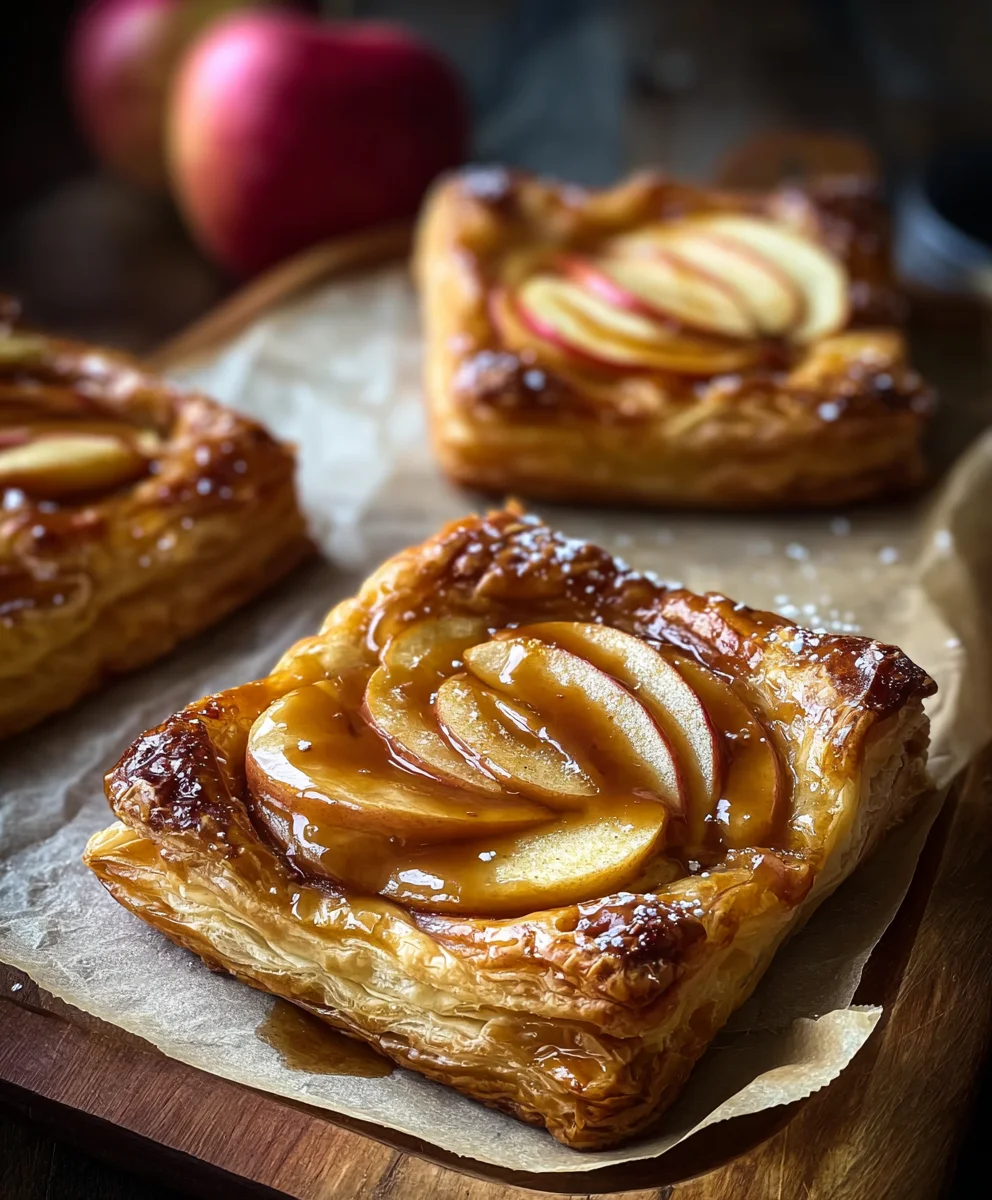
Caramel Apple Puff Pastries are more than just a dessert; they’re a nostalgic hug on a plate, a sweet symphony that transports you back to crisp autumn days and cozy kitchens. There’s a universal joy that erupts when that flaky, golden puff pastry gives way to a warm, gooey filling of tender apples coated in rich, buttery caramel. It’s a dish that consistently wins hearts, perfect for a special occasion or simply to brighten an ordinary afternoon. What makes these Caramel Apple Puff Pastries truly special is the magical interplay of textures and flavors: the delicate crunch of the pastry, the soft, yielding apples, and the deep, satisfying sweetness of the caramel, all mingling to create an unforgettable bite. This recipe elevates this beloved treat, ensuring your homemade version is utterly irresistible.

Ingredients:
- 1 sheet puff pastry, thawed but still cold
- 2 apples, cored and thinly sliced
- 6 tablespoons granulated sugar
- ½ teaspoon cinnamon
- ¼ teaspoon salt
- 1½ tablespoons of butter, sliced into 6 thin slices
- 4-6 tablespoons caramel sauce
- Vanilla ice cream for serving (optional)
Preparing the Apples
Preheat and Prep
Begin extract by preheating your oven to 400°F (200°C). This is a crucial step to ensure the puff pastry bakes up golden and flaky. While the oven heats, prepare your apples. I find using a mix of tart and sweet apples, like a Granny Smith and a Fuji, gives the best flavor balance, but two of the same kind will work beautifully too. Core your apples and then slice them thinly. Aim for slices that are about 1/8 inch thick. If your slices are too thick, they might not soften enough during baking, and if they’re too thin, they could become mushy.
Spice and Sugar Mixture
In a medium bowl, combine the granulated sugar, cinnamon, and salt. This simple mixture will transform your apples into a delightful filling. Sprinkle this mixture over the thinly sliced apples and toss gently to coat each slice evenly. The sugar will help draw out some of the moisture from the apples, creating a richer flavor as it caramelizes in the oven. The cinnamon adds that warm, cozy spice that pairs perfectly with apples, and a pinch of salt enhances all the other flavors, preventing the filling from being overly sweet.
Assembling the Pastries
Preparing the Puff Pastry
Unfold your thawed puff pastry sheet onto a lightly floured surface. It’s important that the pastry is still cold; this is key to achieving those beautiful, airy layers. If it becomes too warm, the butter within the layers will melt prematurely, and you won’t get that characteristic puff. Gently roll it out just a little to smooth any creases, but don’t overwork it. Cut the pastry sheet into six equal rectangles. You can do this by simply folding the pastry in half lengthwise, then in half again, and cutting along those folds, or by measuring if you prefer precision.
Filling the Pastry Rectangles
Lay out your six puff pastry rectangles. On one half of each rectangle, arrange a portion of the sugared apple slices. Try to create a neat layer, leaving a small border around the edges. Don’t overload them; you want the pastry to be able to puff up properly. Place one thin slice of butter on top of the apples on each pastry rectangle. The butter will melt and help the apples cook, adding richness and flavor.
Folding and Sealing
Now, carefully fold the plain half of each puff pastry rectangle over the apple filling, creating a turnover or half-moon shape. Press the edges firmly with your fingers to seal them. You can then use the tines of a fork to crimp the edges all around, ensuring that no delicious apple filling escapes during baking. This also creates a lovely decorative edge. Make sure the seals are good and tight.
Baking and Finishing
Baking to Golden Perfection
Arrange the assembled pastries on a baking sheet lined with parchment paper. This prevents sticking and makes for easy cleanup. Ensure there’s a little space between each pastry so they can puff up without touching each other. Place the baking sheet into your preheated oven. Bake for 18-22 minutes, or until the puff pastry is beautifully golden brown and puffed up, and the apple filling is tender and bubbling. Keep an eye on them, as oven temperatures can vary. If they start to brown too quickly, you can loosely tent them with aluminum foil.
The Final Drizzle
Once your Caramel Apple Puff Pastries are out of the oven, let them cool on the baking sheet for a few minutes. This allows them to set slightly. While they’re still warm, drizzle generously with your caramel sauce. The warmth of the pastries will help the caramel sauce become wonderfully gooey. For an extra decadent treat, serve them warm with a scoop of vanilla ice cream. The contrast of the warm, flaky pastry with the cold, creamy ice cream is absolutely divine. Enjoy these delightful treats!
Conclusion:
And there you have it! These Caramel Apple Puff Pastries are a delightful and surprisingly simple treat that’s perfect for any occasion. The flaky, buttery puff pastry combined with the sweet, spiced apple filling and rich caramel drizzle creates a symphony of textures and flavors. Whether you’re hosting a gathering, looking for a special dessert, or simply craving something comforting, these pastries are sure to impress. I encourage you to give them a try and experience the magic for yourself!
For serving suggestions, these Caramel Apple Puff Pastries are wonderful served warm, perhaps with a scoop of vanilla ice cream or a dollop of whipped cream. They also make a fantastic addition to a brunch spread or as a sophisticated afternoon tea treat. Don’t be afraid to experiment with variations! You could add a pinch of nutmeg or cinnamon to the apple filling for an extra spice kick, or even a sprinkle of chopped nuts like walnuts or pecans for added crunch. Some people even enjoy a drizzle of white chocolate alongside the caramel.
Frequently Asked Questions:
Q1: Can I make the Caramel Apple Puff Pastries ahead of time?
You can prepare the apple filling and caramel sauce a day in advance and store them separately in airtight containers in the refrigerator. However, it’s best to assemble and bake the pastries just before serving for the crispiest puff pastry. You can also freeze the unbaked assembled pastries on a baking sheet until solid, then transfer them to a freezer bag for up to a month. Bake from frozen, adding a few extra minutes to the baking time.
Q2: What kind of apples are best for Caramel Apple Puff Pastries?
Firm, tart apples like Granny Smith, Honeycrisp, or Fuji are ideal for these pastries. They hold their shape well during baking and provide a lovely balance to the sweetness of the caramel. Avoid softer apples that tend to turn mushy when cooked.
Caramel Apple Puff Pastry Bites
Easy and delicious dessert featuring sweet apples and flaky puff pastry, drizzled with caramel sauce.
Ingredients
-
1 sheet puff pastry, thawed but still cold
-
2 apples, cored and thinly sliced
-
6 tablespoons granulated sugar
-
½ teaspoon cinnamon
-
¼ teaspoon salt
-
1½ tablespoons of butter, sliced into 6 thin slices
-
4-6 tablespoons caramel sauce
-
Vanilla ice cream for serving (optional)
Instructions
-
Step 1
Preheat oven to 400°F (200°C). Core and thinly slice apples (about 1/8 inch thick). -
Step 2
In a bowl, combine granulated sugar, cinnamon, and salt. Toss gently with apple slices to coat evenly. -
Step 3
Unfold puff pastry on a lightly floured surface. Cut into six equal rectangles. Place a portion of sugared apple slices on one half of each rectangle, leaving a border. Top apples with one slice of butter. -
Step 4
Fold the plain half of each pastry rectangle over the apples to create a half-moon shape. Press edges to seal and crimp with a fork. -
Step 5
Arrange pastries on a parchment-lined baking sheet. Bake for 18-22 minutes, or until golden brown and puffed. -
Step 6
Let cool slightly, then drizzle generously with caramel sauce. Serve warm, optionally with vanilla ice cream.
Important Information
Nutrition Facts (Per Serving)
It is important to consider this information as approximate and not to use it as definitive health advice.
Allergy Information
Please check ingredients for potential allergens and consult a health professional if in doubt.

Leave a Comment